Entry Form Layout and Structure
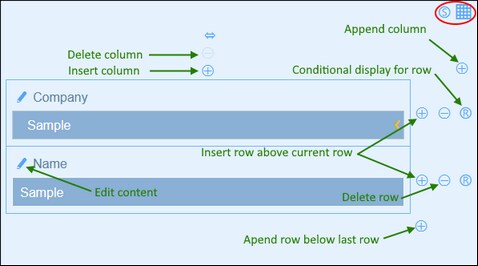
When the form is open for editing, click the Table editing icon (inside the red ellipse in the screenshot below). The table will be displayed with its editing entry helpers (see screenshot). The table contains multiple body rows, each of which contains either a data entry field for one of the container's fields, or a display item such as text, an image, or a table.
You can edit the form's table structure as follows:
•Insert/append columns to left/right of the selected column, and insert/append rows above/below the selected row. Use the respective icons for these operations (see screenshot above). Note that there is only one Append Column icon: to the right of the rightmost column. Similarly, there is only one Append Row icon: below the last row.
•Delete rows/columns by using the respective icons.
•Edit the content in a cell by using that column's Edit icon. See the topic Entry Form Content for details about adding content.
•Set a condition to determine whether a row should be visible (Conditional display for row in screenshot above). For example, you might want to make a row that holds a contract's date visible only if the contract's ID field contains some value. These conditions are defined in an XPath expression that returns either Boolean true() or false().
Note about editing XPath expressions: The form for editing XPath expressions has three tabs: (i) Samples provides a random example of an XPath expression, such as: (a) the concatenation of three values (two values from other fields and a comma separator); or (b) an exists function to test whether a field contains some content; (ii) Fields lists the names of all the record's fields in alphabetical order so that they can be correctly entered in the XPath expression; (iii) Copy lists a selection of XPath expressions that contain various useful functions, which you can copy into your expression and modify.
See Altova's XPath 3.0 and 3.1 Training for information and examples of how to use XPath expressions and functions.
| Note: | After you complete making changes to the table structure and want to exit the table editing mode, click the Table editing icon. |
Column properties
You can set the following properties on individual columns:
•Column width options: (i) Default column width, where all columns are equally sized; (ii) Fixed width as percent; (iii) Auto-size the column width based on content, with an optional maximum width. Auto-sized columns are indicated by an A. For columns with fixed widths as percent, and for auto-sized columns with a maximum percent width, the percent width is indicated in the column header.
•Column padding (left and right): Set these with the respective sliders.
