Email Forms
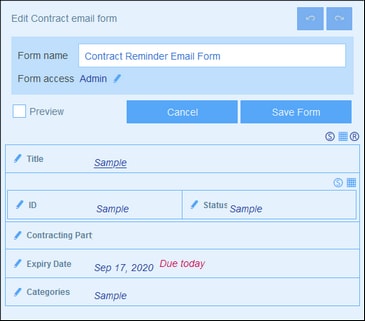
An email form (screenshot below) automatically generates the body of an email based on the design of the form. The form contains a table within which the design is structured. You can add columns and rows to the table, as well as tables within individual cells of tables. Content is provided by adding, within individual cells, text or one of the container's fields or loose links. Each field value can be set, via the Email link option, to be a hyperlink in the email. The link opens the record for viewing. You can also specify that individual rows are created only when certain conditions are met. Additionally, each table can be styled separately and access to the form can be restricted to selected roles.
After the form has been saved (with Save Form) and changes to all forms have been saved (with Save Changes), the email form is available for use. All users who have been authorized (via the roles selected for the form) will get emails sent using this form.
Create an email form
Create a new email form as follows:
1.On the container's Edit Forms page, click New Email Form.
2.Add the fields you want to appear in the email, and click Continue. Parent links and loose links are also available for inclusion.
3.Give the email form a suitable name.
4.Specify which roles can access this form. Only users who have at least one of the selected roles will get emails sent using this form.
5.Click the Table Editing icon to modify the table structure and content. Click an Insert button to insert a row above the current row, or the Append button (last button) to add a last row to the table. To delete a row, click the respective row's Delete button.
6.Within each cell, you can add one of the following: a field, a calculation to obtain a dynamic result, static text, or a table. You can edit the styles of labels and values of individual cells separately.
7.Select the Email link option of at least one field or calculation. The email link will be used to open the record directly from the email. You can switch on email links on multiple fields/calculations. In this case, the values of these fields/calculations will all be links to the record.
8.For date fields, you can also (i) edit date formats, and (ii) select the Show Due option to display the number of days till a contract expires.
9.To change a field, click the field's Edit icon, and make the changes you want.
10.Click the Conditional Display for Row icon (the R icon that is displayed when table-editing icons are switched on) to set an XPath condition that must be met in order for the row to be displayed. The default setting is to always display the row. See note about XPath editing below.
11.Click Save Form.
12.Click Save Changes (on the container's Edit Forms page).
13.Remember to select, on the container's Edit Forms page, the Use option of the Email form you want to currently use.
Note about editing XPath expressions: The form for editing XPath expressions has three tabs: (i) Samples provides a random example of an XPath expression, such as: (a) the concatenation of three values (two values from other fields and a comma separator); or (b) an exists function to test whether a field contains some content; (ii) Fields lists the names of all the record's fields in alphabetical order so that they can be correctly entered in the XPath expression; (iii) Copy lists a selection of XPath expressions that contain various useful functions, which you can copy into your expression and modify.
See Altova's XPath 3.0 and 3.1 Training for information and examples of how to use XPath expressions and functions.
Using email forms
You can define more than one email form for a container, and these will be displayed on the container's Edit Forms page. On this page, choose which Email form you want to use by checking its Use option. You can change your selection at any time. See the section Reminder Mails for a detailed description.
