SPS Design Features for DB
You can design a DB-based SPS just as you would design any other schema-based SPS, that is by dragging-and-dropping schema nodes from the schema window into the design document; by inserting static content directly in the design document; and by applying suitable formatting to the various design components. The following points, however, are specific to DB-based SPSs.
Creating a dynamic table for a DB table
To create a dynamic table for a DB table, do the following:
| 1. | In the schema tree, select the top-level DB table to be created as a dynamic table, drag it into the design. |
| 2. | When you drop it, create is as contents and delete the contents placeholder. If the Auto-Add DB Controls feature is on, your design will look something like this: |

| 3. | In the schema tree, select the Row element of the DB table you wish to create as a dynamic table. |
| 4. | Drag it to a location inside the Addresses element. |
| 5. | When you release the element, select Create Table from the menu that pops up, and select the DB fields you wish to create as columns of the dynamic table. The DB table is created as a dynamic table. |
Note: You can also create a DB table in any other format, such as (contents).
Auto-add DB Controls
The Authentic | Auto-add DB Controls menu command or the toolbar icon ![]() toggles the auto-insertion of navigation controls for DB tables on and off. When the toggle is switched on, this toolbar icon has a black border; when the toggle is off, the toolbar icon has no border. If the Auto-insert toggle is on, DB Controls (see screenshot below) are automatically inserted when a DB table is dropped into the Design document. It is dropped, by default, immediately after the start tag of the table.
toggles the auto-insertion of navigation controls for DB tables on and off. When the toggle is switched on, this toolbar icon has a black border; when the toggle is off, the toolbar icon has no border. If the Auto-insert toggle is on, DB Controls (see screenshot below) are automatically inserted when a DB table is dropped into the Design document. It is dropped, by default, immediately after the start tag of the table.
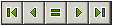
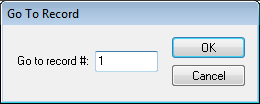
These controls enable the Authentic View user to navigate the records of the DB table in Authentic View. The first (leftmost) button navigates to the first record; the second button navigates to the previous record; the third button is the Goto Record button, which pops up the Goto Record dialog (screenshot below); it pops up a dialog that prompts you for the number of the record to which you wish to go; the fourth button navigates to the next record; and the fifth button navigates to the last record.
To manually insert the navigation controls in the Design document—which is useful if you wish to insert the controls at some other location than the default location—then do the following:
| 1. | Turn the Auto-insert DB Controls toggle off. |
| 2. | Place the cursor at the location where you wish the navigation controls to appear (but within the DB table element's start and end tags). |
| 3. | Right-click, and from the popup menu, select Insert DB Control | Navigation or Insert DB Control | Navigation+Goto. Alternatively, these commands can be accessed via the Insert menu. |
Inserting a DB Query button for
The DB Query button  enables the Authentic View user to submit a DB query. This helps the user to build conditions for the records to be displayed in Authentic View. Query buttons can be inserted for individual DB tables anywhere between:
•The start tag of the DB table element and the start tag of the DB table element's (child) Row element.
•The end tag of the DB table element and the end tag of that table element's (child) Row element.
To insert a DB Query button in your Design document, do the following:
| 1. | Place the cursor at the allowed location (see above) where you wish the Query button to appear. |
| 2. | Right-click, and from the context menu (or Insert menu), select Insert | DB Control | Query Button. The Query Button is inserted at that point in the Design document. |
When it is clicked in Authentic View, the Query button will pop up the Edit Database Query dialog. This dialog is described in the Authentic View documentation.
Records displayed and records fetched
You can control the number of records displayed in Authentic View and the number of records fetched when the file is loaded. To make these settings, do the following:
| 1. | In Design View, select the Row element that corresponds to the records to be displayed/fetched. |
| 2. | In the Properties sidebar, select template in the Properties For column, and the Authentic group of properties. |
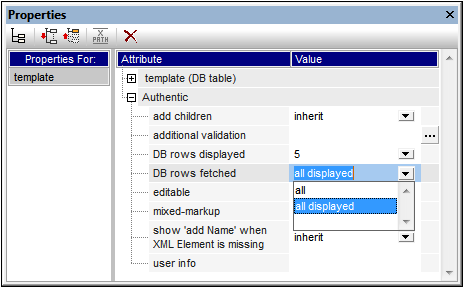
| 3. | For the property DB Rows Displayed, select all from the dropdown list or enter the number of rows to be displayed. |
| 4. | For the property DB Rows Fetched, select all or all displayed from the dropdown list, or enter the number of rows to be fetched. The value all displayed is the default. This property determines how many rows are fetched when the DB data is loaded. If the value is less than that of the DB Rows Displayed property, then the value of DB Rows Displayed is used as the value of DB Rows Fetched. The DB Rows Fetched property enables you to reduce the number of rows initially loaded, thus speeding up the loading and display time. Additional rows (records) are loaded and displayed when the row navigation buttons in Authentic View are used. |
Note:
•The number of rows displayed is applied to Authentic View.
•If a large number of tables is open in Authentic View, then the user will get an error message saying that too many tables are open. On the design side, you can reduce the number of tables that are open by reducing the number of rows displayed (because a row can contain tables). On the user side, the user can use queries to reduce the number of tables loaded into Authentic View.
AltovaRowStatus
In the XML Schema that is created from a DB, each table has an AltovaRowStatus attribute. The value of this attribute is automatically determined by StyleVision and consists of three characters, which are initialized to ---. If a row is modified, or a new row is added, the value is changed using the following characters.
A | The row has been added (but not yet saved to the DB). |
U,u | The row has been updated (but not yet saved to the DB). |
D,d, X | The row has been deleted (but not yet saved to the DB). |
These values can be used to provide users with information about rows being edited. The status information exists up to the time when the file is saved. After the file is saved, the status information is initialized (indicated by ---).
Formatting design document components
When records are added, modified, or deleted, StyleVision formats the added/modified/deleted records in a certain way to enable users to distinguish them from other records. Datatype errors are also flagged by being displayed in red. If you wish to maintain this differentiation, make sure that the formatting you assign to rows in a table do not have the same properties as those assigned by StyleVision. The formatting assigned by StyleVision is as follows:
Added | A | Bold, underlined |
Modified (Updated) | U, u | Underlined |
Deleted | D, d, X | Strikethrough |
Datatype error | Red text |