ODBC Connection
ODBC (Open Database Connectivity) is a widely used data access technology that enables you to connect to a database from StyleVision. It can be used either as primary means to connect to a database, or as an alternative to native, OLE DB, or JDBC-driven connections.
To connect to a database through ODBC, first you need to create an ODBC data source name (DSN) on the operating system. This step is not required if the DSN has already been created, perhaps by another user of the operating system. The DSN represents a uniform way to describe the database connection to any ODBC-aware client application on the operating system, including StyleVision. DSNs can be of the following types:
•System DSN
•User DSN
•File DSN
A System data source is accessible by all users with privileges on the operating system. A User data source is available to the user who created it. Finally, if you create a File DSN, the data source will be created as a file with the .dsn extension which you can share with other users, provided that they have installed the drivers used by the data source.
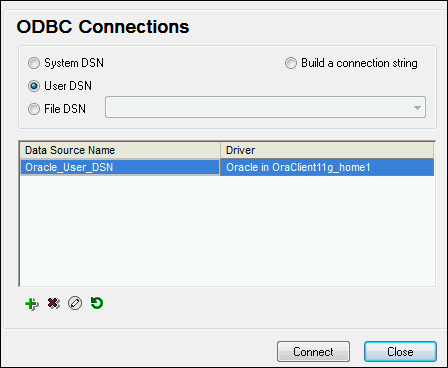
Any DSNs already available on your machine are listed by the database connection dialog box when you click ODBC connections on the ODBC connections dialog box (screenshot below).
If a DSN to the required database is not available, the StyleVision database connection wizard will assist you to create it; however, you can also create it directly on your Windows operating system. In either case, before you proceed, ensure that the ODBC driver applicable for your database is in the list of ODBC drivers available to the operating system (see Viewing the Available ODBC Drivers ).
Connect with a new DSN
To connect with a new DSN, carry out the following steps. Note that, to create a System DSN, you need administrative rights on the operating system and StyleVision must be run as administrator..
1.Start the database connection wizard.
2.On the database connection dialog box, click ODBC Connections.
3.Select a data source type (User DSN, System DSN, File DSN).
4.Click Add  .
.
5.Select a driver, and then click User DSN or System DSN (depending on the type of the DSN you want to create). If the driver applicable to your database is not listed, download it from the database vendor and install it (see Database Drivers Overview ).
6.On the dialog box that pops up, fill in any driver specific connection information to complete the setup.
For the connection to be successful, you will need to provide the host name (or IP address) of the database server, as well as the database username and password. There may be other optional connection parameters—these parameters vary between database providers. For detailed information about the parameters specific to each connection method, consult the documentation of the driver provider. Once created, the DSN becomes available in the list of data source names. This enables you to reuse the database connection details any time you want to connect to the database. Note that User DSNs are added to the list of User DSNs whereas System DSNs are added to the list of System DSNs.
Connect with an existing DSN
To connect with an existing DSN, do the following.
1.Start the database connection wizard.
2.Click ODBC Connections.
3.Choose the type of the existing data source (User DSN, System DSN, File DSN).
4.Click the existing DSN record, and then click Connect.
Build a connection string based on an existing .dsn file
Do this as follows.
1.Start the database connection wizard.
2.Click ODBC Connections.
3.Select Build a connection string and then click Build.
4.If you want to build the connection string using a File DSN, click the File Data Source tab. Otherwise, click the Machine Data Source tab. (System DSNs and User DSNs are known as "Machine" data sources.)
5.Select the required .dsn file, and then click OK.
Connect by using a prepared connection string
Do this as follows.
1.Start the database connection wizard.
2.Click ODBC Connections.
3.Select Build a connection string.
4.Paste the connection string into the provided box, and then click Connect.