Table Formatting
Static and dynamic tables can be formatted using:
•HTML table formatting properties (in the Properties sidebar)
•CSS (styling) properties (in the Styles sidebar).
Note: For Text output, tables will be generated using a user-selected character as the cell separator. The default character is the semicolon. It can be changed in the XSD/XSLTtab of the Properties dialog.
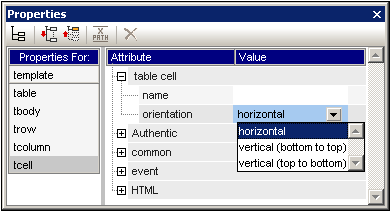
Properties sidebar
The HTML table formatting properties are available in the Properties sidebar (screenshot below). These properties are available in the HTML group of properties for the table component and its sub-components (body, row, column, and cell).

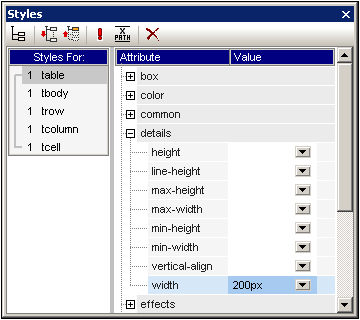
Styles sidebar
The CSS table formatting properties are available in the Styles sidebar (screenshot below). CSS properties are available for the table component and its sub-components (body, row, column, and cell).
Note: If all table cells in a row are empty, Internet Explorer collapses the row and the row might therefore not be visible. In this case, you should use the HTML workaround of putting a non-breaking space in the appropriate cell/s.
Vertical text
Text in table cells can be rotated 90 degrees clockwise or anti-clockwise, so that the text is vertical, reading from top-to-bottom or bottom-to-top, respectively. To do this, in the design, select the content in the table cell that is to be rotated and, in the Properties sidebar (screenshot below), select tcell. In the Table Cell group of properties, select the required value for the Orientation property.
Note the following points:
•The rotation will be applied to the output, but will not be be displayed in the design.
•This property is intended to be applied to text and should not be used for other content.
•Besides being applicable to text in table cells, the property can also be applied to text in Text boxes.
Table formatting via Properties and Styles
Some formatting properties are available in both the Properties sidebar as well as in the Styles sidebar. The table below lists some of the more important table properties available in both sidebars.
Table component | Properties sidebar | Styles sidebar |
Table | border, frame, rules; cellpadding, cellspacing; bgcolor; height, width (overriden by height, width in Styles sidebar if the latter exist); align | borders and padding in Box styles; height, width in Details group (they override height and width in Properties sidebar); color, font, and text styles |
Body | align, valign | height, vertical-align; color, font, and text styles |
Column | align, valign | width, vertical-align; color, font, and text styles; box styles |
Row | align, valign | height, vertical-align; color, font, and text styles; box styles |
Cell | align, valign | height, width, vertical-align; color, font, and text styles; box styles |
Height and width
The height and width of tables, rows, columns, and cells must be set in the Styles sidebar (in the Details group of styles). When a table, column, or row is resized in the display by using the mouse, the altered values are entered automatically in the appropriate style in the Styles sidebar. Note, however, that the height and width styles are not supported for cells that are spanned (row-spanned or column-spanned).
Centering a table
To center a table, set the align property in the HTML group of table properties to center. The align property can be accessed by selecting the table, then selecting the menu command Table | Table Properties. Alternatively, the property is available in the HTML group of properties in the Properties sidebar.
Centering the table in the PDF output will require additional settings according to the FOP processor you are using. According to the FO specification the correct way to center a table is to surround the fo:table element with an fo:table-and-caption element and to set the text-align attribute of the fo:table-and-caption element to center. Stylevision does not automatically create an fo:table-and-caption element when a table is inserted in the design, but you can add this element as a User-Defined Element. If you are using the Apache FOP processor, however, you should note that the fo:table-and-caption element might not be supported, depending on which FOP version you are using. In this case there is a simple workaround: Make the table a fixed-width table. Do this by specifying a length value, such as 4in or 120mm, as the value of the width property of the HTML group of table properties (accessed via the menu command Table | Table Properties).
Giving alternating rows different background colors
If you want alternating background colors for the rows of your dynamic table, do the following:
| 1. | Select the row indicator of the row for which alternating background colors are required. Bear in mind that, this being a dynamic table, one element is being created as a row, and the design contains a single row, which corresponds to the element being created as a table. |
| 2. | With the row indicator selected, in the Properties sidebar, click the Properties for: trow. |
| 3. | Select the bgcolor property. |
| 4. | Click the XPath icon in the toolbar of the Properties window, and, in the Edit XPath Expression dialog that appears, enter an XPath expression similar to this: |
if ( position() mod 2 = 0 ) then "white" else "gray"
| This XPath expression specifies a bgcolor of white for even-numbered rows and a bgcolor of gray for odd-numbered rows |
You can extend the above principle to provide even more complex formatting.
Numbering the rows of a dynamic table
You can number the rows of a dynamic table by using the position()function of XPath. To do this, first insert a column in the table to hold the numbers, then insert an Auto-Calculation in the cell of this column with an XPath of: position(). Since the context node is the element that corresponds to the row of the dynamic table, the position()function returns the position of each row element in the set of all row elements.
Table headers and footers in PDF output
If a table flows over on to more than one page, then the table header and footer appear on each page that contains the table. The following points should be noted:
•If the footer contains Auto-Calculations, the footer that appears at the end of the table segment on each page contains the Auto-Calculations for the whole table—not those for only the table segment on that page.
•The header and footer will not be turned off for individual pages (for example, if you want a footer only at the end of the table and not at the end of each page).
In order to omit the header or footer being displayed each time the page breaks, use the table-omit-header-at-break and/or table-omit-footer-at-break properties (attributes) on the table element. These properties are available in the Styles sidebar, in the XSL-FO group of properties for the table. To omit the header or footer when the page breaks, specify a value of true for the respective attribute. (Note that the default value is false. So not specifying these properties has the effect of inserting headers and footers whenever there is a break.)
Hyphenating content of table cells
If you wish to hyphenate text in table cells of your PDF output, note that the XSL:FO specification uses the hyphenate attribute of the fo:block element to do this. So, to apply hyphenation, you must explicitly, in the FO document, set the hyphenate property of the respective fo:block elements to true.