Retrieving and Editing Data
Altova website: ![]() Database tool
Database tool
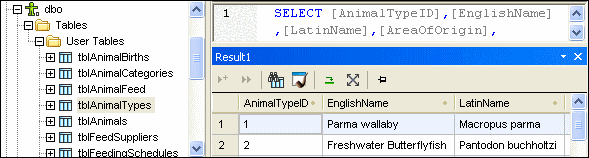
In DatabaseSpy, you can retrieve database data directly from the Online Browser or from a table design in the Design Editor using the Retrieve data option in the context menu. The required query is generated and executed and the data is displayed in a Result tab of the SQL Browser. You can choose to retrieve all rows at once or only a particular number of rows at a time.
If you need to edit data after retrieving it, DatabaseSpy provides the Edit Data option in the context menu of the Online Browser for this purpose. The Result window is switched into the Editing mode in this case, indicating this condition in its status bar.
You can also select individual columns of a table when using the Retrieve data and Edit data commands. Only data from these columns will be retrieved in this case. Note, however, that all columns may be retrieved if you have deactivated the Generate SELECT statements with full column list check box in the SQL Generation options.
•In the Online Browser, right-click the object(s) you want to retrieve data from and select Retrieve data | All rows (Ctrl+Alt+R) or Retrieve data | First n rows (Ctrl+Alt+T) from the context menu.
•In the Design Editor, right-click either the title bar or one or several individual columns (using Ctrl+click) in a table design and select SQL and Data | Retrieve data | All rows (Ctrl+Alt+R) or SQL and Data | Retrieve data | First n rows (Ctrl+Alt+T) from the context menu.
An SQL Editor window opens which displays the query for the data retrieval. If you have selected objects from different tables, separate SELECT statements for the individual tables are created. The results of the query are displayed in the Result window below.
To retrieve data for editing:
•Provided that direct editing of database data is supported for the respective data source connection, right-click a table or column in the Online Browser and select Edit Data from the context menu.
Partial retrieval
In the SQL Editor options, you can define the number n of rows to be retrieved if you select the Retrieve data | First n rows option from the context menu. You can then use the toolbar icons of the Result window to retrieve the data in fractions.
Stopping the retrieval
While data is being retrieved, the status bar of the Result tab counts up the rows already retrieved and displays the execution time. In addition, the tab of the respective SQL Editor window shows an icon at the left side, indicating that data is still being retrieved.
While data is being retrieved, the Execute  button is replaced by the Stop Retrieval
  button in the SQL Editor toolbar. You can stop the retrieval process at any time by clicking the Stop Retrieval button. The status bar indicates that the retrieval has been stopped.
To stop the retrieval of database data:
•Click the Stop Retrieval button which is visible in the SQL Editor toolbar while data is being retrieved.
To resume the interrupted retrieval of database data:
Do one of the following:
•To retrieve the next n rows of data, click the Retrieve next n rows  icon or right-click anywhere in the Result tab and select Retrieve next n rows from the context menu.
•To retrieve all outstanding data, click the Retrieve outstanding rows  icon or right-click anywhere in the Result tab and select Retrieve outstanding rows from the context menu.
Editing database data in the Result window
To edit data contained in your database tables, you can either generate the corresponding SQL statements and execute them in the SQL Editor or, more conveniently, retrieve data and edit it directly in the Result window.
The Result window has to be enabled for editing before you can make any changes to the data displayed in the result grid. For this purpose, the context menu of the Online Browser as well as the context menu that opens when you right-click into a table design in the Design Editor provides the Edit Data command which is available on table and column level. This command generates a SELECT statement which appears in a new SQL Editor window and is executed immediately, thus switching the Result window into editing mode.
In addition, the Execute for Data Editing  button is available in the SQL Editor toolbar, allowing you to execute a SELECT statement and, at the same time, switch the Result window into the Editing mode. This is particularly useful if you have already retrieved data and now want to update some of the records. The table below shows the editing options for the individual data source connections.
To select data for editing in the Result window:
Do one of the following:
•In the Online Browser or in a Design Editor window, right-click the table or column you want to edit, and choose Edit Data from the context menu. A SELECT statement is created and executed automatically in the SQL Editor.
•Generate a SELECT statement in a new SQL Editor window and click the Execute for Data Editing button, if available for the currently used data source connection.
Note: Not all editing options (update, insert, or delete row) may be available, depending on the data source connection you are currently using, and on whether the table you are editing has or has not a primary key defined.
The following restrictions apply when editing data in the Result window:
•Only SELECT statements may be present in the SQL Editor window if the Execute for Data Editing command is used. If you click the Execute for Data Editing button while any other statement is in the SQL Editor, the statement will be executed without switching the Result window into the Editing mode.
•Tables where row uniqueness cannot be guaranteed are only partly supported for editing. Namely, you can insert new rows but you cannot update or delete existing rows. This is typically the case for tables without primary or unique keys or indices (or SELECT queries where you omitted such columns). DatabaseSpy displays a warning dialog box if you select the Edit Data command for such a table or SELECT query.
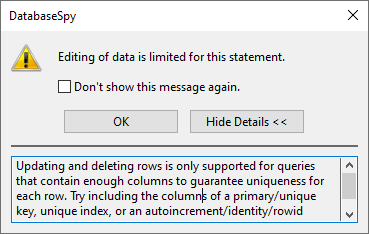
If you do not want to have this dialog box displayed, select the Don't show this message again! check box or disable this feature in the SQL Editor options.
•If the primary key is defined on multiple columns, all columns that form part of the table's primary key must be included in the statement. A warning dialog box similar to the one above ("Editing of data is limited for this statement") is displayed if you omit such a column in your SELECT statement.
•Columns that are the result of an equation or have certain properties such as auto-increment, timestamp, etc., are excluded from editing. If such columns are present, a warning dialog box similar to the one above appears before the results are displayed. You can, however, still edit the remaining columns of the table.
To make it possible to update or delete existing rows even in tables without primary or unique keys, edit the SELECT statement so as to include a column that guarantees uniqueness of the row. For example, if the table does not have a primary key, include an auto-increment column in the SELECT statement, or a column that has a unique key or unique index. In addition, SQLite databases provide by default an internal rowid column for this purpose. Even though this column is internal and thus not shown in the Online Browser, you can still use it in your SELECT statement, as shown below. You cannot update the value of rowid itself, though, so the warning dialog box is still displayed informing you that this column cannot be edited.
SQLite
SELECT "col1", |
Using a rowid is not possible if this behavior was explicitly disabled when creating the table (that is, if the table was created using the WITHOUT ROWID keyword).