Defining a Default Constraint
For some columns it may be useful to define a standard default value. When no other value is supplied explicitly, the default is inserted automatically in the respective column when you add a new record to the table.
In this section of the tutorial, you will define a default constraint on the NumberInLitter column of the tblAnimalBirths table. In other words, the NumberInLitter value must be set automatically to "1" for new rows.
To add a default constraint:
1.Open the "ZooDB" project created previously and double-click the  ZooDBConnect data source to connect to it.
2.In the Online Browser, right-click table tblAnimalBirths and select Design Editor | Show in new Design Editor from the context menu.
3.In the table design, right-click column "NumberInLitter" and select Create Default Constraint from the context menu. The Default Value column appears in the table design. (If the Default Value column is not visible, click into the table design and it will resize properly.)
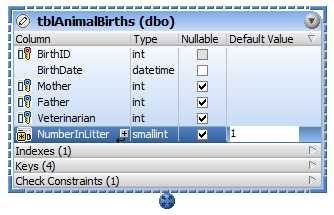
4.Double-click the field in the NumberInLitter row, type "1", and press Enter.
5.In the Database Structure Change Script window, click the Execute Change Script  button to execute the change script and to commit the new default constraint to the database.
Testing the default constraint
Before testing the default constraint you have just defined, make sure that the Initialize cells with default values option is enabled in the Result View options.
To create a new row containing a default value:
1.Right-click the table heading in the Design Editor and select SQL and Data | Edit Data from the context menu. A message box appears, click OK.
2.In the Result view, click the Append a new row ![]() button. The "NumberInLitter" column shows "1" in the new row.
button. The "NumberInLitter" column shows "1" in the new row.
