Adding Files
You can add existing SQL scripts to your DatabaseSpy Project, or you can save designs as files and add them to the project. The Project window provides folders for the different file types and you can define properties (e.g., data source to connect to, execution options for SQL, etc.) on file or folder level. This way, you have all the files that you may need at hand, even if they are stored in different locations. If you need to find the exact path to a file that has been added to a project, DatabaseSpy provides the following context menu option:
•Right-click a file in the Project window and select Locate File... from the context menu. DatabaseSpy opens the folder that contains the file in Windows Explorer.
To add files to a project:
1.In the Project window, right-click a folder and select Add Files to Project... from the context menu. Alternatively, click the Add files to the Project  button in the Project window toolbar. The Open dialog appears.
2.Browse for the file that you want to add to the project.
3.Click Open. The selected file is added to the corresponding folder of the project.
In addition, you can also save the content of the SQL Editor or Design Editor to a file and add this file to the project at the same time. For every file that is saved for the first time or under a new name, DatabaseSpy pops up the Add to Project dialog box.
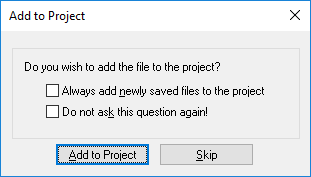
The Add to Project dialog box also serves as a shortcut to the General options, allowing you to define that newly saved files be always added to the project automatically. In addition, you can also suppress the display of this dialog box in the future.
To save a file:
1.Make the SQL Editor or Design Editor the active window and do one of the following:
•Click the Save  button in the Standard toolbar.
•Select the menu option File | Save.
•Press Ctrl+S.
•Right click the naming tab at the bottom of the document window and select Save... from the context menu.
2.Enter a name for the new file, select a folder and click the Save button. The Add to Project dialog box opens (if the dialog box does not pop up, check whether the Do not show dialog option is checked in the Newly saved files group box of the General options).
3.Do one or more of the following:
•Click the Add to Project button to add the file to the currently active project.
•Click Skip to close the dialog box without adding the file to the project.
•Select the Always add newly saved files to the project check box.
•Select the Do not ask this question again! check box to suppress the display of the dialog box in the future.
To add the active file to the project:
1.Make the window that contains the file you want to add to the project the active window.
2.Do one of the following:
•In the Project window, click the Add the Active File  icon in the toolbar, or right-click the respective folder and select Add Active File to Project from the context menu.
•In the SQL Editor or Design Editor, right-click the tab at the bottom of the Editor window and select Add to project from the context menu. If the file has not been saved yet, the Windows Save As dialog box opens where you can enter a name and path for the file.
The file appears below the respective folder in the Project window.
To remove a file from a project:
Do one of the following:
•Right-click the file and select Remove from the context menu.
•Select the file and press Delete.