Selecting Database Data for Export
You can select database data for export in the same way for all export file types.
To export database data:
1.Make sure that at least one connection to a data source is active.
2.Select the menu option Tools | Export database data, or press Ctrl+E, or click the Export  toolbar button. The "Export database data" dialog box opens.
3.Select the desired export format on the left side of the dialog box.
4.Select the desired data source from the Data Source list.
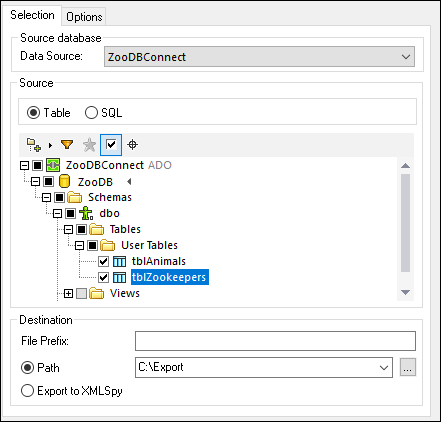
5.In the Source tree view, select the data you want to export, as follows:
•To change the root database object, click the ![]() arrow icon and switch to the required schema or database. This is applicable only for those databases where multiple root objects (schema or databases) exist, such as SQL Server.
arrow icon and switch to the required schema or database. This is applicable only for those databases where multiple root objects (schema or databases) exist, such as SQL Server.
•To select data from tables or views, leave the default Table option selected, and then click the check boxes next to the required tables or views. You can optionally refine the selection with the help of views, filters, favorites, and Object Locator, as well as the Show checked objects only  option, like in the Online Browser. Only the selected tables or views will be exported.
Note: The default layout shown in the tree view depends on the export file type. For XML, CSV, HTML, and Excel, the default layout is Folders. For XML Structure, the default layout is Table Dependencies. The latter helps you decide which of the dependent tables should be included in the export file. You can change the layout by clicking the Layouts ![]() button at the top of the tree view.
button at the top of the tree view.
•To select data by entering SQL commands, select the SQL option, and enter the desired SELECT statement. You may enter multiple SELECT statements delimiting them with a separator applicable to the database kind, typically ";".
When you initiate the data export from the SQL Editor, the SQL option is selected by default and the SELECT statement is pre-filled. If you select tables while the Table option is selected and then click the SQL option, the SELECT statements for those tables will be generated automatically.
6.Specify the Destination to which you want to export the data, as follows:
•Optionally, enter a prefix that will be added to the table name when the table is exported.
•To export data to a directory, select Path and enter the directory path in the text box or browse for it.
•To open data in XMLSpy, select Export to XMLSpy.
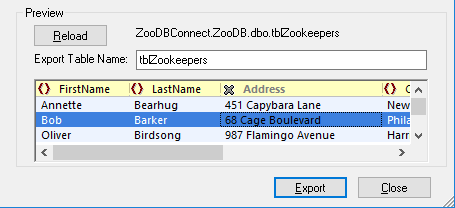
7.Optionally, click the table you want to preview and then click Preview. Note that the Preview button is enabled only after you click a table. Also, the Preview button changes to Reload after the first preview.
8.Optionally, choose, for each column, whether it should be included or excluded from the export. To do this, click the icon next to the column name and switch to the desired state: include ![]() or exclude
or exclude  . In case of XML, you can choose whether each column should be exported as element, as attribute, or not be exported at all. The possible states for XML export format are, therefore, as follows: export as element
 ![]() , export as attribute
, export as attribute ![]() , or exclude . To restore the original settings, click the Reload button.
, or exclude . To restore the original settings, click the Reload button.
9.Optionally, change the file name of the selected table in the Export Table Name text box.
10.Click Export.
Exporting data from designs
If you have a specific design open in a Design Editor window, you can easily export the data that is contained in the tables of this particular design. The Design Editor window provides an additional Export button which is active if at least one table in the Design Editor window is selected. When you click this button, the "Export database data" dialog box opens with the selected tables or views already checked. You can still add tables to the export definition.
Note: Clicking the Export toolbar button also opens the "Export database data" dialog box. However, in this case no tables are pre-selected for export.