Creating Tables
After connecting to a data source, you can create a new table in DatabaseSpy in several ways.
From the Online Browser
The following instructions illustrate how to create a minimal table having two columns. The first column is auto-incremented and has a primary key. The second column is nullable. The instructions are for a SQLite database but are similar in other database kinds.
1.Right-click the "Tables" folder and select Create Table from the context menu.
The "Tables" folder may appear either under a schema or a database, depending on the database kind. |
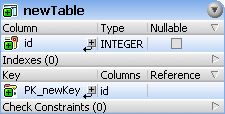
The new table appears in the Online Browser with the default name "newtable", and a table creation script is generated in the Database Structure Change Script Window. Also, a new column called "column" is created by default for the table.

2.Select the new table and press F2 to rename it to "assets". (Alternatively, right-click the table and select Rename from the context menu).
3.Select the new column and press F2 to rename it to "id".
4.Select the column and make sure that the following properties are as follows in the Properties window:
•Data Type: INTEGER
•Nullable: Off
•The Nullable property must be switched off. This makes it possible to add a primary key to the table (see the next step). •The list of properties varies depending on the database kind. |
5.Right-click the column and select Create Primary Key from the context menu.
6.Right-click the table or the "Columns" folder and select Create Column from the context menu. Using the same approach as above, rename the new column "description". Make sure that the Nullable property in the Properties window is on.
7.Optionally, to change the order of columns while the changes are not committed to the database, drag a column up or down in the list of columns and drop it at the desired position.
8.Click the Execute Change Script  button in the Database Structure Change Script window.
From the Design Editor
1.Open a Design Editor window (Ctrl+D).
2.Click the New Table  button in the Design Editor toolbar (or select the menu command Design Editor | Create New Table), and add the required table objects. For a step-by-step example, see Adding Tables Using Design Editor.
Note: By default, DatabaseSpy creates automatically the primary key for new tables in Design Editor. To disable this option, select the menu command Tools | Options | Design Editor, and then clear the option Automatically create primary key for new tables.
3.Using the same steps as above, add as many new columns as necessary. If you need to reorder columns while changes are not committed to the database, right-click a column and select Move Column Up or Move Column Down from the context menu. Alternatively, drag a column and drop it to a new position in the table.
4.Click the Execute Change Script  button in the Database Structure Change Script window.
By generating SQL
This approach requires that the database already contains a table that you can use as template for the new table.
1.Right-click an existing table in the Online Browser and select Show in new SQL Editor | Create from the context menu. A CREATE statement appears in the SQL Editor.
2.Modify the generated SQL as required (at the minimum, you should rename the table to ensure the successful execution of the script).
3.Click the Execute button at the top of SQL Editor (or press F5). The outcome is reported in the Message window.
You can also generate the CREATE script from a different database kind. In this case, however, you will need to edit the SQL statement so that it is compatible with the target database. For example, let's assume that you need to create a new table in a SQLite database that is very similar to an existing table from an Access database. In this case, Access is the "source", and SQLite is the "target". You can duplicate the table as follows:
1.Connect to both databases.
2.In the Online Browser, right-click a table from the "source" database and select Show in new SQL Editor | Create from the context menu.
3.Click the Execution Target Bar at the top of SQL Editor.
4.From the Properties window, change the Data Source property to point to the target database.
5.Edit the CREATE statement so that it's compatible with the target database.
4.Click the Execute button at the top of SQL Editor (or press F5). The outcome is reported in the Message window.
For a slightly different approach that performs automatic conversion to the new SQL grammar, see Migrate Table Structure.
By writing SQL
Open a new SQL Editor window (Ctrl+N), enter a CREATE statement in the grammar of the currently connected database, and click Execute . The code listing below is applicable for SQL Server databases.
CREATE TABLE newTable ( |
You must define at least one column for the new table.