Creating Indexes
Some indexes in a database table are created automatically when you define a primary or unique key on a column. You can also add indexes explicitly, either at table design time, or later. Where supported by the database, DatabaseSpy allows for the definition of clustered, non-clustered, and XML indexes.
Note the following:
•In databases that support clustered indexes (DB2, DB2 for i, SQL Server, Sybase), only one clustered index can be defined per table.
•In MariaDB, MySQL, and SQLite databases, a unique key will be created automatically by the database when you add a unique index.
•For Teradata databases, you can manually create from Design Editor only secondary unique and non-unique indexes. To do this, right-click a table column in Design Editor, and select Make index | Non Clustered Index from the context menu. To specify that the index should be unique, select the Unique check box in the Properties window.
•With Teradata databases, a primary non-partitioned index is always created automatically for the first column in the table, even if you disabled the option Automatically create primary key for new tables from Tools | Options | Design Editor. Therefore, if you create a primary key manually from Design Editor, do not additionally create an index for that column; otherwise, the database change script will fail.
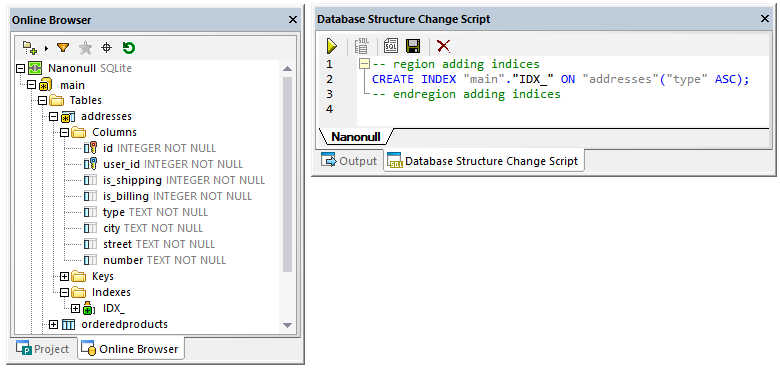
Creating indexes in the Online Browser
To create an index:
1.In the Online Browser, right-click a table, a column, or the "Indexes" folder of a table, and select Create Index from the context menu. The new index appears in the "Indexes" folder of the respective table, and a structure change script is generated in the Database Structure Change Script Window.
2.Select the new index and press F2 to rename it. Alternatively, right-click the index and select Rename from the context menu.
3.Optionally, change the index properties in the Properties window. Available options vary by database kind. To see the available options in the Properties window, first click the index in the Online Browser.
4.Optionally, to add more columns to the index, right-click the index and select Add Column | <name> from the context menu. Note that only columns that are not already part of the index are shown in the context menu.
5.Click Execute  to run the generated database change script.
Creating indexes in the Design Editor
To define an index in the Design Editor:
1.Do one of the following:
•Right-click the column where you want to create the index definition, and select Make Index from the context menu.
•Click the column and, keeping the mouse button pressed, drag it into the Index section.
•Right-click into the table and select Insert new | Index from the context menu.
•Expand the Index section (by default, it is collapsed) and click Create new index ![]() .
.
2.Select the appropriate index type (non-clustered, clustered, or XML index) from the sub-menu that opens. The types of indexes that are available depend on the database kind you are using.
3.Optionally, change the index properties in the Properties window. Available options vary by database kind. To see the available options in the Properties window, first click the index in Design Editor.
4.In the Index column, enter a descriptive name and press Enter.
5.In the Columns column, optionally double-click the column and select a different column from the drop-down list.
6.Click into the Order column and select either ascending or descending sort order and press Enter.
7.Optionally, click the plus symbol  and select a column from the drop-down list and repeat this step to add one or more additional columns to the index definition.
8.Click Execute to run the generated database change script.
Creating indexes by generating SQL
If indexes already exist in a table, you can add new indexes to the table also by right-clicking an existing index and generating a statement that uses the properties of the existing item as default. After editing the properties as required and executing the SQL, a new index is added to the database.
To add an index to a table using SQL:
1.Connect to the database and show the respective data source in the Online Browser.
2.Expand the table to which you want to add an index.
3.Right-click an existing index in the Index folder, and select Show in new SQL Editor | Create from the context menu. Alternatively, holding down the right mouse button, drag the index into an open SQL Editor window and choose Create from the context menu. An SQL statement is generated in the SQL Editor window.
4.Edit the statement as required.
5.Click the Execute  button to execute the statement and to add the new index to the database.
6.In the Online Browser, right-click the database and choose Refresh from the context menu.