Updating Data
To update data in the Result window, first select data for editing. This switches the Result window into the Editing mode, which is indicated by the "Editing Mode" message in the status bar.
To edit records, double-click the cell you want to edit and proceed like in any spreadsheet application. You can use the context menu to copy, cut, paste, delete, or select all content or to undo your editing action. You can also paste into the Result grid cell ranges copied from another Result grid or from external files such as Microsoft Excel spreadsheets (see also Adding and Copying Rows).
Result grid
The updated data is not immediately committed to the database but only displayed in the Result grid. To actually commit the update to the database, the Result window provides a Commit button in its toolbar.
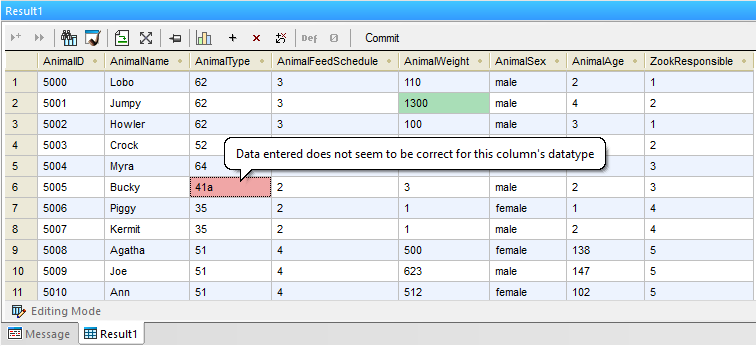
Data cells that have been edited are indicated by a different background color. The color informs you if there are potential problems with the entered data. For example, if the entered text is not suitable for the data type of the column, the background color of the cell turns red.
If XML columns are present in the Result window, an additional button for each row appears inside the XML column: ![]() . Clicking this button allows you to load an XML file into this XML cell or to save the XML content of the respective cell as XML file. Furthermore, you can assign an XML schema to the XML cell, provided that the current data source connection supports this feature. In databases where XML columns are currently not supported by DatabaseSpy, this icon changes to
. Clicking this button allows you to load an XML file into this XML cell or to save the XML content of the respective cell as XML file. Furthermore, you can assign an XML schema to the XML cell, provided that the current data source connection supports this feature. In databases where XML columns are currently not supported by DatabaseSpy, this icon changes to ![]() and you can only save the XML content of the respective cell to a file.
and you can only save the XML content of the respective cell to a file.
In the Editing mode, the toolbar shows the following additional commands:
 | Appends a new row. This command is also available in the context menu, when your right-click a cell. See also Adding and Copying Rows. |
 | Deletes an existing row. This command is also available in the context menu, when your right-click a cell. |
 | Undoes all changes made to the Result grid (provided that they have not been committed to the database yet). To undo the editing of a particular cell, right-click it, and select Undo Changes for this Cell from the context menu. |
Sets the currently selected cell(s) to the default database value. This command is also available in the context menu, when your right-click a cell. Note that the command (and its corresponding button) is enabled only if the database column provides a default value. | |
Set the currently selected cell(s) to a NULL value. This command is also available in the context menu, when your right-click a cell. Note that the command (and its corresponding button) is enabled only if the corresponding database column allows nulls. |
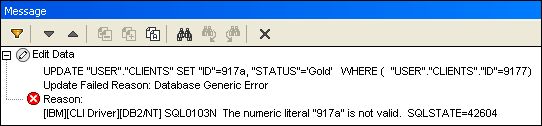
When you finished editing data, click Commit to send the changes to the database. DatabaseSpy automatically creates the required SQL statements and executes them. If the execution fails, you can view the statements in the Output window and check why they have not been executed successfully.
Using SQL
If you prefer to update data by means of SQL statements, DatabaseSpy can generate the required SQL statement based on the detected table structure. You can choose to update either all columns of a table or only specific ones.
To update a table by means of SQL statements:
1.Connect to the database and show the respective data source in the Online Browser.
2.Optionally, right-click the table you want to update and choose Retrieve data | All rows to see the data that is contained in the table.
3.Do one of the following:
•Select the respective table you want to update.
•Expand the respective table and select the column(s) you want to update.
4.Right-click and select Show in new SQL Editor | Update from the context menu or, holding down the right mouse button, drag the selected objects into an open SQL Editor window and choose Update from the context menu. An UPDATE statement for all the selected objects is generated in the SQL Editor.
Note: Auto-increment and computed columns do not appear in the generated UPDATE statement. See also "The UPDATE statement" below.
5.Edit the SET part of the generated UPDATE statement with the values that you want to be inserted.
6.Edit the WHERE clause to select the rows that are to be updated.
Note: If you remove the WHERE clause, all rows of the table will be updated with the same values.
7.Click the Execute  button to execute the statement and to update the data in the database.
The UPDATE statement
By default, the UPDATE statement is intentionally generated so as to prevent accidental update of multiple rows. For this reason, you will likely need to edit it in order to achieve the desired result.
The WHERE clause of the UPDATE statement is generated so as to include the table's primary key, if the table has one. For example, the statement below is generated for a SQLite table which has a primary key on the id column.
UPDATE "products" SET "id"=0, "name"='', "quantity"=0, "description"=NULL WHERE "id"=0; |
If the table does not have a primary key, the WHERE clause will include the unified list of all columns of all unique keys. If the table has neither primary nor unique keys, the WHERE clause will include all the columns, except for computed columns.
The generated values that appear in the WHERE clause depend on the column's default value, on whether it is nullable, and on the data type of the column. For example, the following is an example of an UPDATE statement generated from a SQL Server table where (i) no primary or unique keys exist, (ii) the first column is of integer type, (iii) the second column is of nvarchar type, and (iv) id is an auto-increment column:
UPDATE [dbo].[Events] |