Expose a Job as a Web Service
This example illustrates how to create a FlowForce Server job exposed as a Web service. The job executes a mapping designed with Altova MapForce. The mapping queries data from a SQLite database and retrieves only records that match a value supplied as parameter when the Web service is called. You will learn how to deploy the existing mapping from MapForce to FlowForce Server and turn it into a Web service. After completing this example, you will be able to invoke the Web service from a browser.
Prerequisites
•Required licenses: MapForce Enterprise or Professional edition, MapForce Server or MapForce Server Advanced Edition, FlowForce Server
•The FlowForce Web Server and FlowForce Server services must be listening at the configured network address and port
•You have a FlowForce Server user account with permissions to one of the containers (by default, the /public container is accessible to any authenticated user)
•The mapping job created in this example writes an XML file to a local directory. Therefore, on the operating system where FlowForce Server runs, a writeable directory must exist where the job output will be created. This example uses C:\FlowForceExamples\GetPersonRecords.
•The job used in this example reads data from a SQLite database and does not require installing any database drivers. However, if you would like to use a different database, then the database drivers must be installed not only on the computer where the mapping is designed but also on the server where the job runs. For example, in case of Microsoft Access databases, the Microsoft Access Runtime (https://www.microsoft.com/en-us/download/details.aspx?id=50040) must be installed on the machine where FlowForce Server runs.
Demo files used
This example makes use of the following files, available at the following path on the computer where MapForce is installed: ..\Documents\Altova\MapForce2026\MapForceExamples\Tutorial.
•FilterDatabaseRecords.mfd (the MapForce mapping design file)
•Nanonull.sqlite (the SQLite database from which the mapping reads data).
What the mapping does
The mapping discussed in this example is called FilterDatabaseRecords.mfd and is available in the "Tutorial" folder of MapForce (..\Documents\Altova\MapForce2026\MapForceExamples\Tutorial).
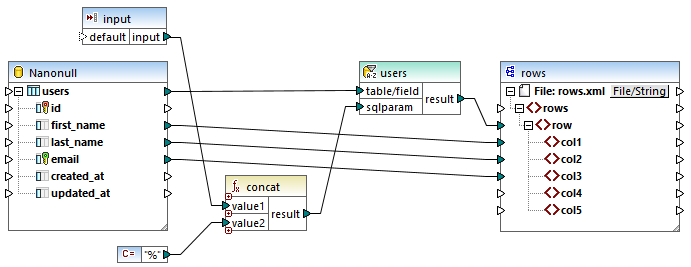
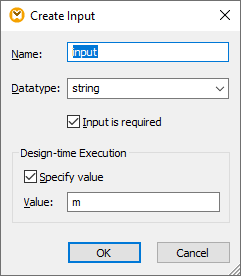
As illustrated above, the source component is a database which stores user records. The target component is an XML file. The connection from users to row creates one row for each database record extracted from the source. The mapping also contains an input parameter to be supplied at runtime. Double-click the title bar of the input parameter to view its properties:
The mapping also contains a SQL-WHERE component placed between the source and the target. The goal of the SQL-WHERE component is to pass on to the target component only those database records that match the condition last_name LIKE :sqlparam. Again, this is configured from the component properties:
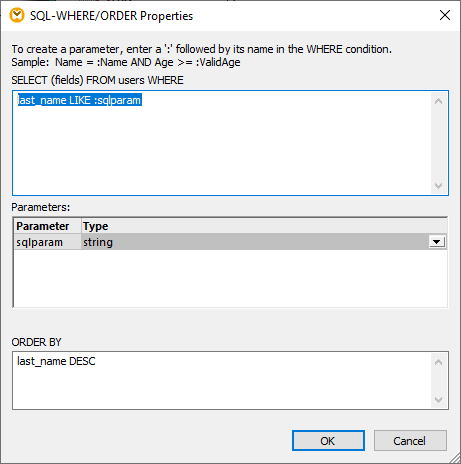
On the mapping, the value of :sqlparam is obtained by concatenating the input parameter with the % character. Therefore, if the caller supplies the input parameter "m" at runtime, then the mapping will retrieve user records whose last name begins with "m".
For more information about designing mappings such as the one discussed in this example, refer to MapForce documentation (https://www.altova.com/documentation) .
Preparing the mapping for deployment to FlowForce Server
In the instructions below, the term "source machine" refers to the computer where the MapForce is installed and the term "target machine" refers to the computer where FlowForce Server is installed (this may or may not be the same computer).
Before attempting to deploy the mapping to the target machine, do the following:
1.Make sure that the "FlowForce Web Server" service is configured to listen for client HTTP(S) requests, see Defining the Network Settings. For example, if FlowForce Server is installed on the same computer and is configured with the default settings, then you should be able to access it by typing http:/localhost:8082 in your browser. If FlowForce Server is running on a different computer, make sure that the incoming connections to the specified address and port are not blocked by the firewall.
2.Make sure that the "FlowForce Server" service is also configured to listen for client HTTP(S) requests. This service handles requests to jobs exposed as Web services, see also How It Works. Therefore, in order for the Web service to be accessible to HTTP clients outside of the local host, the "FlowForce Server" service must be configured to listen either on all interfaces, or on a specific address other than the local host. You can check whether this service is configured correctly by accessing the following URL from the browser: http(s)://<host or IP address><port>/service/ . When prompted to enter a password, supply the password of your FlowForce Server user account. All jobs that are exposed as Web services (if any) should appear as links directly in the browser window.
3.Verify that the mapping is configured to use relative instead of absolute paths, as follows:
a)Open the FilterDatabaseRecords.mfd mapping in MapForce, right-click the mapping area, and select Mapping Settings from the context menu.
b)If applicable, clear the Make paths absolute in generated code check box.

Note: The check box Ensure Windows path convention... is not applicable in case of mappings designed in the BUILT-IN language, such as this one. It is relevant only when the mapping language is either XSLT or XQuery.
c)Save the mapping.
File-based databases such as Microsoft Access or SQLite are not deployed to a target machine together with the mapping. Therefore, the SQLite database must be manually copied from the source machine to the target machine. Copy the Nanonull.sqlite database file from the directory ..\Documents\Altova\MapForce2026\MapForceExamples\Tutorial on the source machine to some empty directory on the target machine. In this example, the target directory is C:\FlowForceExamples\GetPersonRecords. Take notice of this path because it will be referenced later from the FlowForce job.
The mapping is now ready for deployment to FlowForce Server. For more information about deploying mappings which include database connections, see Preparing Files for Server Execution.
Deploying the mapping
To deploy the mapping to FlowForce Server:
1.On the File menu, click Deploy to FlowForce Server. If you are deploying the mapping to FlowForce Server on a different machine, change the server address and port from "localhost:8082" to those configured from the FlowForce Server network settings.
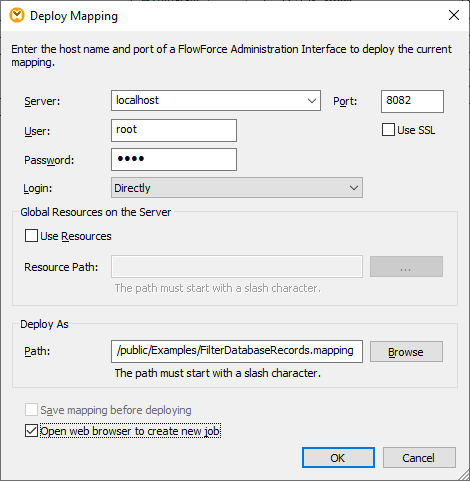
2.For consistency with all other examples, we will choose to deploy the mapping to the /public/Examples container. Click Browse and change the container path to /public/Examples. The /public/Examples container must already exist if you followed the previous examples; otherwise, you can create it by clicking Create Container.
3.Select the Open new browser to create new job check box.
4.Click OK.
For reference to all deployment settings, see Deploying Mappings to FlowForce Server.
Creating the FlowForce job
So far, you have deployed the mapping to FlowForce Server and have the job configuration page open in the browser (provided that you selected the check box Open web browser to create new job on the dialog box above). Otherwise, login to the FlowForce Server Web administration interface, open the previously deployed mapping function (it should be in the /public/Examples container), and then click Create Job.
To configure the job:
1.Under "Job Input Parameters", create a new input parameter of type string. This value will be provided by callers of the Web service when they invoke the job. Let's name it "LookupValue".
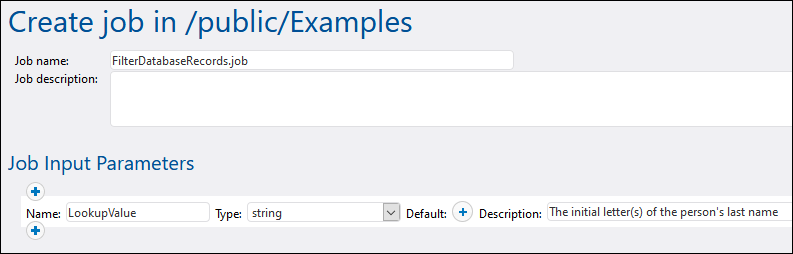
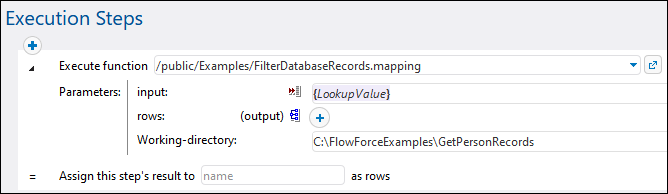
2.Configure the execution step as follows:
•Set the value of the input parameter to the "LookupValue" input parameter created in previous step.
•Set the working directory to C:\FlowForceExamples\GetPersonRecords. Note that this directory must already exist on the file system, and it must already contain the source Nanonull.sqlite database if you followed the previous steps.
3.To turn the job into a Web service, select the Make this job available via HTTP... check box and enter the name of the Web service, for example:

Take notice of the service name; you will need it to call the Web service.
4.Under "Credentials", select an existing credential record or specify a local credential.
Note: These are the credentials of your user account on the operating system and not the ones used to access the FlowForce Server Web administration interface. The user account must be able to access the Nanonull.sqlite database file from the working directory; otherwise, the job will fail to execute successfully.
5.Click Save.
Invoking the Web service
At this stage, you have completed the job configuration. Because this job is exposed as a Web service, you can run it in any of the following ways:
•Go to the Home page and click Show all active triggers and services. Next, click the job's URL displayed in the Info column.
•Enter http://127.0.0.1:4646/service/GetPersonRecordsService in the browser's address bar. Note that this URL works only if the FlowForce Server service listens at the default host address and port name. If you have defined other host and port settings on the Setup page, change the address accordingly.
•If you set the optional Host name field of FlowForce Server on the Setup page, you can execute the web service call directly from the job configuration page, by clicking the  button adjacent to the Make this job available via HTTP check box. The button is not displayed otherwise.
If you are asked for credentials when you access the Web service, supply the same credentials you use to log on to FlowForce Server.
Important Supplying your FlowForce Server user credentials for HTTP authentication is only for testing purposes. For production, it is recommended to create a new FlowForce user, grant the Service - Use permission to this user on the container where the job is, and then access the Web service with the corresponding user account. To disable HTTP authentication and make the Web service public, grant the Service - Use permission to the user Anonymous. For details, see How Permissions Work. |
Since this job takes parameters, you will be prompted to supply a parameter value when you access the Web service from the browser.
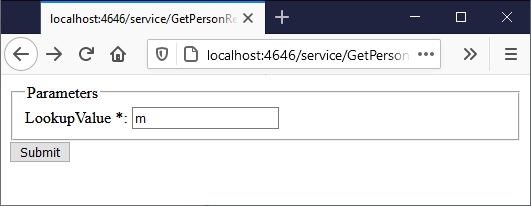
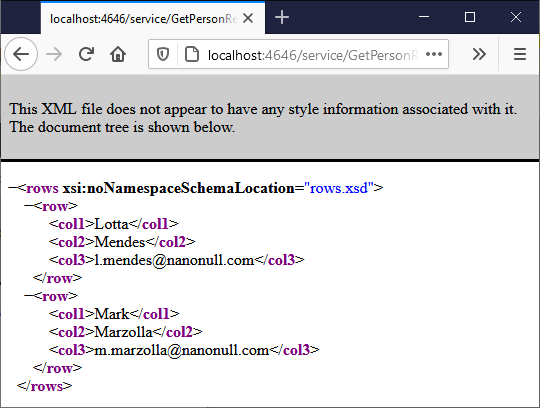
If you enter a valid directory path like M, for example, the job will query the database and return only the rows where the person's last name begins with "M", for example:
On job failure, a "Service execution failed" error is displayed in the browser. If you see this error, check the Job Log for further information.