Send AS2 Messages
A job that sends an AS2 message to a remote partner is similar to any other FlowForce Server jobs. Namely, it can take parameters, contain various execution steps, be triggered as a scheduled job or on demand, and so on. This example shows you how to create a simple AS2 job that sends an EDIFACT file to an AS2 server.
Prerequisites
•An AS2 server must be available and configured to accept AS2 messages from HTTP clients (in this case, FlowForce Server acts as HTTP client to the remote server).
•The remote partner details must be added in FlowForce Server, see Configuring AS2 Partners. At the minimum, for a basic connectivity test, you could define a partner without any certificates (if it accepts unencrypted and unsigned connections). In this case, all you need to know is the partner's URL, the partner AS2 name, and your organization's AS2 name to communicate with this partner.
Creating the job
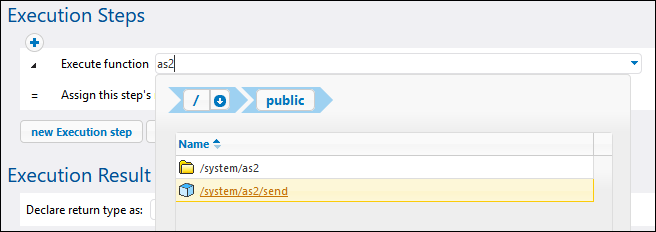
Create a new FlowForce Server job in the standard way (click Create | Create Job inside any container, see also Creating Jobs). Next, add an execution step that calls the ![]() /system/as2/send function. To quickly search for this function, click inside the Execute function box, and start typing the function name, for example:
/system/as2/send function. To quickly search for this function, click inside the Execute function box, and start typing the function name, for example:
After you add the function to the job, its structure is loaded into the page, and fields for all the required parameters become available. To ensure the AS2 transmission is sent correctly, set the parameters as follows:
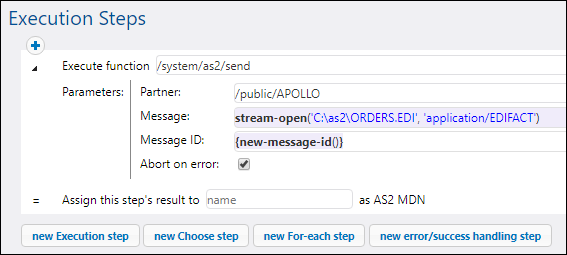
•Partner - This field must be a reference to a partner object configured earlier, see Configuring AS2 Partners. Click inside the field to browse for the partner object.
•Message - This field must contain a FlowForce expression that opens the stream you want to include in the message. For example, to send an EDIFACT file found at C:\as2\orders.edi, with a Content-Type header application/EDIFACT, enter the following expression:
stream-open("c:\as2\orders.edi", "application/EDIFACT")
For more information about expressions in FlowForce, see FlowForce Expressions. The source file (be it EDI or XML) could also be a file generated with MapForce (for example, by a previous execution step which runs a mapping that was previously deployed to FlowForce Server), see AS2 Integration with MapForce and MapForce Server.
•Message ID - This field must provide the value for the Message-ID header field, as a string. To generate this value, call the new-message-id expression function, as shown below.
•Abort on error - A job may consist of various execution steps, not just the one that is sending the AS2 message. For example, you may want to define other execution steps after the current one, in order process the MDN returned by the partner in some way. Set this parameter to TRUE (enabled) to abandon further job execution if the current execution step fails. If the Abort on error parameter is TRUE (enabled) and the current execution step fails, any subsequent execution steps will no longer be run, and the entire job will be aborted, see also Processing Steps Sequentially.
The image below illustrates a sample execution step that refers to a partner "APOLLO" and supplies an EDIFACT file in the message body with the help of a FlowForce Server expression:
As stated above, a FlowForce job may be configured to run on demand, or as a scheduled job. For information about various job triggers that can be configured, see Managing Triggers. In this example, we will configure the AS2 job to run on demand from the browser as a Web service, as shown below. Observe the name of the Web service, it is "sendAS2" in this example, but could be a different name if so required. For more information, see Exposing Jobs as Web Services.

Finally, before attempting to save the job, enter the credentials to the operating system account that FlowForce Server must run as (note these are not the same credentials as the ones you use to log on to FlowForce Server). In this example, credentials are entered directly inside the job; however, it is also possible to store them separately as a credential record, and conveniently select (refer to) them from within jobs, see also Credentials.

Now you can save the job by clicking the Save button at the bottom of the page.
FlowForce Server performs data integrity checks that will prevent you from saving the job if it is not configured properly. It is often the case that errors are caused by incorrect expressions supplied as parameter values, see Handling Data Types in Steps. If you are new to FlowForce Server, refer to FlowForce Expressions and Job Configuration Examples sections. |
Note: If you need to create multiple similar jobs, be aware that FlowForce jobs can be easily duplicated, helping you save time, see Duplicate Jobs.
Running the job
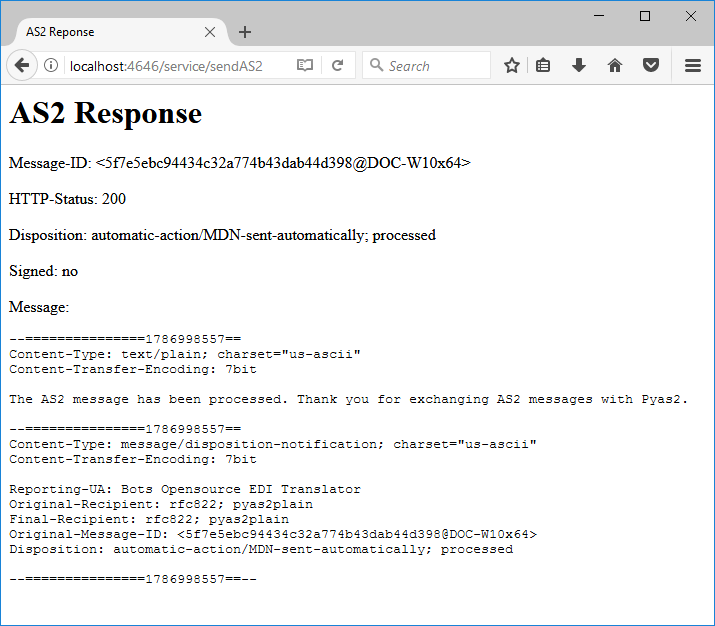
Since this job was exposed as a Web service, you can run it by typing the Web service URL in the browser's address bar. The Web service URL is composed of the URL at which FlowForce Server service runs (for example, http://localhost:4646/), plus the service/sendAS2 part, where sendAS2 is the name of the Web service we gave previously. The final URL is therefore: http://localhost:4646/service/sendAS2. If you configured the FlowForce Server service to run on a different host and port, make sure to adjust this URL accordingly, see Defining the Network Settings. The image below illustrates the result of a successful execution as it could appear in the browser:
The job execution results can also be viewed through the FlowForce Server log, see Viewing the Job Log.
Processing the AS2 job result
You have seen above how to create a simple job that consists of only one execution step which calls the  /system/as2/send function. However, in a real life scenario, it is likely that your FlowForce Server job will need more steps.
Importantly, the return type of the /system/as2/send function is an AS2 MDN object. In order to extract useful information from this object, it must be further processed by means of FlowForce expression functions. For example, to get the message ID of the original AS2 message, you could add an execution step like the one illustrated below:
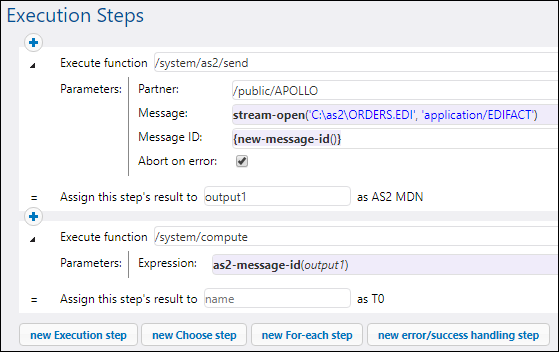
In the job above, the second step gets the original AS2 message ID as a string, by taking the result of the first step (declared as output1) as parameter. To achieve this, it calls the /system/compute function which is the usual way in FlowForce to compute an expression. The expression applies the as2-message-id expression function to the result of the first execution step (output1).
Note that FlowForce Server includes other expression functions that could be handy in various circumstances. For example, in order to determine if the AS2 call was successful, you could call the as2-success function, in a similar way as shown above. Likewise, to obtain the HTTP status of the AS2 call, you could call the as2-http-status expression function. All available expression functions are listed in the Expression Functions chapter. The ones applicable to AS2 and MIME are listed in the AS2 Expression Functions and MIME Expression Functions chapters, respectively.
An important rule when working with FlowForce expressions is to pay special attention to the return data type of each function. The data type must be compatible across all calling functions and steps; otherwise, the job cannot be saved because of validation errors. It is therefore strongly recommended that you have a basic understanding of FlowForce expressions before using them, see FlowForce Expressions.