Cache Job Results
This example shows you how to cache the result of a job (referred to as cache producer) and use it in another job (referred to as cache consumer). Both jobs will be exposed as Web services with the following behavior:
•When the cache producer Web service is invoked, it lists recursively the contents of the directory, creates or updates the cache, and then outputs the result in the browser;
•When the cache consumer Web service is invoked, it reads the cache created by the cache producer service and outputs the result in the browser.
Our goal is to compare the execution time of both jobs, and see that the second job executes significantly faster than the first job, since it consumes cached data.
Prerequisites
•Required licenses: FlowForce Server
•The FlowForce Web Server and FlowForce Server services must be listening at the configured network address and port
•You have a FlowForce Server user account with permissions to one of the containers (by default, the /public container is accessible to any authenticated user).
Note: Although this example uses Windows paths and commands, you can still test it on other operating systems, if you change the paths and the commands accordingly.
Configuring the job
1.Click Configuration, and then navigate to the /public/Examples container. The public/Examples container should already exist if you followed the previous examples; otherwise, create it using the Create | Create Container command.
2.Click Create, and then select Create Job.
3.In the Job Name box, enter CachedResult.
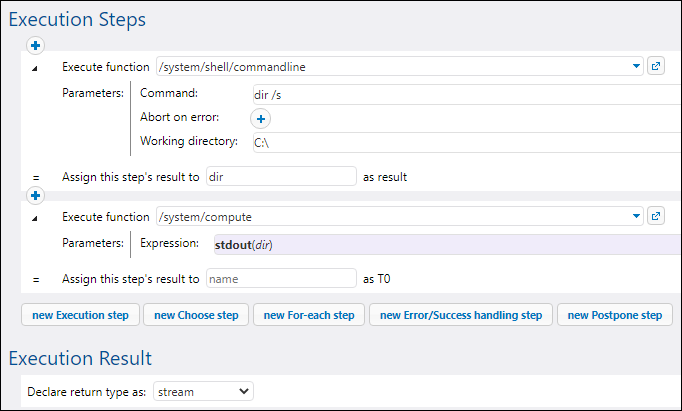
4.Under "Execution Steps", add a new execution step with the following settings:
Execute function | Browse for the /system/shell/commandline function. |
Command | Enter the following shell command:
dir /s
On Windows, this command lists recursively the contents of the working directory (see the next setting). |
Working directory | Set the value to a directory on the machine where FlowForce Server runs, for example:
C:\
If you would like to use a different directory, choose one that is big enough so that it takes at least 20-30 seconds to list the directory contents recursively. |
Assign this step's result to | We will need to refer to the value returned by the execution step in a subsequent step, so it must have a name. For the scope of this example, enter dir as value of this field. |
5.Under Execution Steps, add a new execution step with the following settings:
Execute function | Browse for the /system/compute function. |
Expression | Enter the following FlowForce Server expression:
stdout(dir)
The stdout function converts the raw result returned by the previous execution step into a stream of data (see Step Result Functions). |
6.Under "Execution Result", set the return type to stream. As you might have noticed, we set it to the same data type as returned by the last execution step of the job. The job should now looks as follows:
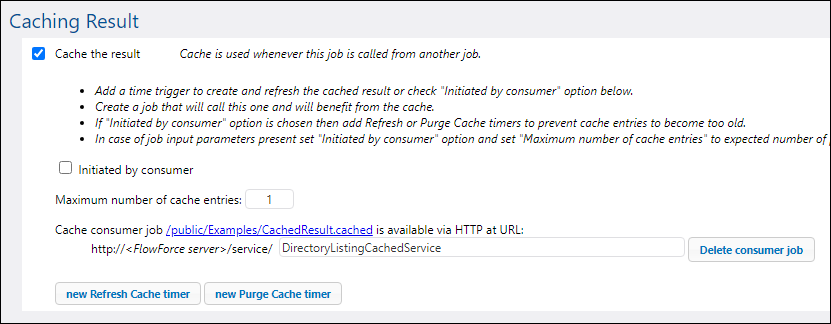
7.Under "Caching Result", select the Cache the result check box.
8.Select the Auto-create a new cache consumer job check box, and then enter DirectoryListingCachedService as the name of the Web service.
9.Under "Service", click to select the Make this job available via HTTP check box, and enter DirectoryListingService as name of the service.

10.Under "Credentials", select an existing credential record or specify a local credential, see Credentials.
11.Click Save.
Running the job
At this stage, you have completed the configuration of both the cache producer and the cache consumer jobs. To test the performance of the non-cached service (DirectoryListingService) in the browser, run the job using any of the following approaches:
•Go to the Home page and click Show all active triggers and services. Next, click the job's URL displayed in the Info column.
•Enter http://127.0.0.1:4646/service/DirectoryListingService in the browser's address bar. Note that this URL works only if the FlowForce Server service listens at the default host address and port name. If you have defined other host and port settings on the Setup page, change the address accordingly.
•If you set the optional Host name field of FlowForce Server on the Setup page, you can execute the web service call directly from the job configuration page, by clicking the  button adjacent to the Make this job available via HTTP check box. The button is not displayed otherwise.
If you are asked for credentials when you access the Web service, supply the same credentials you use to log on to FlowForce Server.
Important Supplying your FlowForce Server user credentials for HTTP authentication is only for testing purposes. For production, it is recommended to create a new FlowForce user, grant the Service - Use permission to this user on the container where the job is, and then access the Web service with the corresponding user account. To disable HTTP authentication and make the Web service public, grant the Service - Use permission to the user Anonymous. For details, see How Permissions Work. |
Note that, because the job was configured to list the contents of the C:\ directory recursively, it might take up to several minutes to complete. Refer to the job log to see how long it took for the job to complete, see Viewing the Job Log.
To test the performance of the cache consumer service (DirectoryListingCachedService), enter http://127.0.0.1:4646/service/DirectoryListingCachedService (or the equivalent URL if your host name and port are configured differently) in the browser's address bar. Since this service consumes the cache rather than executing the directory listing, it is expected to take significantly less time to complete.