Create a Job from a MapForce Mapping
This example shows you how to create a FlowForce Server job from a MapForce mapping. First, you will deploy a demo mapping file from MapForce to FlowForce Server. Once the mapping is deployed to FlowForce Server, you will create a server job from it. The job will be configured to run daily at a specific time.
Prerequisites
•Required licenses: MapForce Enterprise or Professional edition, MapForce Server or MapForce Server Advanced Edition, FlowForce Server
•The FlowForce Web Server and FlowForce Server services must be listening at the configured network address and port
•You have a FlowForce Server user account with permissions to one of the containers (by default, the /public container used in this example is accessible to any authenticated user).
•The mapping job created in this example generates an XML file every time when it runs. Therefore, on the operating system where FlowForce Server runs, you must have rights to create files in some directory (this example uses the C:\FlowForceExamples\Mapping directory).
Demo files used
The mapping file used in this example is called CompletePO.mfd, and it is available at the following path on the computer where MapForce is installed: <Documents>\Altova\MapForce2026\MapForceExamples. Note that the "MapForceExamples" directory is created when you run MapForce for the first time (but not earlier).

CompletePO.mfd
The demo mapping illustrated above takes three XML files as input and produces a single XML file as output. In this example, the input XML files will be included automatically in the package deployed to FlowForce Server. Other mappings may require extra preparation steps before you can deploy them, as described in Deploying Mappings to FlowForce Server.
Creating the job
Deploying a mapping means that MapForce organizes the resources used by the mapping into a single package and sends it through HTTP (or HTTPS, if configured) to FlowForce Server.
To deploy the mapping to FlowForce Server:
1.Open the CompletePO.mfd file in MapForce.
2.If you haven't done so already, set the transformation language of the mapping to "Built-in".
3.On the File menu, click Deploy to FlowForce Server.
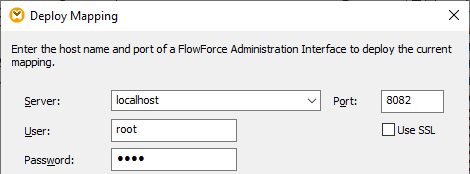
4.In the Server and Port text boxes, enter the server name and port of the Web administration interface (for example, 127.0.0.1 and 8082, if the FlowForce Web Server service is listening on the same machine at the default port). Change these values if you have configured a different address and port, see Defining the Network Settings.
5.In the User and Password text boxes, enter your FlowForce Server user name and password.
6.Select either Directly from the Login drop-down list, or leave the <Default> option as is.
If Directory Service integration is enabled, enter your domain user name and password, and then select your domain name from the Login drop-down list. For more information, see Changing the Directory Service Settings |
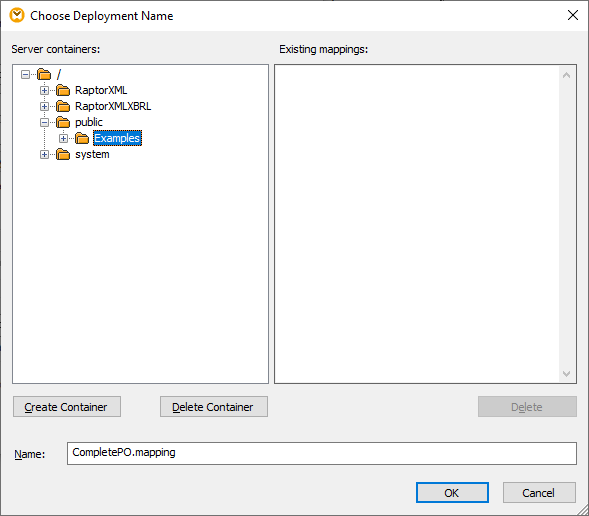
7.For consistency with other examples, we will be deploying the mapping to the /public/Examples container. Click Browse and change the container path to /public/Examples. The /public/Examples container must already exist if you followed the previous examples; otherwise, you can create it by clicking Create Container in the dialog box below:
8.Select the Open web browser to create new job check box.
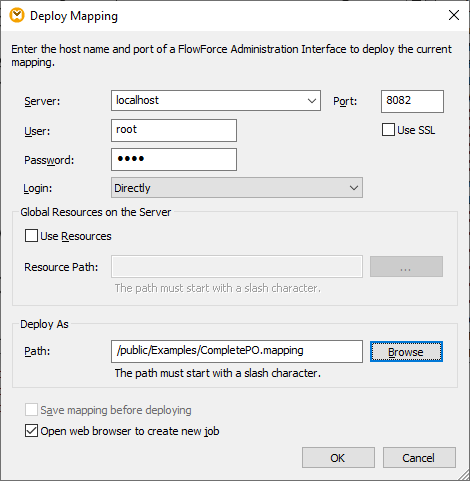
9.Click OK to deploy the mapping.
When deployment finishes, the FlowForce Server Administration Interface opens in your web browser, and a partially filled in job page is displayed. The mapping function itself is saved at the container path specified earlier. This concludes the deployment part.
Creating the job
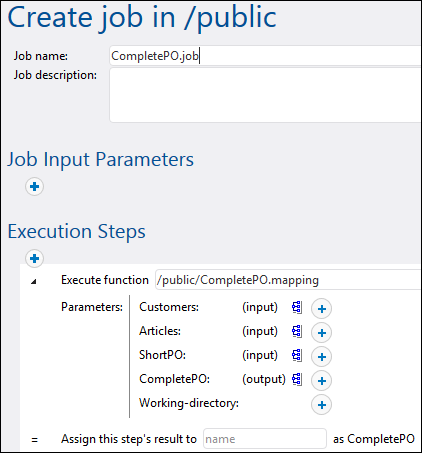
After you have deployed the mapping file to FlowForce Server as described above, the browser displays a partially filled job page. The first execution step is created automatically with some pre-filled parameters.
You can also create the job by opening the function's page (/public/Examples/CompletePO.mapping), and then clicking Create job.
To configure the job:
1.Change the default job name from "CompletePO.job" to something more descriptive, for example, "GeneratePurchaseOrder". This is an optional step, but it may be necessary if the name is already used by some other job in the same container.
2.Fill in the first execution step created by default as follows:
Execute function | This field points to the mapping function deployed earlier; leave it as is. |
Parameters | The Customers, Articles, and ShortPO fields contain the respective XML files pre-packaged into the job.
The CompletePO field specifies the path of the output file. By default, it is CompletePO.xml. The path is relative to the working directory, as further described below.
In this example, you can leave all the input and output options as is. For information about changing input and output instances, see Running Mappings and Transformations as Jobs.
In the Working-directory box, enter the path to the job's working directory. This example uses C:\FlowForceExamples\Mapping as working directory.
A working directory is a parameter required by execution steps if the job needs a location to unpack any input files or save output files. FlowForce Server also uses the working directory to resolve any relative paths that occur during step execution. When asked to provide a working directory, you should supply a valid path on the operating system where FlowForce Server runs. If you do not supply a working directory when creating the step, FlowForce Server uses a temporary directory. |
Assign this step's result to | This field gives a name to the mapping result. In this example, you can leave it empty. |
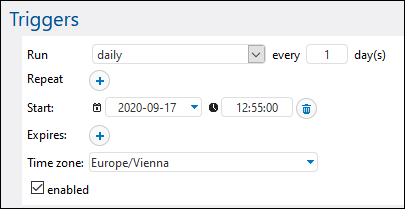
3.Under "Triggers", click new Timer.
4.Next to "Run", set the timer to run Daily every 1 days. Next to "Start", select a date and time when the job must start, for example:
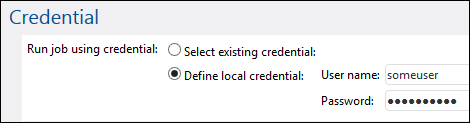
5.Under "Credentials", select an existing credential record or specify a local credential. For details, see Credentials.
6.Click Save.
Running the job
At the time and date specified in the trigger, FlowForce Server executes the mapping job. If the job executes successfully, the file generated as a result (CompletePO.xml) becomes available in the C:\FlowForceExamples\Mapping directory. To see whether the job executed successfully, refer to the job log.