Error/Success-Handling Steps
When a step of a job fails, the job is considered failed as well. To perform some clean-up actions before the job exits (such as logging or sending email notifications), you can create error/success handling steps. These steps allow you to protect the execution of one or more steps (i.e., protected steps). Error/success handlers and protected steps are part of the so-called protected block (see Structure of a Protected Block below).
Depending on your business needs, you can create Execution steps, Choose, For-Each, and Postpone blocks inside a protected block. You can also nest other protected blocks inside your protected block.
Add an error/success handler
To add an error/success handler, create a job or open an existing job and click new Error/Success handling step. Then select the relevant error/success handling step.
Structure of a protected block
The example illustrates the structure of a sample protected block. The protected block below consists of the protected steps (Steps A and B) and the error/success handlers (Steps C, D, E and F). Whenever the protected steps have been executed (successfully or with an error), the handler blocks will be executed next.
Protected block
Step A
Step B
On error
Step C
On retry
Step D
On success
Step E
Always
Step F
Protected block
Types of handlers
Each handler block has a special condition, and if this condition is true, the steps of this handler will be executed. Error/success handlers are listed below:
•The On-Error block is executed if any of the protected steps has failed.
•The On-Success block runs if all protected steps have been successful.
•The On-Retry handler runs if any of the protected steps has failed. The protected steps run as many times as specified in the retry count option (see Retry Option below). By default, this option is set to 0.
•The Always handler runs regardless of whether the protected steps have been successful or not.
Order of handler execution
Handler blocks are always executed in the specified order. For example, if there is an Always block followed by an On-Error block, which is in turn followed by another Always block, the two Always blocks will be executed in the order specified whenever the protected steps have finished executing. The On-Error block will run after the first Always block only if the protected steps have encountered an error.
In the sample protected block above, if Step A or B fails, the protected steps are left, and Steps C and F are guaranteed to be executed (because they are On-Error and Always, respectively). Step D will be executed only when retries are left (see subsection below).
Retry option
There are cases, in which you may want to run a step again if its execution has failed. For this purpose, FlowForce Server provides the Retry option. By default, this option is set to 0, which means that the protected block will be executed once only and no retries will be attempted.
On-Retry blocks are executed only if the protected steps have retries left. The actual retry will start only after all the handler blocks have been successfully executed and only if the protected steps have been left because of an error. When no retries are left, the error is re-raised outside of this protected block.
To add an execution step that will be retried a certain number of times, follow the instructions below:
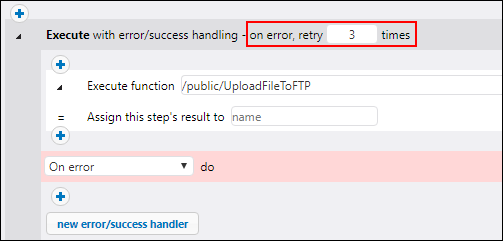
1.Specify the number of retries you need (e.g., 3 times) in the text field at the top of the Error/Success-Handling step (see screenshot below).
2.Click the  button under the Execute with error/success handling section and add a step (or steps) that will be retried if an error occurs.
In the example below, the job, which uploads a file to an FTP server, will be retried 3 times on error. The number of retries of any given job instance is reported in the log. In addition, if you need to get and process the number of retries at runtime, call the retry-count expression function.
Set timeout
You can set a timeout on an Error/Success-Handling step, by clicking the set timeout button at the top of the Error/Success block. When you click this button, two options will pop up: timeout and force stop after additional N seconds. The first timeout aborts a job step if it is not successful after the specified time (in seconds). The job step might comply with the request or ignore it. When the first timeout has expired, the second timeout will take place and abort the job step forcefully. Timeouts render the aborted step failed. If you have defined On-Error, On-Retry, or Always handlers, these will be processed next.
Resume steps
Resume steps make it possible to continue execution even after an error has been encountered. Resume steps are relevant to error handling and can occur only in protected-block handler sections. Resume steps can also be used inside conditionals that are used inside protected-block handler sections.
How Resume steps work
The main idea of the Resume step is to replace the result of the failed protected step with a newly constructed result object. This prevents the job from being aborted in case an error is encountered inside the Error/Success-Handling step. When a Resume step has been executed, the following actions take place:
1.The result of the corresponding protected block is set to the computed expression.
2.After that, the Resume step leaves the protected block it is a handler of.
3.Execution resumes after the protected block, which could be the next step after it or job end, as if the protected block were successful.
Once the Resume step has finished executing, no further handler blocks of the current protected block or even steps within the current handler block will be executed. If you need to define some cleanup operations, you can nest another protected block inside the first one and add, for example, Always or On-Success handlers.
Add a Resume step
To add a Resume step, follow the steps below:
1.Create a Success/Error-Handling step.
2.Click the Plus icon at the desired location.
3.Select Resume Step from the list.
4.The Resume step will appear and contain a text field in which you will need to supply an expression function. The result of the current protected block will be set to the expression computed in this field.
The expression passed to the Resume step must be compatible with the protected block return type, which is the type of the last step executed inside the protected sequence. The list below provides the expression functions you can use:
Where to place a Resume step
There are different locations where you can place Resume steps in protected blocks. Some of the possible examples are given below:
•Example 1: You can place a Resume step inside a handler block.
•Example 2: You can also split the protected block into two nested ones, one which contains a Resume step and the other which executes any Always handlers that are left.
Example
In practice, it is not necessary to define all handler types for every job. The most common scenario is to define only On-Error and Always handlers (screenshot below).
In the sample job below, the first step runs a script from the C:\scripts directory by calling the \system\shell\commandline function. The execution of this step is protected by two handlers: On-Error and Always. Only if the execution of the first step fails will the On-Error handler send an email with the ID of the failed job instance in the subject line. The Always handler will be executed regardless of whether the first step has been successful or not. The Always handler will log a message by running a script from the C:\scripts directory.
For more examples, see Adding Error Handling to a Job.
