Run XSLT with RaptorXML
This example shows you how to run an XSLT transformation with RaptorXML Server (or RaptorXML+XBRL Server) running under FlowForce Server management. The job will call the xslt function of RaptorXML Server. When you configure the job from the FlowForce Server configuration page, there are two ways to supply the parameters to the xslt function:
1.By typing key-value pairs (parameter name and value) in text boxes.
2.By entering a FlowForce Server expression.
Both ways are presented in more detail below.
Prerequisites
•Required licenses: FlowForce Server, RaptorXML (or RaptorXML+XBRL) Server
•The FlowForce Web Server and FlowForce Server services must be listening at the configured network address and port
•Your FlowForce Server user account has permissions to one of the containers (by default, the /public container used in this example is accessible to any authenticated user).
•The job created in this example runs an XSLT stylesheet that processes an input XML file. Both files must exist in some directory on the operation system where FlowForce Server runs, and you must have rights to read and write files in this directory. This example uses the C:\FlowForceExamples\RunXslt directory.
Demo files
The job illustrated below will run an XSLT stylesheet called transformation.xslt which takes as input a file called books.xml, and two required parameters, "year" and "genre". The exact content of the files is shown in the code listings below. To use these files in the job, save both code listings with the indicated file names to the C:\FlowForceExamples\RunXslt directory.
The XSLT stylesheet looks as follows:
<?xml version="1.0" encoding="UTF-8"?> |
transformation.xslt
The input XML file looks as follows:
<?xml version="1.0" encoding="UTF-8"?> |
books.xml
Creating the job
You can create a FlowForce Server jobs to run such an XSLT transformation as follows:
1.Log in to the FlowForce Server Web administration interface and open the /public/Examples container. The public/Examples container should already exist if you followed the previous examples; otherwise, create it using the Create | Create Container command.
2.Click Create Job. Next, enter a name and, optionally, a description for the job you are creating. This example uses "RunXslt" as job name.
3.Click new Execution step.
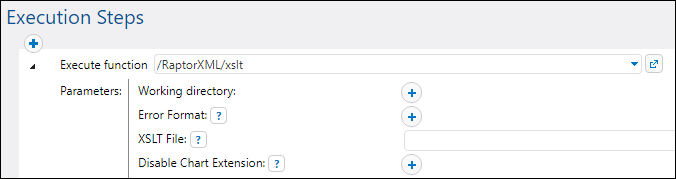
4.Next to "Execute function", browse for the /RaptorXML/xslt function.
Note: The xslt function exists directly under the "RaptorXML" container and also in any container that corresponds to a specific RaptorXML release, for example, "2026". For information about differences between the two, see Generic versus release-specific RaptorXML functions.
5.Set the Working directory parameter to C:\FlowForceExamples\RunXslt.
6.Set the XSLT File parameter to transformation.xslt. This file must exist in the working directory.
7.Set the XSLT Input parameter to books.xml. This file must also exist in the working directory.
8.Set the Parameters parameter as follows:
a. Click the  button next to Parameters. This expands a sub-section within the page, where you can add each parameter name and value individually.

b. Click the button for each new parameter that you need to add. To run the XSLT in this example, you will need to enter the parameters as follows:

The XSLT parameters are supplied to the job as key-value pairs. Notice the parameter name and value are entered in separate boxes. Also, the parameter value is enclosed within quotes. |
9.Under "Service", select the Make this job available via HTTP check box, and enter RunXsltService as name of the service.
10.Under "Credentials", select an existing credential record or specify a local credential. For details, see Credentials.
11.Click Save.
This concludes the job configuration part.
Supplying XSLT parameters as expression
In the job configuration above, you have supplied the parameter to the xslt function using text boxes. Note that there is a second way to do this, by entering a FlowForce Server expression in the Parameters text box, for example:
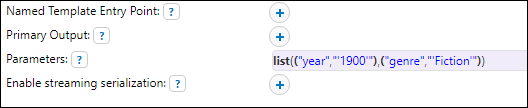
To use this second approach, click  next to Parameters, and then click <Expression>. Make sure that you type the expression very carefully in order to avoid parsing errors. The expression calls the list expression function and builds a list of two key-value pairs. In each key-value pair, the key is the parameter name and the value is the parameter value. Importantly, the parameter values are again enclosed within single quotes.
To switch back to the text box layout, click next to Parameters, and then click <Value>.
Running the job
To run the job, do one of the following:
•Go to the Home page and click Show all active triggers and services. Next, click the job's URL displayed in the Info column.
•Enter http://127.0.0.1:4646/service/RunXsltService in the browser's address bar. Note that this URL works only if the FlowForce Server service listens at the default host address and port name. If you have defined other host and port settings on the Setup page, change the address accordingly.
•If you set the optional Host name field of FlowForce Server on the Setup page, you can execute the web service call directly from the job configuration page, by clicking the  button adjacent to the Make this job available via HTTP check box. The button is not displayed otherwise.
If you are asked for credentials when you access the Web service, supply the same credentials you use to log on to FlowForce Server.
Important Supplying your FlowForce Server user credentials for HTTP authentication is only for testing purposes. For production, it is recommended to create a new FlowForce user, grant the Service - Use permission to this user on the container where the job is, and then access the Web service with the corresponding user account. To disable HTTP authentication and make the Web service public, grant the Service - Use permission to the user Anonymous. For details, see How Permissions Work. |
If the job executes successfully, the browser displays the output of the job, for example:

If the job fails, the browser displays a "Service execution failed" message. In this case, check the FlowForce Server job log to identify the error.