Copy Files
This example shows you how to copy multiple files on the local file system with the help of a FlowForce Server job.
Let's assume that you would like to copy all the files from directory C:\FlowForceExamples\CopyFiles\Source to a new directory C:\FlowForceExamples\CopyFiles\Target. (On a UNIX system, please adjust the paths accordingly.) To achieve the goal, we will use a "for-each" step that iterates through all the files in a directory, and then invoke the /system/filesystem/copy function for each item in the loop.
Prerequisites
•Required licenses: FlowForce Server
•The FlowForce Web Server and FlowForce Server services must be listening at the configured network address and port
•You have a FlowForce Server user account with permissions to one of the containers (by default, the /public container used in this example is accessible to any authenticated user).
•This job copies files from directory C:\FlowForceExamples\CopyFiles\Source to directory C:\FlowForceExamples\CopyFiles\Target. Make sure to create these directories on the local file system before creating the job. Also, make sure that the source directory contains a few files to test the job.
Creating the job
Log on to FlowForce Server and navigate to a container where you have permission to create new jobs. For consistency with other examples, this tutorial uses the /public/Examples container—if you don't have this container yet, create it using the Create | Create Container command.
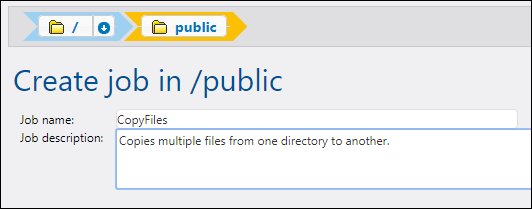
In the /public/Examples container, create a new job. Enter a job name (for example, "CopyFiles"), and, optionally, a job description.
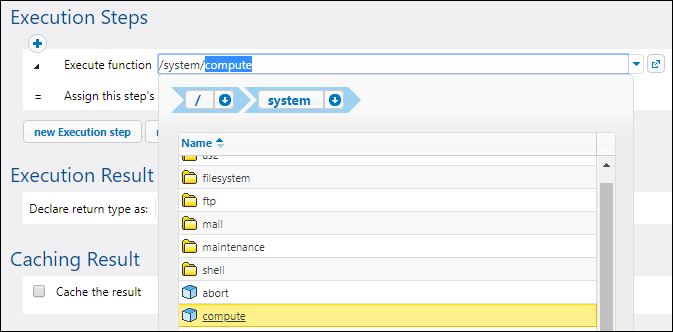
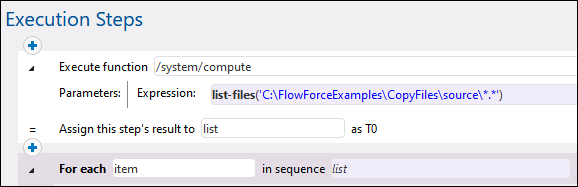
In order to iterate over items in a list, FlowForce Server provides a "for-each" execution step. Such a step iterates over a sequence (list) of items up to and including the last item in the sequence. In this example, our sequence of items will be the list of files in the source directory. To create the required list, click New Execution Step and type /system/compute next to "Execute function". You can also select this path from the drop-down list, as illustrated below.
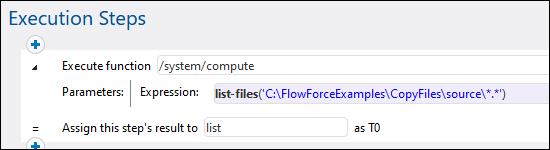
Next, enter the following expression in the Expression field:
list-files("C:\FlowForceExamples\CopyFiles\Source\*.*")
Next, enter a name for the list in the Assign this step's result to field (in this case, the name is list). This makes it possible to easily refer to the newly created list of files in a subsequent step. Your first execution step should now look as follows:
The expression above invokes the list-files expression function. The function takes a path as an argument (in this case, C:\Source\*.*) and returns the list of files (or directories) at the given path. Notice that the path contains the wildcard *.* to select all the files in the directory. If necessary, you can adjust the wildcard to select only specific file extensions, for example *.txt. For more information about expressions in FlowForce, see FlowForce Expressions.
You can now proceed to creating the actual "for-each" iteration step. Click New For-Each step and type list in the "in sequence" box. (This refers to the list created in the previous execution step.)
Tip: You could also copy the expression to the "in sequence" box of the "for-each" step and thus get rid of the first execution step altogether. |
Next, click the  button and add a new execution step inside the "for-each" step. This step will invoke the /system/filesystem/copy function for each item in the loop, as illustrated below.
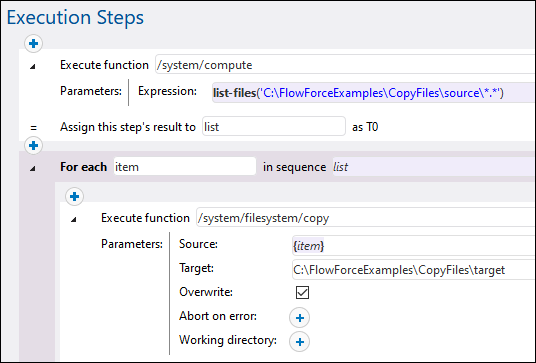
As shown above, the copy function is called with the following arguments:
•The Source is the current item (file) in the loop. You can either type {item} in the Source box or click the  button and select item.
•The Target is the target path. In this example, the path is entered as is; however, you could also supply it as an argument to the job.
•The Overwrite option is enabled, meaning that if a file with the same name already exists in the source directory, it will be overwritten. To prevent this from happening, click the  button.
For the sake of simplicity, we will not set the other two arguments in this example. For further information, see the description of the /system/filesystem/copy function.
The job created so far now includes all the required processing steps, but it has no trigger yet. To trigger the job at recurring time intervals, you could use a timer, see Timers. Or you can monitor the source directory for changes and trigger the job by means of a file system trigger, see File System Triggers. Finally, you can trigger the job on demand, as a Web service call.
In this example, we will trigger the job on demand, by clicking a URL in the browser (in fact, this invokes the job as a Web service). To turn the job into a Web service, select the Make this job available via HTTP... check box and enter the name of the Web service.

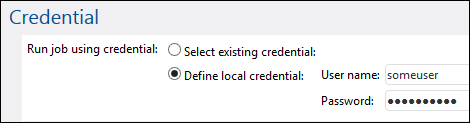
Finally, the job needs your credentials to run. Therefore, enter your operating system username and password (not your FlowForce Server username and password) in the "Credential" section, as shown below. Alternatively, if you created standalone credentials previously, as described in Defining Credentials, you can select them using the Select existing credential option.
Running the job
To test the job, do one of the following:
•Go to the Home page and click Show all active triggers and services. Next, click the job's URL displayed in the Info column.
•Enter http://127.0.0.1:4646/service/CopyFilesService in the browser's address bar. Note that this URL works only if the FlowForce Server service listens at the default host address and port name. If you have defined other host and port settings on the Setup page, change the address accordingly.
•If you set the optional Host name field of FlowForce Server on the Setup page, you can execute the web service call directly from the job configuration page, by clicking the  button adjacent to the Make this job available via HTTP check box. The button is not displayed otherwise.
If you are asked for credentials when you access the Web service, supply the same credentials you use to log on to FlowForce Server.
Important Supplying your FlowForce Server user credentials for HTTP authentication is only for testing purposes. For production, it is recommended to create a new FlowForce user, grant the Service - Use permission to this user on the container where the job is, and then access the Web service with the corresponding user account. To disable HTTP authentication and make the Web service public, grant the Service - Use permission to the user Anonymous. For details, see How Permissions Work. |
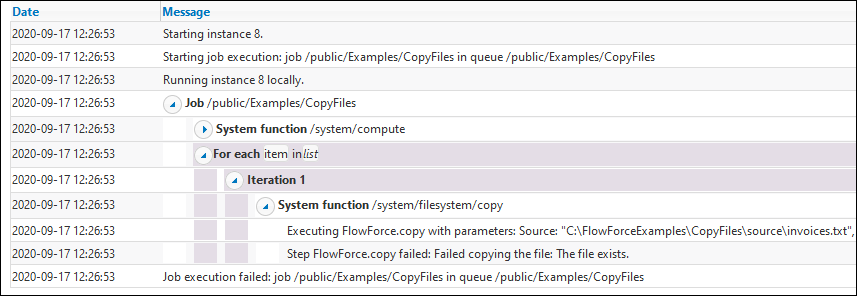
Upon successful execution, the job will copy all the files from the source to the target directory. Otherwise, a "Service execution failed" error is displayed in the browser. If you see this error, check the log of the job for further information, see Viewing the Job Log. Possible causes may include incorrect credentials, incorrect file paths, insufficient permissions on the file system, and others. For example, the job fails if the Overwrite check box is not selected and the target directory already contains a file with the same name, as illustrated below: