Example: OAuth 2.0 Authorization
This example shows you how to call a REST-style Web service that requires OAuth 2.0 Authorization. The client application is a FlowForce Server job that will retrieve calendar events using the Google Calendar API (https://developers.google.com/calendar/). To keep things simple, the job will retrieve the calendar information "as is" and will just output the raw JSON result without any other processing.
Prerequisites:
•MapForce Enterprise Edition
•MapForce Server Advanced Edition
•FlowForce Server Advanced Edition
•To follow this example step-by-step, you must have a Google account. If you would like to call another Web service, obtain OAuth 2.0 credentials from your Web service provider and use them in the instructions below instead.
Obtain the OAuth 2.0 credentials
If you already have the OAuth 2.0 credentials required to access the Web service, you can skip this step. Otherwise, the exact instructions to obtain them depend on the provider of the Web service that your mapping will call. To call the Google Calendar API like in this example, follow these steps:
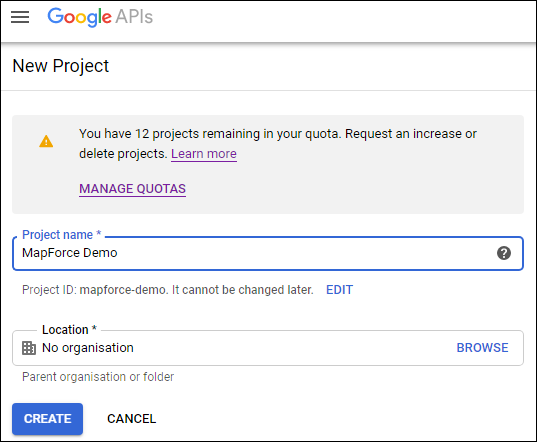
1.Login to the Google API Console (https://console.developers.google.com/).
2.Create a new project.
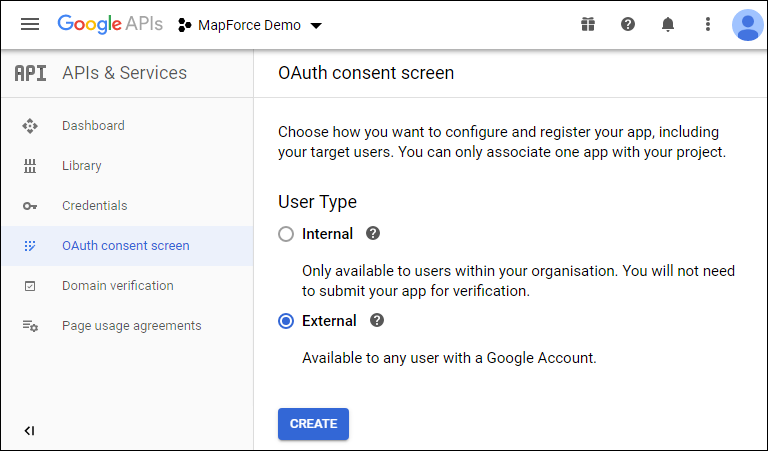
3.Click OAuth consent screen.
4.Select External as user type, unless you have a G Suite account which would enable you to grant API access only to users in your organization.
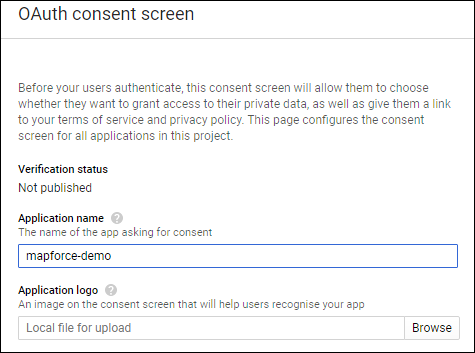
5.Enter "mapforce-demo" as application name and save the settings.
6.Click Create credentials and then select OAuth Client ID.
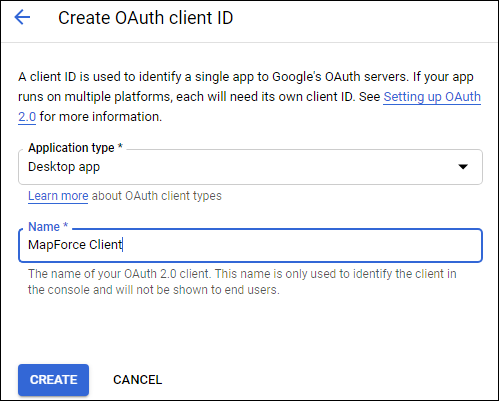
7.Enter Desktop app as application type and "MapForce Client" as the client name.
8.Click Create. The client ID is created and becomes available in the Credentials page.
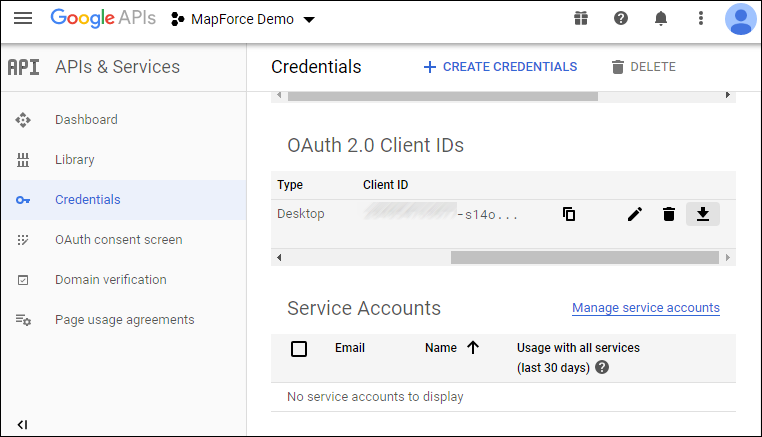
9.Click ![]() to download the OAuth 2.0 authorization details as a JSON file.
to download the OAuth 2.0 authorization details as a JSON file.
You have now obtained the OAuth 2.0 authorization details from Google Console API, namely:
1.Authorization Endpoint
2.Token Endpoint
3.Client ID
4.Client Secret
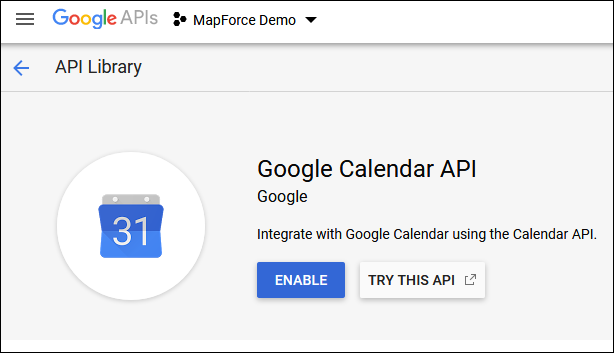
Enable the Google Calendar API
To accept calls from clients, the Google Calendar API used in this example must be enabled. In the Google API Console, click Library, search for the Google Calendar API and enable it:
In this example, we are going to call the list method of the Events entity. You can find detailed reference to this API method at https://developers.google.com/calendar/v3/reference/events/list. For now, note the following important points:
1.As pointed out in documentation, the method must be called by sending a GET request to https://www.googleapis.com/calendar/v3/calendars/calendarId/events, where calendarId is the identifier of a Google Calendar. The calendarId request parameter will be configured from MapForce in a subsequent step.
2.Calling the API method requires at least one of the following scopes:
•https://www.googleapis.com/auth/calendar.readonly
•https://www.googleapis.com/auth/calendar
•https://www.googleapis.com/auth/calendar.events.readonly
•https://www.googleapis.com/auth/calendar.events
During the OAuth 2 authorization process, your mapping will have to provide one of the scopes above—this will also be configured in a subsequent step. For the purpose of this example, the first "read-only" scope is sufficient.
Request an authorization token
In order to preview the mapping in MapForce, you will need to add the OAuth 2.0 authorization details to the mapping and request an authorization token, as illustrated below.
1.In MapForce, right-click an empty area on the mapping, and select Open Credentials Manager from the context menu.
2.Click ![]() Add Credential.
Add Credential.
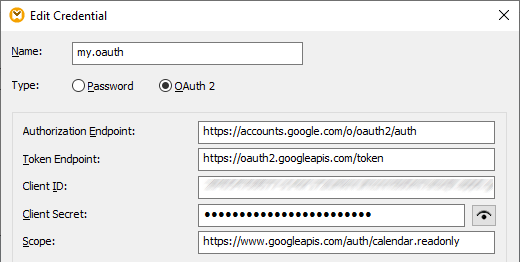
3.Enter a name ("my.oauth", in this example), and select OAuth 2 as type.
4.Fill in the Authorization Endpoint, Token Endpoint, Client ID, Client Secret text boxes with the corresponding values from the JSON file downloaded previously.
5.Enter https://www.googleapis.com/auth/calendar.readonly in the Scope text box.
6.Leave all other settings as is.
7.Click Request Access Token to obtain the token from the authorization server (in this example, Google). A browser window opens asking you to connect to your Google account.
8.Login to your Google account. Since you haven't submitted any app verification requests to Google yet, the following page appears.
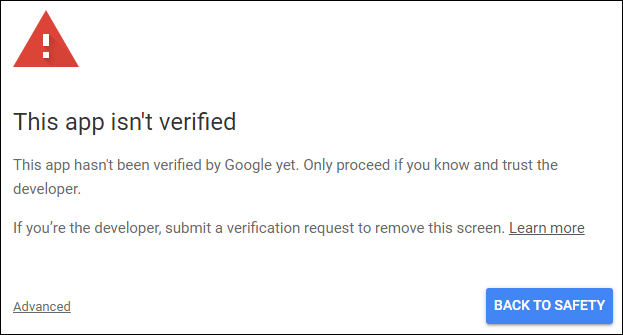
9.Click Advanced, and then click Go to mapforce-demo (unsafe).
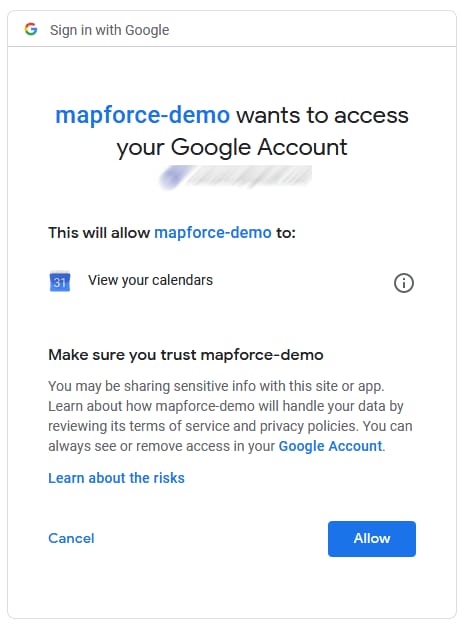
10.Click Allow. A confirmation is now displayed in the browser.

MapForce also notifies you that the OAuth 2.0 authorization code has been retrieved successfully.
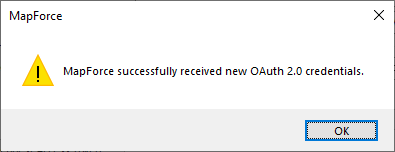
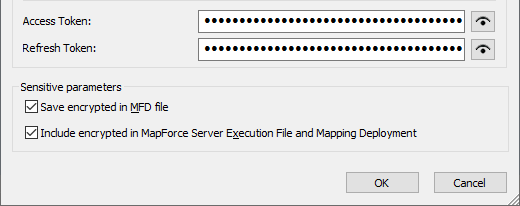
11.Click OK. Notice that the Access Token and Refresh Token fields have now been populated with data.
12.Save the mapping as GetCalendarEvents.mfd.
In this tutorial, the Save encrypted in MFD file check box is selected on the Edit Credentials dialog box. Therefore, the sensitive fields Client Secret , Authorization Token, and Refresh Token will be saved in encrypted form in the mapping design file (.mfd) when you save the mapping. |
Be aware that the authorization token will eventually expire after a period. When that happens, you will no longer be able to run the mapping (at this stage, no mapping has been designed, but this will happen in a subsequent step). Whenever you need to obtain a new authorization code manually, click Request Access Token, and follows the steps described above.
Design the Web service call
The mapping GetCalendarEvents.mfd created so far does not do anything yet. The only thing it contains are OAuth 2.0 credentials that enable access to the Google Calendar API.
Let's now design the Web service call in MapForce, as follows:
1.Open the GetCalendarEvents.mfd mapping.
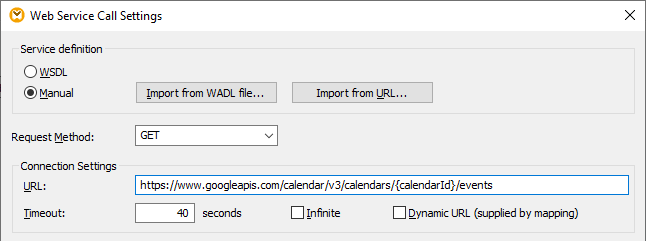
2.On the Insert menu, click Web Service Function. The "Web Service Call Settings" dialog box appears.
3.Click Manual.
4.Select GET as request method and enter the URL to the Web service mentioned in a previous step: https://www.googleapis.com/calendar/v3/calendars/calendarId/events.
5.Because calendarId is a placeholder that must be provided as a parameter, enclose it within curly braces as shown below.
6.Click the ![]() Add Parameter button and define the parameter details as follows:
Add Parameter button and define the parameter details as follows:

In the configuration above, the "Template" style makes it possible to replace the URL part enclosed within curly braces with the parameter value at runtime. "Mappable" means that you can supply the value from the mapping (for example, from a constant, or perhaps from an input parameter). Finally, the parameter has been marked as "Required" because the API call cannot take place without it.
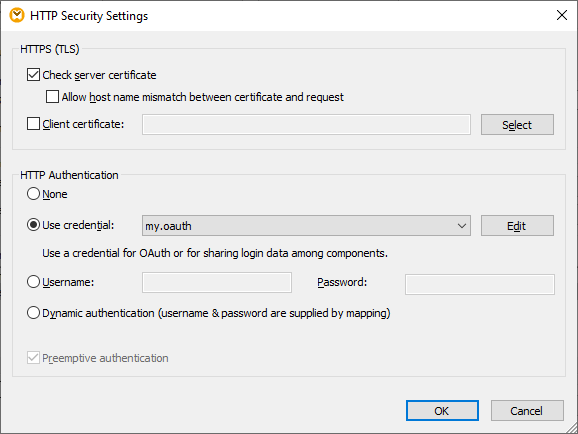
7.Click the Edit button adjacent to HTTP Security Settings.
8.On the "HTTP Security Settings" dialog box, select Use Credential and choose the "my.oauth" credential record configured previously.
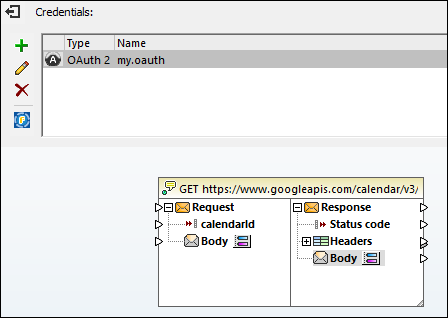
The Web service configured so far has the following appearance on the mapping:
You can now complete the design by taking the following steps:
1.On the Insert menu, click Insert Input, and configure the component as follows:

As illustrated above, the input component has the design-time value "primary". According to the API's documentation, the value "primary" instructs the API server to access the primary Google calendar of the currently logged in user. Note that this value is a design-time value and is applicable only when you preview the mapping in MapForce. When the mapping runs in a server environment, you will need to provide the desired value at runtime.
2.Drag the decode-mime-entity function from the Libraries window into the mapping area. This function converts the raw MIME body received from the server into a string.
3.On the Insert menu, click Insert Output, and add a simple output component whose role is to output the result as a plain string.
4.Make the connections between components as illustrated below.

This concludes the design part in MapForce.
Test the mapping execution
To test the mapping execution in MapForce, click the Output tab and observe the result displayed in the Messages window.
If you get an authorization error such as "Unauthorized (401)", note the following troubleshooting tips:
1.Make sure that the Google Calendar API is enabled, see Enabling the Google Calendar API.
2.Request a new authorization token, in the event that the access token obtained previously has already expired.
3.Double-check that all OAuth 2.0 details were entered correctly in MapForce.
On successful execution and OAuth 2.0 authorization from MapForce, the mapping output is expected to look similar to the one below:

If you used a Google account that does not have any calendar events like in this example, the "items" array is empty in the response. However, if you add an event to your Google Calendar and run the mapping again, the output will reflect that. As a side note, you could also retrieve events from a calendar other than the default one. For example, you could retrieve data from a public calendar like "Holidays in United States". To do this, set the value of calendarId parameter to en.usa#holiday@group.v.calendar.google.com instead of primary.
For information about other parameters that you can add to the API call, refer to the API method's documentation at https://developers.google.com/calendar/v3/reference/events/list.
Deploy the mapping to FlowForce Server
This section shows you how to run the demo OAuth 2.0 mapping with MapForce Server installed under FlowForce Server management. The following prerequisites must be in place:
1.FlowForce Server Advanced Edition must be installed and licensed.
2.MapForce Server Advanced Edition must be installed and licensed.
3.The FlowForce Web Server service must be started and listening on the configured address and port. If FlowForce Server was installed on the current computer with the default settings, the address is http://localhost:8082.
4.You must have a FlowForce Server user account and write access to one of the FlowForce Server containers. To keep things simple, this example uses the default FlowForce Server root account and deploys the mapping to the default public container; these details are otherwise configurable.
To run the mapping as a job in a server environment, you have to deploy it to the designated FlowForce Server instance. Before deploying the mapping, you can deal with OAuth 2.0 credentials in one of the following ways:
•Include the OAuth 2.0 token (in encrypted form) in the package deployed to FlowForce Server. With this approach, you will not need to supply any OAuth 2.0 credentials when the job runs because the embedded token will be used. It will be possible to run the FlowForce job until the authorization token expires or the authorization server revokes it. Note that you can always override the OAuth 2.0 authorization details with new ones (see the next bullet).
•Do not include the OAuth 2.0 token in the package deployed to FlowForce. In this case, you must supply the path to an OAuth 2.0 credential record to the job when configuring it. To achieve this, you can create a completely new OAuth 2.0 credential record in FlowForce Server or deploy an existing OAuth 2.0 credential record from MapForce to FlowForce Server.
In this tutorial, for illustrative purposes, the OAuth 2.0 credential will not be included in the deployed package. Instead, you will deploy it separately and then configure the FlowForce job to reference it. To this aim, take the following steps:
1.In MapForce, right-click an empty area on the mapping and select Open Credentials Manager.
2.Double-click the credential record ("my.oauth", in this example) and clear the Include in MapForce Server Execution File and Mapping Deployment check box.
3.Save the mapping design file (.mfd).
Let's now deploy the mapping to FlowForce Server:
1.On the File menu, click Deploy to FlowForce Server.
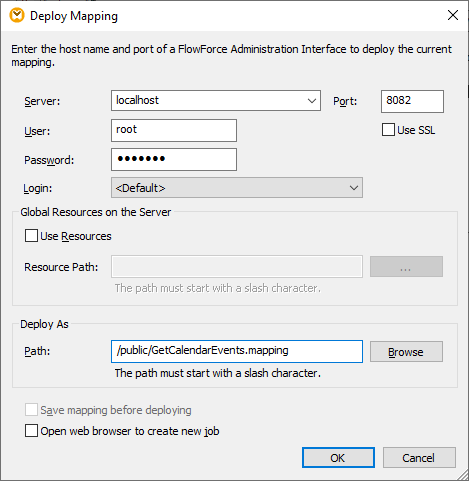
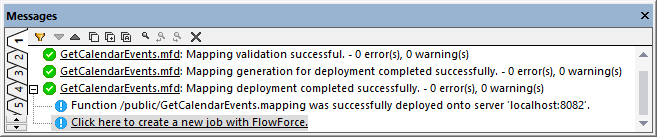
2.Fill in the applicable FlowForce Server details and click OK. On successful deployment, the Messages window displays a relevant message:
Separately, let's deploy the existing OAuth 2.0 credential as well:
1.In MapForce, right-click an empty area on the mapping and select Open Credentials Manager.
2.In Credentials Manager, right-click the "my.oauth" record and select Deploy Credential to FlowForce Server from the context menu.
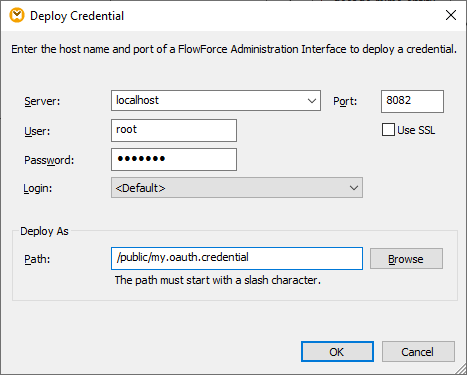
3.Fill in the applicable FlowForce Server details and click OK. On successful deployment, the Messages window displays a relevant message:

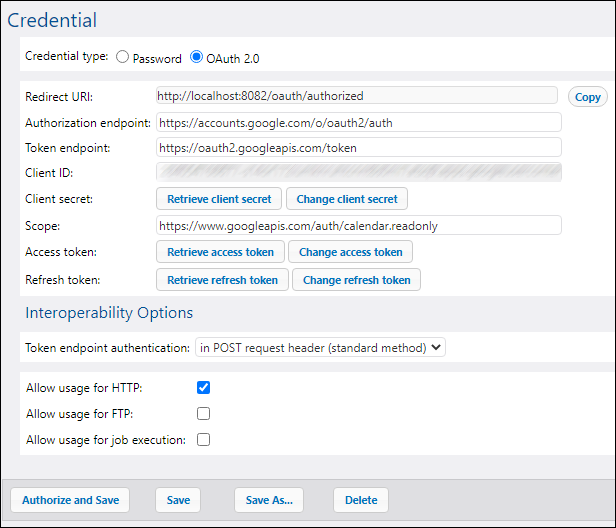
To view the deployed credential, login to FlowForce Server, and open the credential's page from the path above.
Configure the FlowForce Server job
In a previous step, you have deployed the GetCalendarEvents.mfd mapping to a FlowForce Server instance running locally. In this step, you are going to turn the deployed mapping into a FlowForce job. In this example, the job will be called as a Web service so that it can be quickly triggered on demand.
1.Login to FlowForce Server and open the GetCalendarEvents.mapping from the "Public" container. In FlowForce Server, deployed mapping become functions, hence the terminology used in the interface below. Notice that the function expects a credential as input parameter. The name of the credential is the same as the one given in MapForce, "my.oauth".
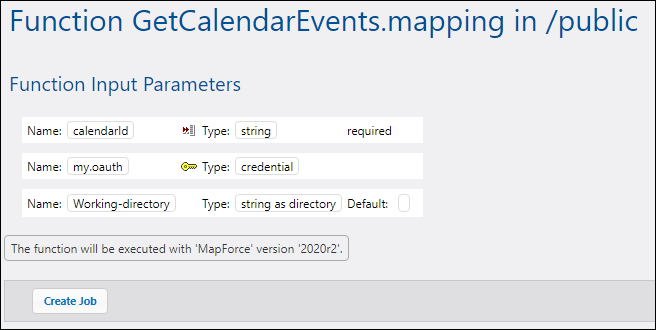
2.Click Create Job. The job configuration page opens.
3.Under "Job Input Parameters", click ![]() and create a new parameter called calendarId, with the default value of en.usa#holiday@group.v.calendar.google.com (alternatively, you can enter primary as default value, the same value used previously in preview execution).
and create a new parameter called calendarId, with the default value of en.usa#holiday@group.v.calendar.google.com (alternatively, you can enter primary as default value, the same value used previously in preview execution).

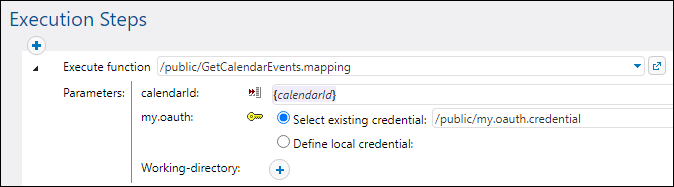
4.Under "Execution Steps", find the calendarId parameter, click "Set to" and select calendarId.
5.For the my.oauth parameter, click the  button, choose Select existing credential, and browse for the previously deployed OAuth 2.0 credential. You will find it in the public container if you did not change the default settings at deployment:
6.Under "Service", click the check box Make this job available via HTTP... and enter a service name ("GetCalendarEvents", in this example).

7.Under "Credential", select Define local credential, and enter your operating system credentials. Be aware that these are different from your FlowForce Server account credentials and are required to run the job.

8.Leave all other settings as is, and save the job.
You can now run the job as follows:
1.Under "Service", click the ![]() Start job URL in new window button.
Start job URL in new window button.
2.When prompted for credentials, enter your FlowForce Server account credentials.
On successful execution and OAuth 2.0 authorization, the browser displays the JSON response received from the Google Calendar API, for example:
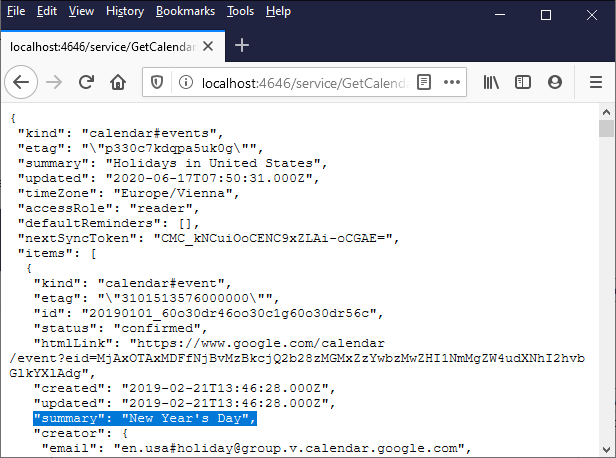
In the Web service call illustrated above, the default value of calendarId was used. Optionally, you can add an input parameter to the URL, for example: http://localhost:4646/service/GetCalendarEvents?calendarId=primary. Calling the Web service would now retrieve data from the Google Calendar API for the calendar identifier supplied as parameter.
In this example, the calendarId parameter was supplied through an HTTP GET method because you are calling the Web service directly from the browser. When you call a Web service programmatically, it is possible to use an HTTP POST method as well. For more information, see Exposing Jobs as Web Services.