Configuration via Setup Page
After you have installed FlowForce Server, you must configure it. This section explains how to configure it via the FlowForce Server Setup page. The Setup page provides a centralized way of managing and configuring server instances. Alternatively, you can configure FlowForce Server via the command line and configuration files.
Note: Internet Explorer is not supported for the FlowForce Server Setup page.
The parameters configured on the Setup page will be preserved when you install a new minor version of FlowForce Server. If you install a new major version, the parameters will be preserved only if you opted to migrate your data from the previous major version during installation.
How to access Setup page
Depending on your operating system, the instructions on how to access the Setup page vary:
Overview of Setup page
The Setup page consists of two sections: LicenseServer and Instances.
LicenseServer
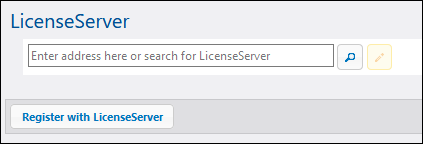
FlowForce Server must be registered with Altova LicenseServer (see Altova LicenseServer). If you do not specify a LicenseServer host during installation, you will need to do this via the Setup page, by entering the address or host name of the machine where Altova LicenseServer runs (LicenseServer field shown below). This can be the address of the local machine if LicenseServer is installed locally or a network address. After entering the relevant address/host name, click Register with LicenseServer.

The registration of FlowForce Server with LicenseServer is also possible during the installation process (Windows) or from the command line (Windows and Linux). The details are provided in the following topics:
•Register FlowForce Server (Windows)
•Register FlowForce Server (Linux)
Instances
The Instances section of the Setup page is shown in the screenshot below.
This section enables you to carry out the following actions:
•Have an overview of existing server instances
•Configure instance parameters
•Install and uninstall the services (the same tasks can be carried out via the install and uninstall commands, respectively)
•Upgrade the database to the latest version (fulfills the same function as the upgradedb command)
•Migrate the instance directory to a new location (fulfills the same function as the migratedb command)
•Integrate the Altova RaptorXML Server functionality into FlowForce Server, by using the Integrate Tools button (or via the --integratetools option of the initdb, createdb, upgradedb, and migratedb commands)
•Reduce the size of the database files (fulfills the same function as the compactdb command)
•Reset the password of the root user to the default value (fulfills the same function as the resetpassword command)
•Start and stop the services individually or both simultaneously
For information about creating, configuring, and installing a server instance, see Configuration Procedures below. Importantly, before compacting the database files, upgrading the database, integrating tools, and migrating your instance data, you must stop the FlowForce Server and FlowForce Web Server services.
Note that you can have multiple server instances, but only one server instance can be running at a given time.
Configuration procedures
The configuration of FlowForce Server on the Setup page involves the procedures described below. Some of the procedures are optional (e.g., setting up SSL encryption).
1.Creating a new server instance
2.Configuring instance parameters, which includes:
a.Setting ports to connect to FlowForce Server and FlowForce Web Server
b.Setting up SSL encryption
c.Configuring the default time zone
d.Configuring cluster-related settings (Advanced Edition)
Note that besides creating a new server instance, you can also add an existing one. If the state on the Setup page shows that your server instance is outdated, you will need to upgrade the instance-data directory. See the details in the topic Create New Server Instance.
After you have finished configuring FlowForce Server, you can log in and carry out various administration tasks.
