Grid View
The Grid View Menu contains commands for working with documents in the Grid View of File Comparison windows. These commands are not available in Text View. For details about each command, see the subsections below.
Insert, Append, Add Child
You can insert, append, and add as a child the following items:
•XML declaration
•XML node types (attributes, elements, text, CDATA, comments, processing instructions)
•DOCTYPE declarations in XML documents
•External DTD declarations (ExternalID) in XML documents
•DTD declarations (ELEMENT, ATTLIST, ENTITY, NOTATION) in DTD documents and internal DTD declarations of XML documents
The submenu items of the Insert, Append, and Add Child commands are available only in Grid View. Items that cannot be inserted for the current selection are grayed out.
Inserting items
When you insert an item, this item will be placed before the item you have selected in Grid View.
Attribute
If you insert an attribute, it may appear a few lines before the current item in Grid View. This is because attributes immediately follow their parent element in Grid View and precede all child elements of that parent element.
Element, Text, CDATA, Comment, Processing Instruction
If the current selection is an attribute, a new item will be inserted after the attribute and before the first child element of the attribute's parent element.
XML declaration
The Insert | XML command inserts a row for the XML declaration before the selected item. You must insert the child attributes of the XML declaration and the values of this attribute. Since an XML document may only contain one XML declaration at the very top of the file, this command should only be used with the topmost row selected and if an XML declaration does not exist yet. An XML declaration must look something like this:
<?xml version="1.0" encoding="UTF-8"?> |
DOCTYPE
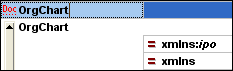
The Insert | DOCTYPE command is available in the Grid View of an XML file when a top-level node is selected. It appends a DOCTYPE declaration at the top of the XML document. You must enter the name of the DOCTYPE, and this name must be the same as the name of the document element (screenshot below). After you have entered the name of the DOCTYPE, you can enter the declarations you wish to use in the internal DTD subset. A DOCTYPE declaration may only appear between the XML declaration and the XML document element.
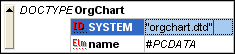
The Insert | ExternalID command is available when a child item of the DOCTYPE declaration in an XML file is selected in Grid View. This command inserts a Grid View row for an external identifier (PUBLIC or SYSTEM). You must enter the type of identifier and its value. A row for ExternalID can be added as a child when the DOCTYPE item is selected, or it can be inserted or appended when one of the child items of the DOCTYPE item is selected, for example, the ELEMENT declaration name in the example below.
The Text View corresponding to the screenshot of the Grid View shown above looks like this:

Referencing external resources
A DOCTYPE declaration in an XML file can contain a reference to an external resource containing DTD declarations. This resource is referenced either through a public or system identifier. For example:
<!DOCTYPE doc_element_name PUBLIC "publicID" "systemID"> |
A system identifier is a URI that identifies the external resource. A public identifier is location-independent and can be used to dereference the location of an external resource. For example, in your <%SPY-GEN%> installation, URIs for popular DTDs and XML Schemas are listed in a catalog file called MainCatalog.xml. A public identifier in an XML document can be used to dereference a DTD listed in MainCatalog.xml.
ELEMENT, ATTLIST, ENTITY, NOTATION
Inserting ELEMENT, ATTLIST, ENTITY and NOTATION declarations is available for DTD documents or when an item in the DOCTYPE declaration of an XML document is selected. A new declaration is inserted before the selected declaration.
Appending items
When you append an item, this item will be placed after the last sibling element of the item you have selected in Grid View.
Element, Text, CDATA, Comment, Processing Instruction
If the current selection is an attribute, a new item will be appended after the last child of the selected attribute's parent element.
XML declaration
The Append | XML command inserts a row for the XML declaration as the first item in a document. You must insert the child attributes of the XML declaration and the values of this attribute. Since an XML document may only contain one XML declaration at the very top of the file, this command should only be used with the topmost row selected and if an XML declaration does not exist yet.
DOCTYPE
The Append | DOCTYPE command is available in the Grid View of an XML file when a top-level node is selected. It appends a DOCTYPE declaration at the top of the XML document. You must enter the name of the DOCTYPE, and this name must be the same as the name of the document element. After you have entered the name of the DOCTYPE, you can enter the declarations you wish to use in the internal DTD subset. A DOCTYPE declaration may only appear between the XML declaration and the XML document element.
ExternalID
For information about the ExternalID command, see the Insert | ExternalID command above.
ELEMENT, ATTLIST, ENTITY, NOTATION
Appending ELEMENT, ATTLIST, ENTITY and NOTATION declarations is available for DTD documents or when an item in the DOCTYPE declaration of an XML document is selected. A new declaration is added to the list of declarations.
Adding child nodes
You can add an attribute, element, text, CDATA, comment, and processing instruction as a child of the selected node. The Add Child | Attribute command is available when an element node is selected.
The Add Child | XML command is available when the file is empty. It inserts a row for the XML declaration. You must insert the child attributes of the XML declaration and the values of this attribute.
The Add Child | DOCTYPE command is available in the Grid View of an empty document. It inserts a DOCTYPE declaration in an XML document. The DOCTYPE declaration can be used to declare an internal DTD subset.
ExternalID
For information about the ExternalID command, see the Insert | ExternalID command above.
ELEMENT, ATTLIST, ENTITY, NOTATION
Adding ELEMENT, ATTLIST, ENTITY and NOTATION declarations is available for DTD documents or when an item in the DOCTYPE declaration of an XML document is selected. The Add Child command adds a new declaration to the list of declarations.
Convert To
The Convert to command converts a selected item in Grid View to a different item type. This operation is available only in Grid View on individual items that do not contain any child node. Placing the cursor over the Convert to command pops up a submenu which contains the items to which the selected item can be converted.
If there is a risk that the operation might result in a loss of data (e.g., converting an attribute to a comment would result in a loss of the attribute name), a warning dialog box will appear.
Table
The Table menu command can be used only in Grid View. It pops out a sub-menu with commands that enable you to edit the selection as a table.
The Display as Table  command allows you to switch between the standard Grid View and Table View of an element in the document.
The Insert Row ![]() command is enabled in Table View when a row or cell is selected. It inserts a new row before the selected row. The new row corresponds to an occurrence of the table element. Mandatory child elements are created for the new element.
command is enabled in Table View when a row or cell is selected. It inserts a new row before the selected row. The new row corresponds to an occurrence of the table element. Mandatory child elements are created for the new element.
The Append Row ![]() command is enabled in Table View when a row or cell is selected. It appends a new row after the last row of the table. The new row corresponds to an occurrence of the table element. Mandatory child elements are created for the new element.
command is enabled in Table View when a row or cell is selected. It appends a new row after the last row of the table. The new row corresponds to an occurrence of the table element. Mandatory child elements are created for the new element.
The Ascending Sort ![]() command is enabled in Table View when a column or cell is selected. It sorts the table on the basis of the contents of the selected column, in ascending order. DiffDog tries to automatically determine what kind of data is used in the column, and sorts on alphabetic or numeric order, as required. In case of uncertainty, you will be prompted for the sort method to use.
command is enabled in Table View when a column or cell is selected. It sorts the table on the basis of the contents of the selected column, in ascending order. DiffDog tries to automatically determine what kind of data is used in the column, and sorts on alphabetic or numeric order, as required. In case of uncertainty, you will be prompted for the sort method to use.
The Descending Sort ![]() command is enabled in Table View when a column or cell is selected. It sorts the table on the basis of the contents of the selected column, in descending order. DiffDog tries to automatically determine what kind of data is used in the column, and sorts on alphabetic or numeric order, as required. In case of uncertainty, you will be prompted for the sort method to use.
command is enabled in Table View when a column or cell is selected. It sorts the table on the basis of the contents of the selected column, in descending order. DiffDog tries to automatically determine what kind of data is used in the column, and sorts on alphabetic or numeric order, as required. In case of uncertainty, you will be prompted for the sort method to use.
Move Left/Right
The Move Left ![]() command is available in Grid View only. It moves the selected node to the left by one level, thereby changing a child element into a sibling of its parent.
command is available in Grid View only. It moves the selected node to the left by one level, thereby changing a child element into a sibling of its parent.
The Move Right ![]() command is available in Grid View only. It moves the selected node to the right by one level, thereby turning it into a child element of the preceding sibling element.
command is available in Grid View only. It moves the selected node to the right by one level, thereby turning it into a child element of the preceding sibling element.
Enclose in Element
The Enclose in Element command is enabled in Grid View only. It encloses a selected text range in a new element. The new element is created inline around the selected text. If you are editing a document based on a Schema or DTD, you will automatically be presented with a list of valid choices for the name of the element in which the text is to be enclosed.
For example, in the screenshot below, the text Nanonull in the para element is highlighted.
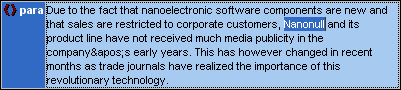
When you select the command Grid View | Enclose in Element, the text "Nanonull" is enclosed in a newly created inline element and a list appears offering a choice for the name of the element. These elements are defined in the schema as children of para.

The selection you make will be the name of the new element. Alternatively, you can enter some other name for the element.