Aligning Files in Designs
SchemaAgent provides several options for automatically aligning the file boxes in a Design window. You can select these options either via the Layout menu, by selecting and right-clicking several file boxes in a Design window, or by clicking the appropriate toolbar icon in the Alignment toolbar.
Aligning box edges
When several file boxes are selected in a Design window, you can choose from among several aligning options provided in the sub-menu that opens when you select the menu option Layout | Align Edges or when you right-click the Design pane and select Align | Edges from the context menu.
The selected file boxes will be aligned with the file box that has the focus. You can change the focus within a selection by double-clicking a file box while holding down the Ctrl key. If you add a file to a selection, the focus will be automatically set to the newly added file.
To align the edges of file boxes:
1.Select the file boxes you want to align, giving the focus to the file box you want to align the others with.
2.Select the menu command Layout | Align Edges or right-click and select Align | Edges from the context menu. A sub-menu appears.
3.Select from this sub-menu, how you want the edges aligned. Alternatively, skip step 2 and do one of the following:
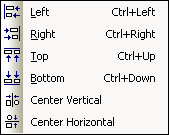
•Press Ctrl+Left or click the Align Left Edges  button from the Alignment toolbar.
•Press Ctrl+Right or click the Align Right Edges  button from the Alignment toolbar.
•Press Ctrl+Up or click the Align Top Edges  button from the Alignment toolbar.
•Press Ctrl+Down or click the Align Bottom Edges  button from the Alignment toolbar.
•Click the Align Vertical Center  button from the Alignment toolbar.
•Click the Align Horizontal Center  button from the Alignment toolbar.
Changing the design layout
In SchemaAgent, you can change the layout of a Design window automatically. Two options are available in the Layout sub-menu to this aim when more than one file box is selected.
To automatically change a design layout:
1.Select at least two file boxes in a Design window.
2.Select the menu option Layout | Layout or right-click and select Align | Layout from the context menu. A sub-menu appears.
3.Select the appropriate layout from the sub-menu. Alternatively, skip step 2 and do one of the following:
•Click the Layout using force-directed algorithm  button from the Alignment toolbar.
•Click the Layout as a hierarchy  button from the Alignment toolbar.
Lining up file boxes
Using the options in the Line Up sub-menu, you can line up the top edges of the selected file boxes with the top edge of the file box that has the focus (when Horizontally is selected) or the left edges of the selected file boxes with the left edge of the file box that has the focus (when Vertically is selected).
To line up file boxes:
1.Select the file boxes you want to line up.
2.Select the menu option Layout | Line Up or right-click and select Align | Line Up from the context menu. A sub-menu appears.
3.Select from this sub-menu, how you want to line up the selected file boxes. Alternatively, skip step 2 and do one of the following:
•Press Alt+Down or click the Line up vertically  button from the Alignment toolbar.
•Press Alt+Right or click the Line up horizontally  button from the Alignment toolbar.
Changing the order of file boxes
If located in a stack of boxes you can bring a particular file box to top or bottom of this stack by selecting the corresponding option in the Order sub-menu.
To bring a file box to the top or bottom of a stack of file boxes:
1.Select the file box you want to change the stack position of.
2.Select the menu option Layout | Order or right-click and select Align | Order from the context menu. A sub-menu appears.
3.Select the appropriate option from the sub-menu. Alternatively, skip step 2 and do one of the following:
•Click the Bring to Top  button from the Alignment toolbar.
•Click the Bring to Bottom  button from the Alignment toolbar.
Resizing file boxes
The Resize sub-menu provides several options to unify the appearance of file boxes in a design. The size to be applied to all selected file boxes is taken from the file box that has the focus.
Note: Resizing height might require that components in a file box be collapsed in order to attain the height of the file box that has the focus.
To resize file boxes:
1.Select the file boxes you want to resize, giving focus to the file box whose size you want the others to be changed to.
2.Select the menu option Layout | Resize or right-click and select Align | Resize from the context menu. A sub-menu appears.
3.Select the appropriate option from the sub-menu. Alternatively, skip step 2 and do one of the following:
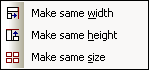
•Click the Make same width  button from the Alignment toolbar.
•Click the Make same height  button from the Alignment toolbar.
•Click the Make same size  button from the Alignment toolbar.
Distributing file boxes evenly
Within a selection of at least three file boxes, you can use the options provided in the Space Evenly sub-menu to arrange the files in a way that the space between them is equally distributed.
To space file boxes evenly:
1.Select three or more file boxes in a design.
2.Select the menu option Layout | Space Evenly or right-click and select Align | Space Evenly from the context menu. A sub-menu appears.
3.Select the appropriate option from the sub-menu. Alternatively, skip step 2 and do one of the following:
•Press Ctrl+Alt+Down or click the Space evenly vertically  button from the Alignment toolbar.
•Press Ctrl+Alt+Right or click the Space evenly horizontally  button from the Alignment toolbar.