Transforming UML Models
You can transform any existing UML package from one modeling language to another. After the transformation, all the relevant elements are transformed from the source to target language, including classes, interfaces, attributes, operations, generalizations, and so on. The source and target language can be any that UModel supports (C++, C#, Java, VB.NET, UML, as well as databases and XML schemas).
A transformation involves a "source" model (that is, the package that you would like to transform), and a "target" model (a destination package). Since the target package may already contain elements, you can perform a model transformation in one of the two ways:
1.Overwrite changes from the source model into the target one
2.Merge changes from the source model into the target model
(If the target is a new package, then "overwrite" and "merge" are irrelevant first time when you transform the model.)
If the source model contains class diagrams, these can be optionally transformed to the target model (this is applicable for C#, Java, VB.NET, and UML). Diagrams which exist in the target model are updated according to the transformation settings: that is, elements in them will be "overwritten" or "merged" with those from the source.
During the transformation, a wizard dialog box lets you optionally map each data type in the source language to a type in the target language. If you skip this step, UModel uses built-in mappings by default. Type mappings can also be changed at a later time, but you will need to re-run the transformation in order to reflect the changes in the target model.
When you perform model transformations, UModel will perform the following changes automatically:
•If a class operation has the UML stereotype «create» applied in the UML source model, it will have the stereotype «constructor» applied in the target model (C++, C#, Java, VB.NET). The opposite is also true: if an operation has the stereotype «constructor» in C++, C#, Java, or VB.NET, the same operation will have the stereotype «create» in the target UML model.
•When the target model is a database, a property named "id" in the source model will be converted to a primary or foreign key of matching data type in the target model.
UModel supports the continuous updating of transformed models. This means that you can safely work in the source model and run the model transformation as many times as necessary to keep the target model up to date with the source model. The model transformation can also be configured to take place automatically, see Model Transformation Settings.
To run a model transformation:
1.Open the UModel project which contains the package that will act as the "source" model.
2.On the Project menu, click Model Transformation.
3.Select the source package (the one that you would like to transform to a different language), and click Next.
4.Select a target package, and click Next. (To put all elements into a new target package, select the Transform in new Package check box.)
5.Choose the transformation kind (for example, Java to C#). For all other settings, see Model Transformation Settings.
6.Do one of the following:
a.To perform the transformation with the default type mappings, click Finish.
b.To review the type mappings before transformation, click Next, change the data mappings as required, and then click Finish.
When the transformation completes successfully, a new package diagram called "Model transformation from <source package> to <target package>" is generated automatically. The diagram is generated in the target package. As shown below, this diagram illustrates the source package, the target package, the dependency relationship between the two, and a list of Tagged Values.
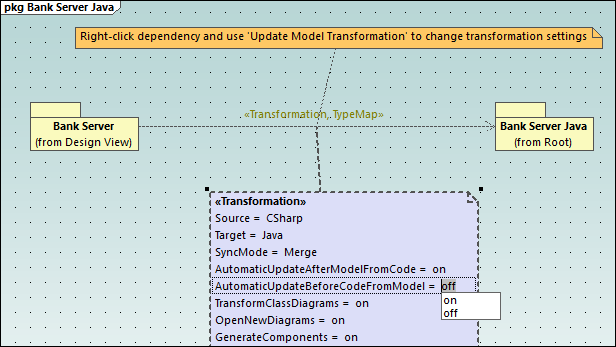
Sample "Model transformation..." diagram
Apart from illustrating the model transformation, this diagram also enables you to modify the model transformation settings, as follows:
1.Click the dependency relationship on the diagram (or in the Model Tree window, you will find it under Relations).
2.Change the necessary options from the Properties window.
Alternatively, double-click a tagged value directly on the diagram to change its value.
After you have finished changing the transformation settings, run the transformation again to update the target model. You can do this as follows:
•Right-click the dependency relationship on the diagram, and select Update Model Transformation from the context menu, or
•Right-click the source package in the Model Tree window, and select Update Model Transformation from the context menu.
For step-by-step transformation examples, see:
•Example: Transform Java to C++