Example: SELECT with Parameters
This example shows you how to create a MapForce mapping which reads data from an SQLite database and writes it to a CSV file. In particular, the mapping described in this example uses a custom database SELECT query with a parameter. The SELECT statement combines data from multiple tables. Then, the results are supplied to the mapping for further processing.
The example is accompanied by a mapping design (.mfd) file available at the following path: <Documents>\Altova\MapForce2023\MapForceExamples\Tutorial\select-component.mfd. You might want to open this sample file and analyze it first, or follow the steps below to create it from scratch.
Although this example uses an SQLite database, the process works in the same way for other database types. For information about connecting to other databases, see Connecting to a Database.
The goals are as follows:
1.We must select from the database only those orders where the number of ordered items exceeds a custom value. This custom value should be supplied as a parameter to the mapping. To achieve this goal, we will create a custom database SELECT statement that takes an input parameter.
2.In the SQLite database, the date format is YYYY-MM-DD HH-MI-SS. In the CSV file, the time part must be stripped, so the format should be YYYY-MM-DD. To achieve this goal, we use the date-from-datetime function available in MapForce.
3.The resulting CSV file must have the name OrdersReport.csv.
Step 1: Add the SELECT structure
1.On the Insert menu, click Database.
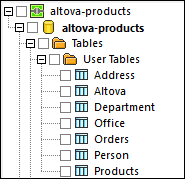
2.Select SQLite and follow the wizard steps to connect to the Altova-Products.sqlite file available in the MapForceExamples\Tutorial folder.
3.On the Insert Database Objects dialog box, click Add/Edit SELECT Statement, and enter the following query:
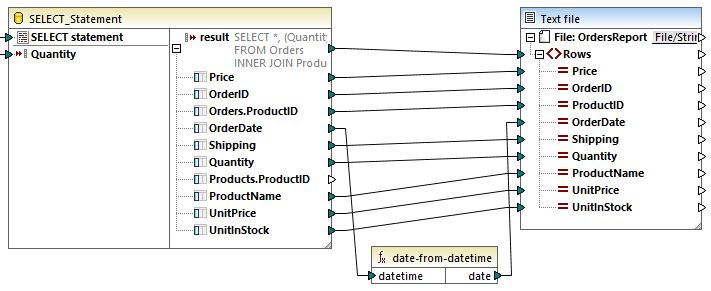
SELECT *, (Quantity * UnitPrice) AS Price |
This query uses a join between the Orders and Products tables, and retrieves all fields (*), and a computed value (AS Price). The query also specifies the :Quantity parameter in the WHERE clause.
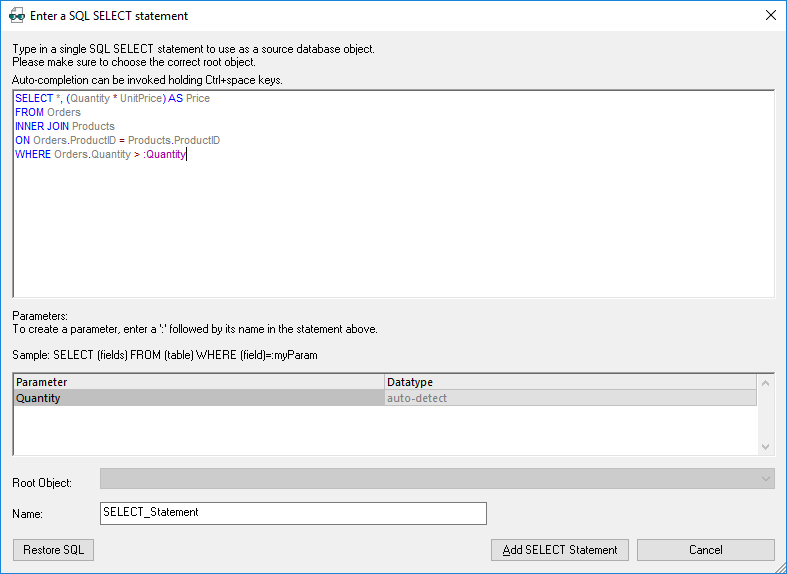
4.Click Add SELECT statement.
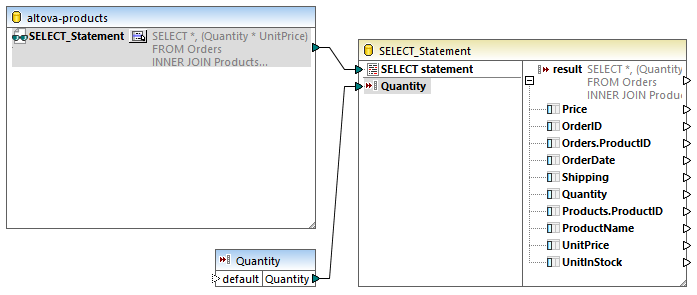
5.Click OK. The altova-products component has now been added to the mapping area.
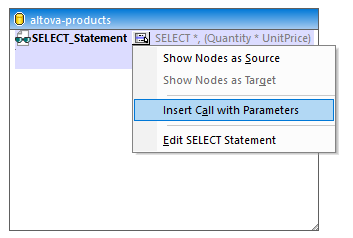
6.On the altova-products component, click ![]() and select Insert Call with Parameters.
and select Insert Call with Parameters.
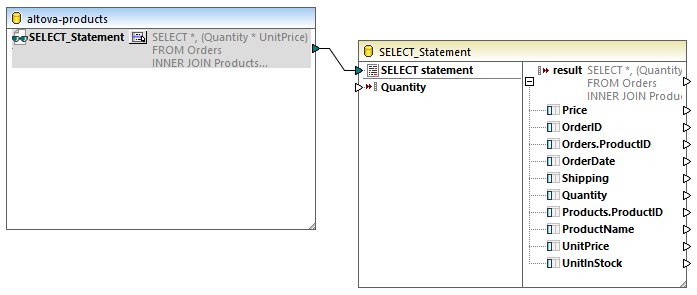
A new structure (SELECT_Statement) is now available on the mapping. It is split into two parts: the left part supplies input connectors and the right part supplies output connectors. Notice that the left part also includes the Quantity parameter defined previously.
Step 2: Add the input parameter
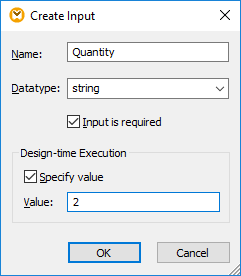
1.On the Insert menu, click Insert Input.
2.Type "Quantity" as name.
3.Under Design-time Execution, enter a parameter value to be used for executing the mapping during the design phase (in this example, "2"). For more information, see Supplying Parameters to the Mapping.
You can now connect the input parameter to the database call structure, as shown below.
Step 3: Add the target CSV component
1.On the Insert menu, click Text File.
2.Select Use simple processing for standard CSV..., and then click Continue.
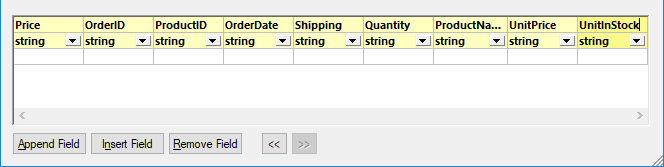
3.On the Component Settings dialog box, click Append Field and add nine new fields. It is recommended that you give to the CSV fields the same name as the name of the database fields, as shown below. This will help you save time later when drawing mapping connections. For more information about these settings, see Setting the CSV Options.
4.Create a connection between the result node of the SELECT structure and the Rows node of the CSV component.
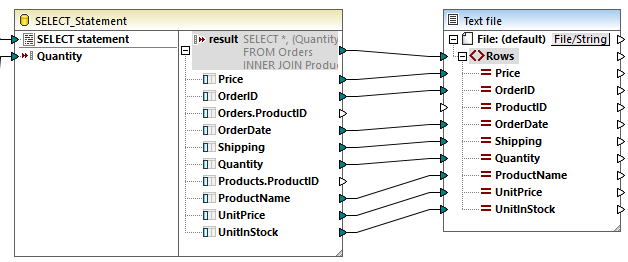
Because most of the fields in the CSV component have the same name as their database equivalent, mapping connections will likely be drawn automatically when you connect result to Rows. If this does happen, select the Connection menu and make sure that the Auto Connect Matching Children option is enabled. The only mapping item that you have to connect manually is ProductID, since there is no field with this name in the SELECT structure.
Step 4: Convert the date
In the Libraries window, search for the date-from-datetime function and drag it to the mapping area. Then connect its input and output as shown below.
Step 5: Set the name of the output file
To set the name of the output file to OrdersReport.csv, double-click the title bar of the CSV component. The Component Settings dialog box opens, where you can enter the value in the Output File text box.