Inserting Data into Multiple Linked Tables
A database table may be a "parent" table; that is, it might be referred by other tables in the database through foreign key relationships. In such scenarios, you can configure the mapping to insert records not only into the parent table, but also into dependent child tables. For example, when inserting a new "company" record into a database table, you can also insert records for offices linked to this company, as well as their children departments, people, and so on.
This example shows you how to insert data into several tables while preserving the database relationships. It is a slightly more elaborate version of the previous example, Inserting Data into a Table. The example is accompanied by a sample mapping, and it uses the following files:
•Altova_Hierarchical.mfd — the actual mapping file.
•Altova_Hierarchical.xml — contains the source data to be inserted into the database.
•Altova_Hierarchical.xsd — the schema used to validate the instance file above.
•AltovaTarget.sqlite — the target database to be updated.
All files are available in the <Documents>\Altova\MapForce2023\MapForceExamples\ folder. Below, the complete path to them will be omitted, for simplicity.
The mapping in this example modifies a sample database file. It is strongly recommended to back up the original database and start with a new copy before following the steps below. This ensures that the original examples are not overridden and that you get the same results as below. For more information, see Executing Mappings Which Modify Databases. |
The goal of the mapping is to replace data in the target database (AltovaTarget.sqlite) with data from a source XML file. The XML file structure roughly corresponds to the hierarchical structure of tables in the database. It is an organization chart, structured as follows: the top element is a company which contains two offices. Each office contains departments, and each department contains people. The same hierarchy exists in the AltovaTarget.sqlite, where the "Altova" table corresponds to the company. This table is linked, through a foreign key relationship, to records in the "Office" table. Likewise, the "Office" links to "Department", and "Department" links to "Person". To view a relationship diagram of the AltovaTarget.sqlite database, open it in the "Relationships" view of Access (see also Handling Database Relationships).
To achieve the mapping goal, we will take the steps below.
Step 1: Insert the source XML component
•On the Insert menu, click XML Schema/File, and browse for Altova_Hierarchical.xsd. When prompted to supply an instance file, browse for Altova_Hierarchical.xml.
Step 2: Insert the target database
•On the Insert menu, click Database, and go through the wizard steps to connect to AltovaTarget.sqlite. See Add a Database.
Step 3: Draw the connections
•Draw the mapping connections as shown below. Notice that the primary and foreign keys are not mapped; they will be generated on the fly, as shown below.
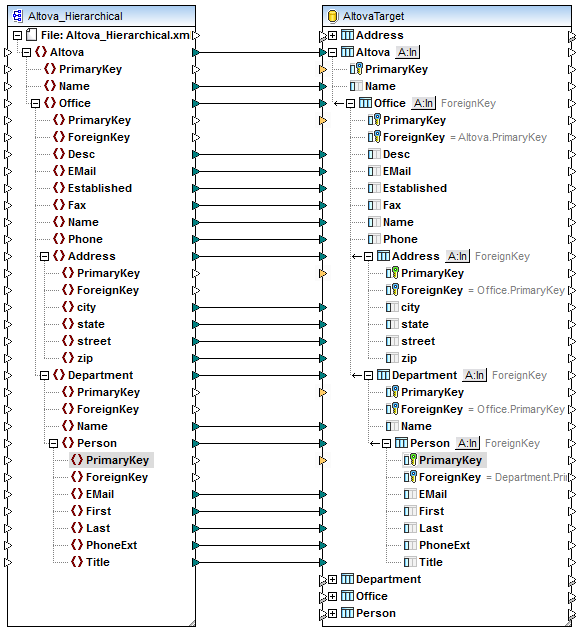
| Note: | If unwanted connections are automatically drawn for descending items, the option "Auto-connect children" is active. In this case, to undo the last action, select the menu option Edit | Undo. To disable the auto-connect option, select the menu option Connection | Auto-connect matching children. |
Step 4: Configure the Insert actions
1.On the target component, click the Action: Insert ( ![]() ) button next to the "Altova" table and configure the max() + 1 setting of the primary key as shown below. This setting was explained in more detail in the previous example, see Inserting Data into a Table.
) button next to the "Altova" table and configure the max() + 1 setting of the primary key as shown below. This setting was explained in more detail in the previous example, see Inserting Data into a Table.
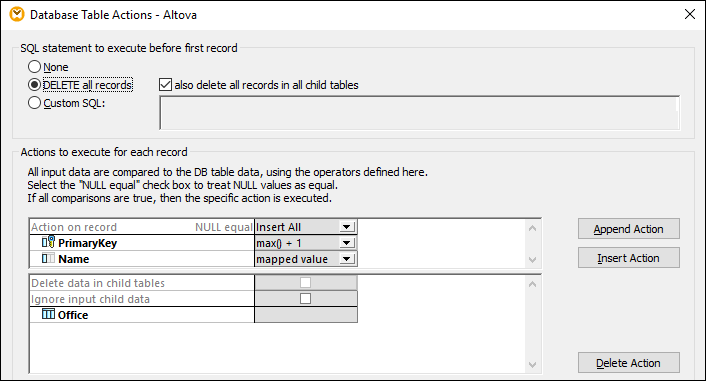
Also, notice that the DELETE all records option is enabled. This clears all existing records from the table, before new ones are entered, which is the desired behavior in this example. If you disable this option, new records (with a new primary key) will be added to the database in addition to existing ones, every time you run the mapping, which is not the desired behaviour.
For the scope of this example, the option also delete all records from child tables is also enabled. This ensures that not only records from the Altova table are deleted, but also all records in tables that are linked to the Altova table through a foreign key relationship. If the child tables have their own child tables, those will also be deleted, and so on, down to the last table in the dependency tree. If you attempted to delete only records from the root Altova table, this would violate the database integrity, and the mapping execution would fail.
For reference to other options available on the Database Table Actions dialog box, see Database Table Actions Settings.
2.Click OK to close the dialog box. Notice that, on the mapping area, the appearance of the button has now changed to ![]() . This indicates that a "Delete" statement is configured to take place before the "Insert" action.
. This indicates that a "Delete" statement is configured to take place before the "Insert" action.
3.Click the ![]() button next to the "Office" table and configure the max() + 1 setting of the primary key.
button next to the "Office" table and configure the max() + 1 setting of the primary key.
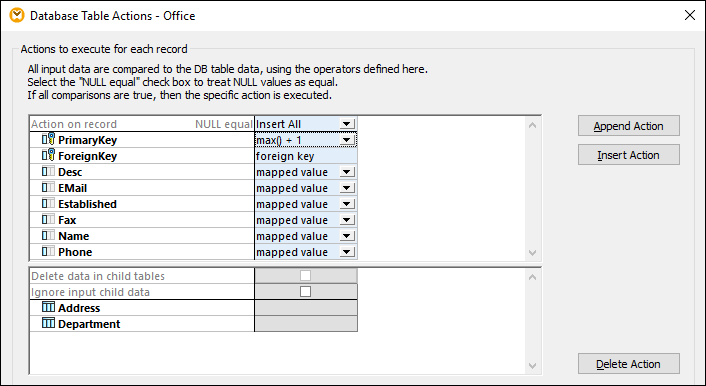
4.Perform step 3 for each table descending from "Office", namely: "Address", "Department", and "Person". Make sure that all these tables are immediate descendants of the root "Altova" table. For an explanation of what is a "root" table and why it is necessary, see Handling Database Relationships.
Step 5: Preview the mapping and update the database
Click the Output pane to preview the mapping. A SQL script is generated, containing actions to be executed against the database. The script has not modified the database yet; it is only for preview.
To run the script against the database:
•On the Output menu, click Run SQL-Script.
| Note: | Running the SQL script directly from MapForce is just one of the ways to update the database, see also Executing Mappings Which Modify Databases. |
To see the result, open the "Altova" table in the SQLite database, and observe how relationships from the XML file have now been propagated to the database, from the "Altova" table down to the "Person" table.
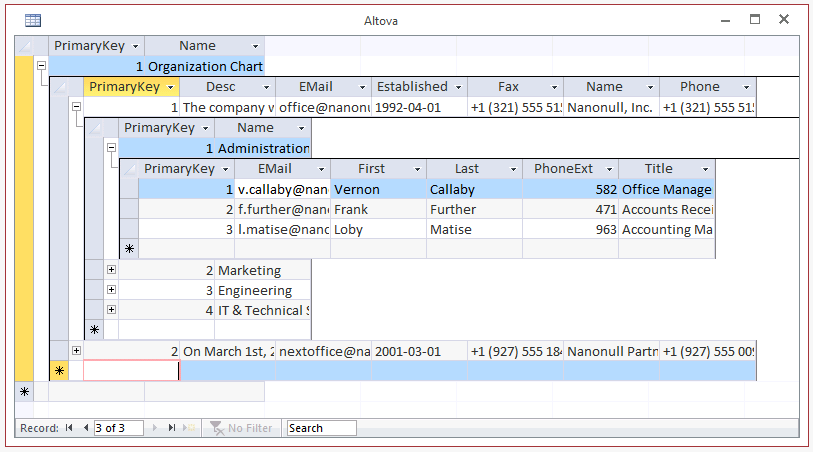
You have now finished creating a mapping which inserts data into multiple database tables, while preserving the table integrity relationships.