Bulk Inserts (MapForce Server)
The Use Bulk Transfer option allows you to insert data at very high speed from a MapForce component (TXT, CSV, DAT, etc.) into a database table. Using this option dramatically speeds up the Insert process, as only one statement needs to be executed instead of many.
The Use Bulk Transfer option can be enabled in MapForce, at mapping design time, as shown below. A mapping where this option is enabled can be executed in MapForce, but no bulk insert applies at this stage. The actual bulk transfer of data occurs when the mapping is run by MapForce Server.
Bulk transfer is supported when the following conditions are true:
•The mapping transformation language is set to BUILT-IN. For further information, see Transformation Languages.
•The mapping is run by MapForce Server (either standalone or under FlowForce Server management). This means that the mapping must be either compiled to .mfx format or deployed to FlowForce Server. For further information, see Compiling Mappings to MapForce Server Execution Files and Deploying Mappings to FlowForce Server.
•The MapForce Server license is not limited to "single thread execution" on a multi-core machine. That is, the Limit to single thread execution check box in the "Server Management" tab of Altova LicenseServer must be inactive.
•The database action is "Insert all", see also Database Table Actions Settings.
•The table into which the data is to be bulk loaded must be a "leaf" table, that is, on the lowest hierarchy of the database. There should not be any related tables, views, or stored procedures referencing the table in the mapping.
•The database driver supports bulk insert on WHERE conditions.
The following table summarizes support for bulk inserts depending on the database kind and the driver used.
ADO | ODBC | JDBC | ADO.NET | Native | |
|---|---|---|---|---|---|
Access | No | No | n/a | n/a | n/a |
DB2 | No | Yes | Yes | Yes | n/a |
Firebird | n/a | Yes | Yes | No | n/a |
Informix | No | Yes | Yes | Yes | n/a |
iSeries | No | Yes | Yes | Yes | n/a |
MariaDB | No | Yes | Yes | No | n/a |
MySQL | n/a | Yes* | Yes | No | n/a |
Oracle | No | Yes | Yes | Yes | n/a |
PostgreSQL | n/a | Yes | Yes | n/a | Yes |
Progress | n/a | Yes | Yes | n/a | n/a |
SQL Server | Yes | Yes | Yes | Yes | n/a |
SQLite | n/a | n/a | n/a | n/a | No |
Sybase | No | Yes | Yes | n/a | n/a |
Teradata | n/a | Yes | Yes | n/a | n/a |
* MySQL version 5 or later is required.
| Note: | To enable bulk insert support for MySQL and MariaDB via JDBC, use the rewriteBatchedStatements=true connection option. |
Bulk insert example
This example shows you how create a mapping which bulk loads data from a sample source.txt file into a target database. The example uses SQL Server 2014 and the AdventureWorks 2014 database. The latter can be downloaded from the AdventureWorks samples page on GitHub (https://github.com/Microsoft/sql-server-samples/releases/tag/adventureworks).
Location A,15.3,39 Location B,46,34 Location C,56.33,0 Location D,0,399 Location E,0,97.43 |
source.txt
To define a bulk insert:
1.Set the transformation language to BUILT-IN ( ![]() ).
).
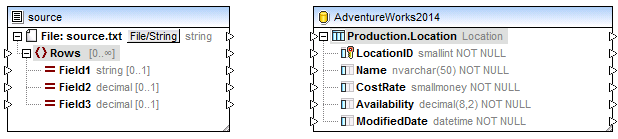
2.Connect to the AdventureWorks 2014 database and add the "Production.Location" table to the mapping. For more information, see Add a Database.

3.On the Insert menu, click Text, and add a source text file (such as the source.txt sample above) to the mapping. For more information, see CSV and Text Files. Make sure that the data types of both the source and the target components are compatible. Data types are visible in the component when the Show Data Types (  ) toolbar button is enabled.
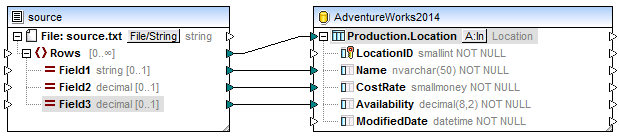
4.Draw the mapping connections as shown below. Note that the Database Actions button ![]() is now visible to the right of the table name.
is now visible to the right of the table name.
5.Click the Database Actions button ( ![]() ), select the Use Bulk Transfer check box, and click OK to confirm.
), select the Use Bulk Transfer check box, and click OK to confirm.
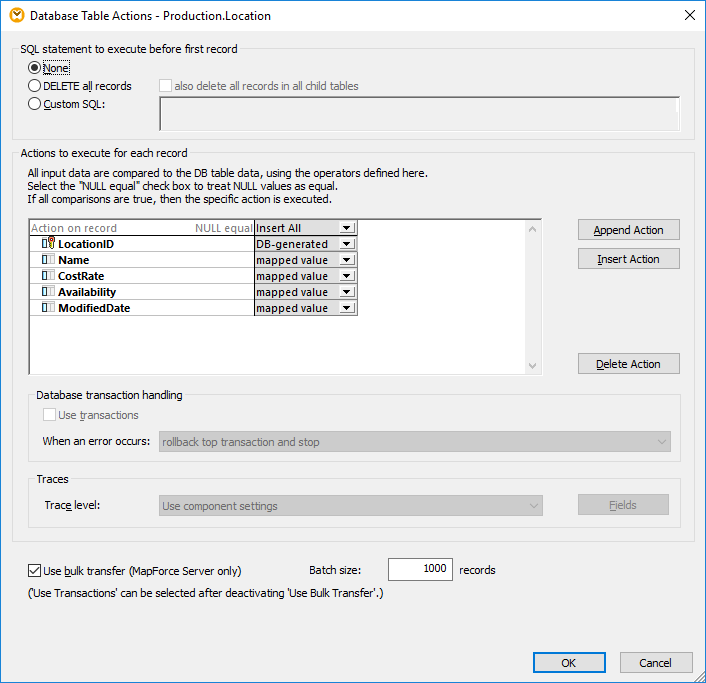
In the dialog box above, notice that the "Action on record" is "Insert All". The Batch size field defines the number of records to be inserted per action.
| Note: | When the Use Bulk Transfer option is enabled, the Use Transactions option becomes disabled, and vice versa. If you want to enable transaction processing, click to clear the Use Bulk Transfer check box. |
Now that bulk insert is enabled, the next step is to execute the mapping in MapForce Server (either standalone or under FlowForce Server management). For further information, see Compiling Mappings to MapForce Server Execution Files and Deploying Mappings to FlowForce Server.