Handling JDBC references
If the mapping connects to a database through JDBC, ensure that the JDBC drivers used by the mapping are installed on your system. To view the current JDBC settings of any database component in MapForce, click it, and then select Component | Properties from the menu. For more information, see Creating a JDBC connection.
If the mapping uses a non-JDBC database connection, the connection may be converted to JDBC during Java code generation, to provide compatibility in a Java environment. For example, ADO, ADO.NET, and ODBC connections are converted to JDBC connections when you generate Java code from the mapping. For details, see Database mappings in various execution environments. |
If you test run the generated Java application in Eclipse, the JDBC driver may need to be added as a "classpath" entry to the current run configuration. Otherwise, test running the application in Eclipse could fail with an error message such as: java.lang.ClassNotFoundException: com.mysql.jdbc.Driver. Taking MySQL database as an example, you can add the JDBC driver as a dependency in Eclipse as follows:
1.Generate the Java code from MapForce and import the project into Eclipse using the menu command File | Import | Existing Projects into Workspace.
2.On the Run menu, click Run Configurations. On the left side of the dialog box, under "Java Application", there are two configurations called MappingApplication and MappingConsole.
3.Click the desired configuration (for example, MappingApplication).
4.On the Dependencies tab, click Classpath entries, and then click Add External JARs.
5.Browse for the .jar file of the JDBC driver, for example:
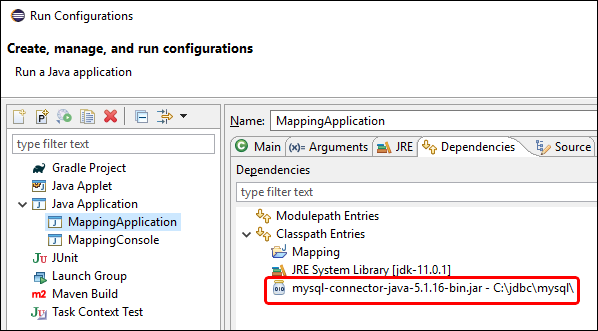
6.Click Run to run the program with the database JDBC driver added as a dependency.
If you get the JDBC driver error above when test running the Ant build.xml file, add the JDBC driver to the classpath of the "test" task. The following is an example of an Ant "test" task that includes a reference to the .jar file of the JDBC driver.
<target name="test" depends="compile"> |
| Note: | The example above assumes that the .jar file exists at the following path: C:\jdbc\mysql\mysql-connector-java-5.1.16-bin.jar. Make sure to change the .jar file path as applicable to your environment. |
Including JDBC drivers in the application's manifest
If you build JAR files from the generated Java application, add a reference to the database driver in the "manifest" section of the build.xml file. This ensures that the reference to the database driver is available in the manifest (MANIFEST.MF) file after you build the project.
To add the database reference to the manifest file:
1.Locate the manifest element in the build.xml file,
2.Add a new element called attribute where the "name" attribute is "Class-Path" and the "value" attribute is the name of the .jar file. For example, for MySQL 5.1.16, the new element could look as follows:
<attribute name="Class-Path" value="mysql-connector-java-5.1.16-bin.jar"/> |
The manifest element of the build.xml file now looks as follows:
<manifest file="C:\codegen\java\mysql_mapping/META-INF/MANIFEST.MF" mode="replace"> |
3.Copy the JAR file of the JDBC driver to the folder that contains the JAR file of the generated application.