Example: Logging Database Errors
This example shows you how to configure database tracing and error logging for a mapping which inserts data into a SQLite database. The instructions are similar for all other database types supported by MapForce, as well as for other database action types (such as "update", "ignore", "delete", and so on).
You can find the demo mapping referenced by this example at the following path: <Documents>\Altova\MapForce2023\MapForceExamples\Tutorial\DatabaseExceptions.mfd. This mapping inserts data from two tables of a database into a new pair of tables of the same database, and is described in more detail in the Example: Transaction Rollback. Note that some of the records in the database are deliberately null so as to generate database exceptions.
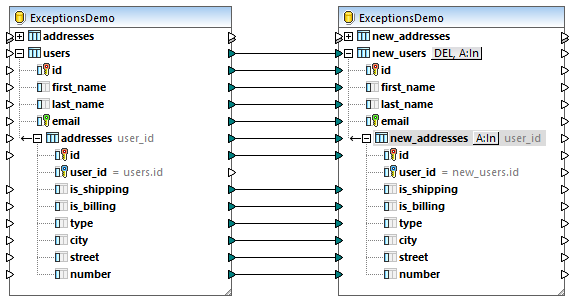
DatabaseExceptions.mfd
In this example, the business requirement is to enable tracing for the target database component in order to determine how many errors were generated, and where exactly did the errors occur. The steps below illustrate how to achieve this goal.
Step 1: Enable transaction rollback
This demo mapping is configured to use transaction rollback at database component level. This means that, when the first exception is encountered, the mapping will stop execution and roll back all data to the initial state. Let's first change the transaction rollback options so that the mapping execution continues even if exceptions are encountered for some of the records:
1.Click the ![]() button next to the new_users table, select the Use transactions check box and choose rollback current transaction and continue.
button next to the new_users table, select the Use transactions check box and choose rollback current transaction and continue.

2.Click the ![]() button next to the new_addresses table, select the Use transactions check box and choose rollback current transaction and continue.
button next to the new_addresses table, select the Use transactions check box and choose rollback current transaction and continue.
You could also disable transaction rollback completely; however, doing this would stop mapping execution at the first encountered error and would not roll back changes, so this is not recommended. Tracing and logging in this case would reflect execution only up to the first encountered exception. For further information about transaction rollback, see Handling Database Exceptions.
Step 2: Configure error logging
To enable tracing, do the following:
1.Right-click the title bar of the database component, and select Properties from the context menu (Alternatively, double-click the title bar of the database component). This opens the Database Component Settings dialog box.
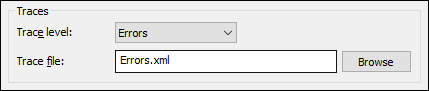
2.Select Errors as trace level.
3.Next to Trace file, type the name of the tracing file (in this example, Errors.xml). Do not enter an absolute path if you intend to run the mapping with MapForce Server on other machines or operating systems.
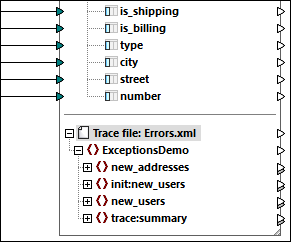
The target database component has now changed its structure and displays an additional compartment with the trace file structure:
So far, you have enabled tracing at the database component level. Consequently, the tracing settings will be inherited by all table actions on this database component. In this example, they are inherited by the "Insert" actions of both new_users and new_addresses tables. If you click the action button  for each of these tables, the settings illustrate this fact:

Optionally, click the Fields button to configure which fields should be included or hidden in the trace file. In this example, all fields are included.
Step 3: Configure the mapping output
This step shows you how to map the values from the trace file to some other component kind (in this case, a simple output component). Note that this step is optional; an error log file is produced even if you do not map the trace file to some other component. In this example, however, we would like to explicitly configure the mapping to return the total number of encountered errors in the output. To do this, let's take the following steps:
1.Add a simple output component, by selecting the Insert | Insert Output menu command. For more information about simple input components, see Returning String Values from a Mapping.
2.Add a constant, by selecting the Insert | Constant menu command. The constant will provide the static text "Total errors: " to make the mapping output text more clear.
3.Drag the concat function from the Libraries window onto the mapping. For more information about built-in functions, see Add a Function to the Mapping.
As illustrated below, the concat function concatenates the text of the constant with the errors value supplied by the trace file.
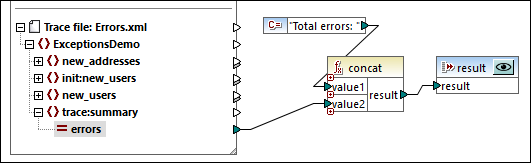
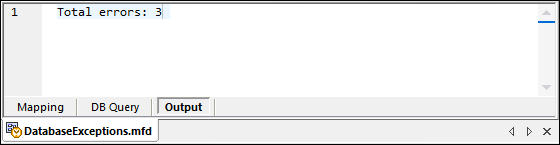
With the configuration above, when the mapping is run with MapForce Server, the output will display the text: "Total errors: {value}", where value represents the number of errors encountered at runtime.
At this stage, running the mapping in MapForce with the Preview |
Step 4: Running the mapping
To run this mapping with MapForce:
1.Click the Preview  button on the database component.
2.Click the Output pane.
3.On the Output menu, click Run SQL-Script. At this stage, the mapping encounters the first exception; this is intentional. The Database Transaction Exception dialog box appears.
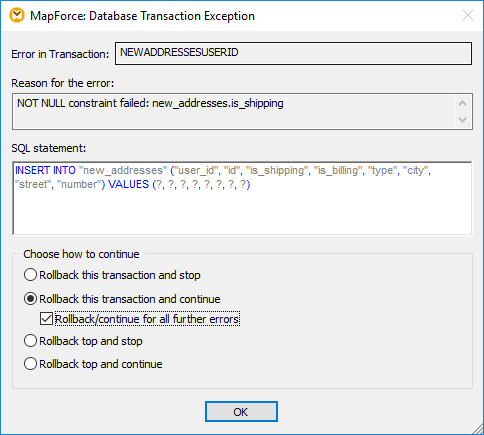
4.Select the rollback options as illustrated above, and click OK.
| Note: | If a mapping is executed by MapForce Server, no dialog box appears and the erroneous transactions are rolled back automatically, according to the rollback settings configured in MapForce. |
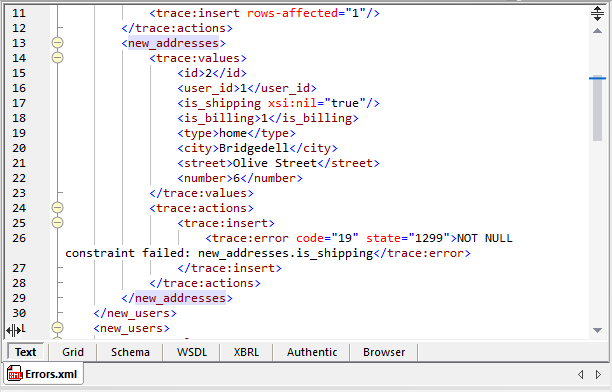
In this example, once the mapping completes execution, all failed transactions are rolled back, and only the successful ones are committed to the database. The encountered errors are written to the Errors.xml file, a small fragment of which is illustrated below:
Now that the log file was produced, you can preview the output that returns the total number of errors in MapForce execution, as follows:
1.Back on the mapping, click the Preview button on the "result" component.
2.Click the Output pane and observe the result.
This part of the mapping reads data from the log file produced previously. If the log file does not exist, an error will be generated. |