Creating SOAP Web Service Projects
This example shows you how to create a SOAP Web service in MapForce. The mapping project created in this example is also available at the following path: <Documents>\Altova\MapForce2023\MapForceExamples\Tutorial\Query Person database.mfp. The Web service in this example has the following goals:
•Retrieve from an SQLite database on a server a set of person records that satisfy some search criteria, through a SOAP Request. (The query is entered at runtime on the client, and is then sent to the server. The server then returns an XML response with the search results).
•Insert new records into the SQLite database, also through SOAP requests. (The person details are provided in the SOAP Request. On success, the server returns a confirmation that the person details have been successfully added to the database.)
Note the following:
•The process of creating the Web service in MapForce does not depend on the target programming language; it is identical when generating Java, or C# Web services. The differences arise only when you compile and deploy the Web service on the web server, as further described in this documentation.
•In order to generate sample SOAP requests required to preview the mapping output, this example uses XMLSpy Enterprise Edition. The source WSDL file of this MapForce project was also created with XMLSpy (and can be validated with it). Designing Web services in MapForce is also possible without XMLSpy; however, in this case you will need a SOAP client capable to generate SOAP requests from WSDL files.
Creating a Web service project
As stated before, a WSDL file is required to create a SOAP Web service with MapForce. In this example, we will use a WSDL file that was created with XMLSpy Enterprise edition. The image below illustrates the WSDL structure as it is displayed in the WSDL view of XMLSpy. The important thing to notice is that it defines two operations (getPerson and putPerson) that correspond to the goals outlined above.

| Note: | The WSDL file must be valid before you can create a MapForce Web Service project from it. |
To create a Web service project from this web service, follow the steps below:
1.On the File menu, click New, and select "Web Service Project".

2.Browse for the query.wsdl file available in the folder <Documents>\Altova\MapForce2023\MapForceExamples\Tutorial\ . After you select the WSDL file, MapForce automatically fills in the remaining fields.
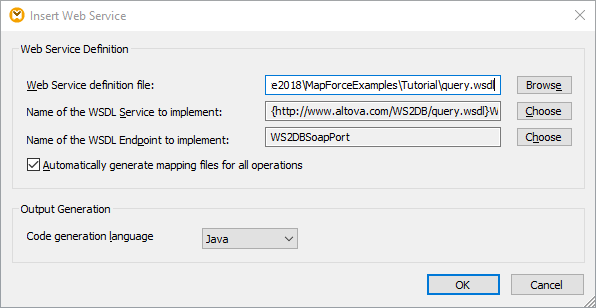
3.Click OK.
4.When prompted, enter the name of the new WSDL project, and click Save.
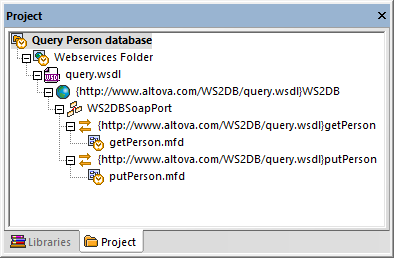
The Project window shows the project and WSDL name, as well as each of the operations defined in the WSDL file. The two operations are getPerson and putPerson.
Designing the "getPerson" operation
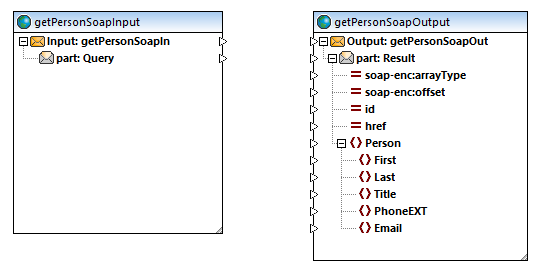
Double-click the getPerson.mfd file in the Project window to load its contents in the main pane. The getPersonSoapIn component contains the query (item) which will be used to query the database through the Web service. The getPersonSoapOut component contains the Person structure defined in the WSDL file.
On the Insert menu, click Database, and add to the mapping area the following SQLite database: <Documents>\Altova\MapForce2023\MapForceExamples\Tutorial\people.sqlite. The database contains only one table, Persons, whose fields match those in the getPersonSoapOut component. For more information about adding databases as mapping components, see Databases and MapForce. Draw connections between components as shown below:
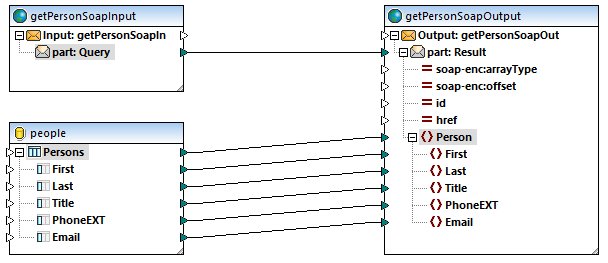
The mapping design above is not yet complete but clearly illustrates what will be happening at runtime. The connection between part:Query and part:Result represents the Web service call. The part:Query item of the getPersonSoapIn component is the query placeholder (it is where the query string is entered in the SOAP client). The connections between the database table and the Person item of the getPersonSoapOutput component extract values from the corresponding database fields and pass them to the corresponding target items. You can already quickly preview the output as follows:
1.Right-click the getPersonSoapInput component, and select Properties from the context menu.
2.Click Browse and select the following example request: <Documents>\Altova\MapForce2023\MapForceExamples\Tutorial\getPersonRequest.xml.
3.Click OK.
4.Click the Output pane.
At this stage, the mapping extracts all the records from the database table, which is not very useful. Therefore, we need to add a filter and extract only items that match the request string.
1.Add the concat function, by dragging it from the Libraries window. This function will be used to concatenate the First and Last names of each person.
2.On the Insert menu, click Constant, and add a constant which contains one space character. The constant will supply the space character between the first and the last name extracted from the database.
3.Add the contains function, by dragging it from the Libraries window.
4.Right-click the connection between the source Persons table and Person target node, and select Insert Filter: Nodes/Rows from the context menu.
5.Draw connections between components as shown below.
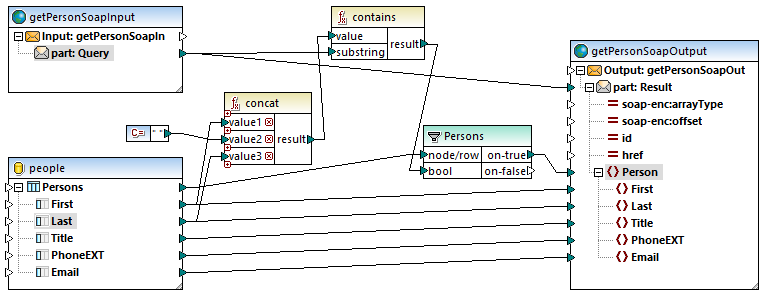
"getPerson" mapping
As illustrated above, the contains function returns true when the query string matches the full or partial name of any person in the database (where "name" is provided by the concat function, and it consists of the first name, followed by a space, followed by the last name). When there is a match, the details of the matching person are included in the response message. Therefore, in this example, the search value "Ro" would return all the following records: "Martin Rope", "Ronald Superstring", "Robert Darkmatter", and "Roger Gravity".
Designing the "putPerson" operation
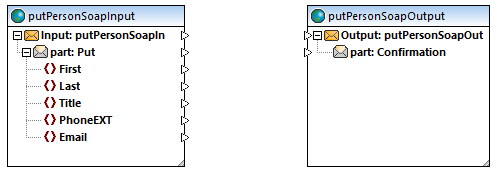
Double-click the putPerson.mfd file in the Project window to load its contents in the main pane. The putPersonSoapInput component supplies the request structure (items that will be inserted into the database through the Web service). The putPersonSoapOutput component represents the result of the Web service call. It contains a confirmation part to display the outcome of the call to the Web service caller.
Follow the same instructions as above to add the following to the mapping:
•The people.sqlite database (this is where data supplied by the Web service caller will be inserted)
•The concat function and five constants (these will be used to build the confirmation string shown to the caller of the Web service)
Draw the connections as shown below:
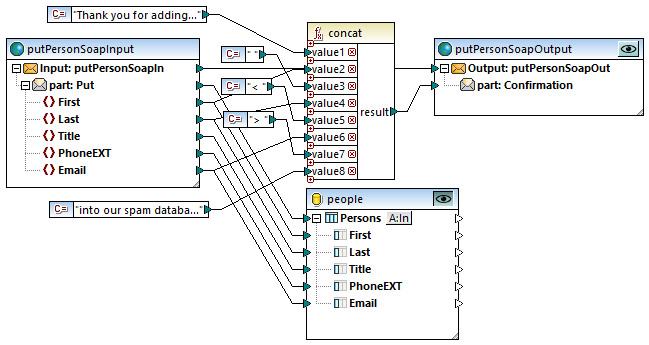
putPerson mapping
In the mapping above, the connection between part: Put and the database will cause the database to be updated at runtime. On the target side, the part: Confirmation response is obtained by concatenating various fields from the request, as well as some text supplied by constants. For more information about mappings which update databases, see Mapping Data to Databases.
To preview the output of the mapping:
1.Right-click the putPersonSoapInput component.
2.Click Browse and select the following example request: <Documents>\Altova\MapForce2023\MapForceExamples\Tutorial\putPersonRequest.xml.
3.Click the Output pane.
When you preview the mapping, MapForce will generate the INSERT query required to update the database and display it in the Output window, but will not perform the actual update. To run the query against the database, select the menu command Output | Run SQL-Script.

By contrast, when the compiled Web service is deployed to a server and called by a client, the database will be updated with immediate effect. See also Executing Mappings Which Modify Databases.
Previewing the mapping output
Mappings created from WSDL files can be previewed in MapForce before they are deployed to an actual Web server. To preview such mappings, a sample SOAP request (XML file) is necessary which conforms to the WSDL file. You can create a sample request for each operation (mapping) inside your Web service project either with XMLSpy or another SOAP client of your choice. If you use XMLSpy, run the menu command SOAP | Create New SOAP Request to generate the request. If XMLSpy is installed alongside MapForce, you can generate a sample request directly from MapForce, for example:
1.Right-click the getPersonSoapInput component on the mapping, and select Properties from the context menu.
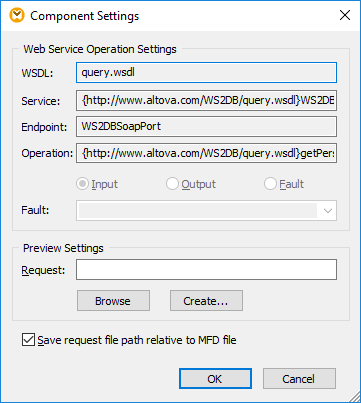
2.Click Create.
3.When prompted, save the XML file to a location on the disk.
The request file is generated with some dummy input values (for example, "String") instead of input parameters. Before using the request file, make sure to replace the dummy values with the actual request values that you want to use. For this project, two sample requests are available:
1.<Documents>\Altova\MapForce2023\MapForceExamples\Tutorial\getPersonRequest.xml. Use this file to preview the output of the getPerson mapping. By default, this request file supplies the value "Ro" as input to the Web service. This will retrieve from the database all people records where the last or first name contains the text "Ro".
2.<Documents>\Altova\MapForce2023\MapForceExamples\Tutorial\putPersonRequest.xml. Use this file to preview the output of the putPerson mapping. By default, this request file supplies the details of a fictitious person as input to the Web service.
To obtain a different output while previewing the two mappings, therefore, edit the files above so that they contain the input values you wish to test.
Next steps
You are now ready to generate code that implements the Web service (either Java or C#), compile it, and deploy it to a server, as further described in the following examples:
•Example: Generating SOAP Web Services (C#)
•Example: Generating SOAP Web Services (Java)