Connect Sources and Target
Now we want to map the data from two source files (Books.xml and Library.xml) to the target file (MergedLibrary.xml). To achieve the goal, take the following steps:
•Connect the <book> element in the first source component with the <publication> element in MergedLibrary.xml. When you do this, MapForce may automatically connect all the child elements of <book> in the source file to the elements with the same names in the target file. In our example, four connections have been created simultaneously. To find out more about the automatic connection of child elements, see the first tutorial.
•When you connect the <book> element with the <publication> element, you will notice that some of the input connectors in the target component have been highlighted in orange. This indicates that these items are mandatory. To ensure the validity of the target XML file, connect the <category> element with the <genre> element and the <year> element with the <publish_year> element.
•To supply a value for the <last_updated> element, find the function called current-dateTime in the XSLT2 library. Drag the function to the mapping area and connect result with the <last_updated> element in MergedLibrary.xml.
•To instruct MapForce to write data from the second source to the target, press and hold the output connector of the <publication> element in Library.xml and drag it to the input connector of the <publication> element in MergedLibrary.xml. Since the target input connector already has a connection, MapForce will prompt you to replace the connection or to duplicate the input. In this tutorial, our goal is to map data from two sources to one target. Therefore, click Duplicate Input. By doing so, you configure the target component in such a way that it will accept the data from the new source, too. The mapping now looks as follows:
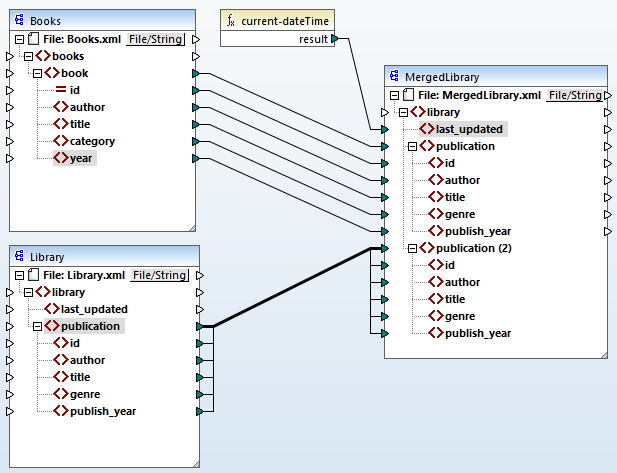
The screenshot above demonstrates that the publication item in the target component has been duplicated. The new publication(2) node will accept the data from the source component Library. Importantly, even though the name of this node appears as publication(2) in the mapping, its name in the target XML file will be publication, which is our goal in this case.
Click the Output button at the bottom of the Mapping pane to view the mapping result. You will notice that the data from both Books.xml and Library.xml has now been merged into the new MergedLibrary.xml file. To save the output, open the Output pane and select the menu command Output | Save Output File or click  (Save generated output) in the toolbar.
For your convenience, the mapping design in this tutorial is saved as Tut2_MultipleToOne.mfd. This mapping will be used as a starting point in the next tutorial.