Example: Generating SOAP Web Services (C#)
This example illustrates how to generate a SOAP Web service with MapForce. You will generate C# program code from a sample MapForce project available at the following path: <Documents>\Altova\MapForce2023\MapForceExamples\Tutorial\Query Person database.mfp. This project implements a SOAP Web service that exposes two operations: getPerson and putPerson. This Web service communicates in the background with an SQLite database to retrieve or add person details, respectively, through the operations above. For an example of how to create such projects in MapForce, see Creating Web Service Projects from WSDL Files.
This example uses Visual Studio 2015 to compile the generated C# code. The solution will be deployed to Internet Information Services (IIS) 10 with ASP.NET enabled.
For simplicity, this example uses a basic Web server configuration and should not be taken as prescriptive. In a production environment, you may need to use a different approach as demanded by the specifics of your Web server, the security policies in your organization, and other factors.
To call the SOAP Web service, this example makes use of XMLSpy Enterprise Edition. If you do not have XMLSpy, you will need a SOAP client to test the Web service, or, alternatively, write program code that can call the Web service.
| Note: | If you are using IIS 7.x, you may first need to install the Windows feature "IIS Metabase and IIS 6 configuration compatibility". |
Step 1: Prepare the query.wsdl file
This example Web service originates from the following WSDL file: <Documents>\Altova\MapForce2023\MapForceExamples\Tutorial\query.wsdl. By default, the query.wsdl file defines the service details for both C# and Java in two separate sections, one of which is commented out. Therefore, before generating C# code, locate the following section in the query.wsdl file and make sure that it is not commented out:
<service name="WS2DB"> |
Also, make sure that the following section (only applicable to Java) is commented out:
<!--<service name="WS2DB"> |
Step 2: Generate C# code and build it
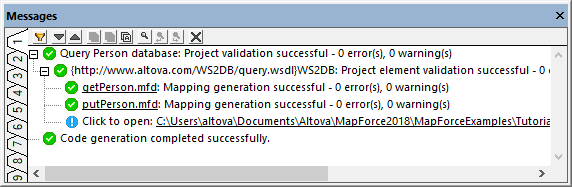
Run MapForce and open the "Query Person database.mfp" project from the folder <Documents>\Altova\MapForce2023\MapForceExamples\Tutorial\. Right-click the project in the Project window, and select Generate code in | C#. MapForce generates program code and displays the outcome in the Messages window:
By default, code will be generated in a subdirectory called "output", relative to the project's directory. For the scope of this tutorial, we will leave the default settings as is. However, if you want to change the output directory, see Setting the Code Generation Settings .
Run Visual Studio and open the generated solution.
You may need to run Visual Studio as administrator. Also, this example solution must be compiled as a 32-bit application, as shown below. |
You can build the solution as follows:
•On the Build menu, click Build Solution (Ctrl+Shift+B).
Step 3: Deploy the Web service to IIS
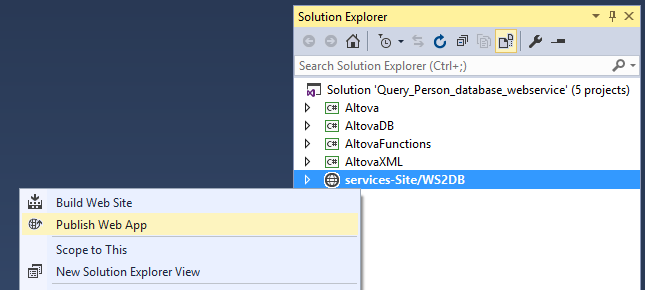
In the Solution Explorer window of Visual Studio, right-click the project services-Site/WS2DB and select "Publish Web App" from the content menu.
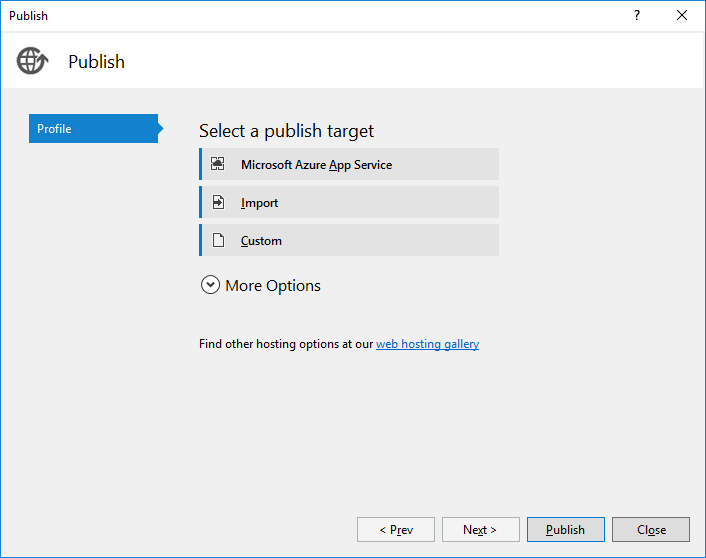
When prompted to select a publish target, select "Custom".
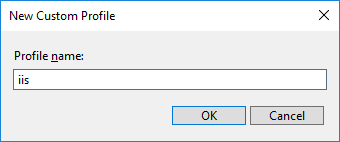
When prompted to enter a profile name, enter a value that will be easy to recognize later, for example "iis".
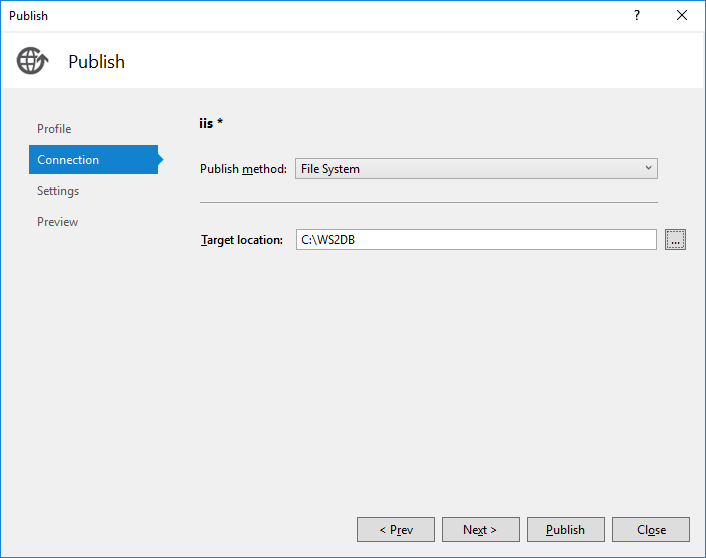
Select "File System" as publish method and choose a destination folder (in this example, "C:\WS2DB").
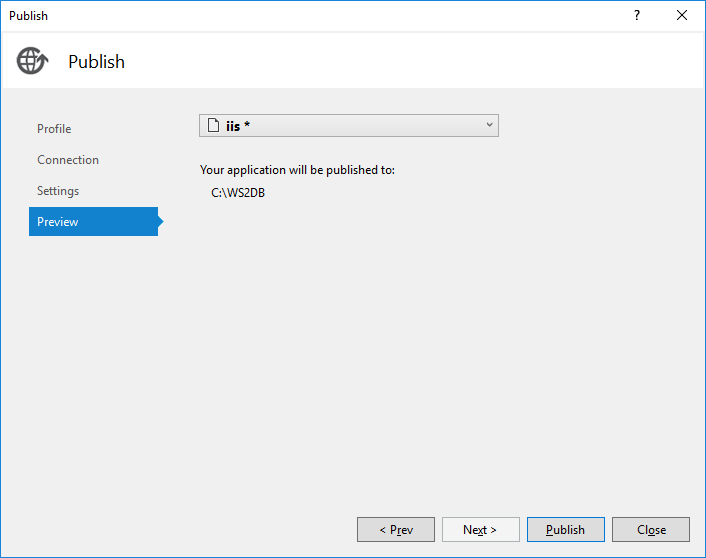
Click Next. Leave the default settings as is.

Click Next, and then click Publish.
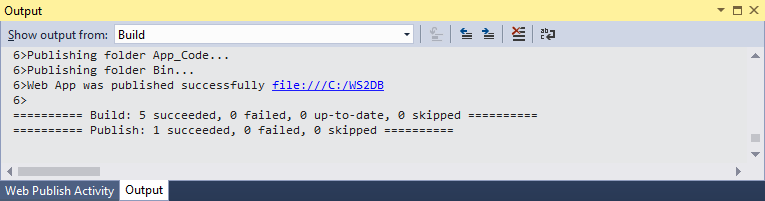
The Output window displays the result.
Step 4: Configure the application in IIS Manager
You can add the new application to IIS as follows:
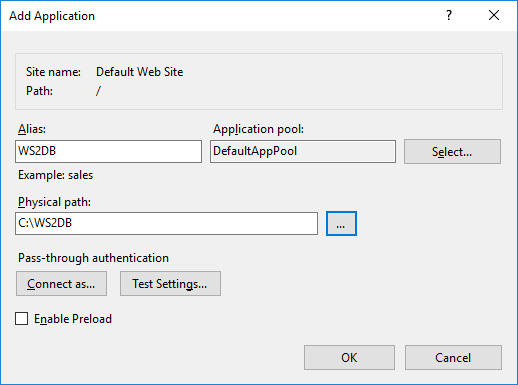
1.In IIS, right-click Sites | Default Web Site, and select Add Application from the context menu.
2.Under "Alias name", enter a name to identify your web application ("services", in this example).
3.Under "Physical path", enter the path where the application was previously published ("C:\WS2DB", in this example).
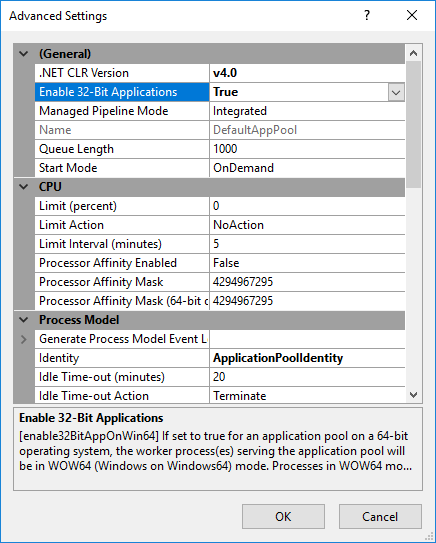
Additionally, for this particular example, it is necessary that 32-bit applications are enabled for the pool where the app is running.
1.In IIS, right-click the application pool where the app was deployed, and select Advanced Settings from the context menu.
2.Under Enable 32-bit Applications, select the option True.
Finally, since this example reads data from the SQLite database, the IIS application pool must have permissions to access the database file. Unless you modified the MapForce project, the database is available at the following path: <Documents>\Altova\MapForce2023\MapForceExamples\Tutorial\people.sqlite.
1.In Windows Explorer, right-click the people.sqlite file and select Properties.
2.On the Security tab, click Edit.
3.Click Add, and enter the object name as follows: IIS AppPool\DefaultAppPool. Change "DefaultAppPool" to a different value if you deployed the app to a pool other than the default one.
4.Grant the required permissions, and click Apply. (In this example, permission to read and write the database file is required.)

To test if the Web service is up and running, access the following URL: http://localhost/WS2DB.
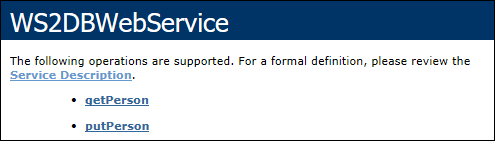
If the Web service details load in the browser, you can proceed to calling the Web service from a client application, as shown below.
Calling the Web service
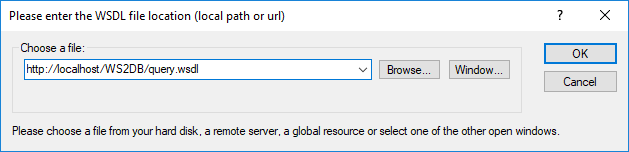
If you followed the steps above literally, then the WSDL of the Web service is available at http://localhost/WS2DB/query.wsdl. To call the Web service we just deployed, we will use XMLSpy, although you can use, of course, other SOAP clients as well.
| Note: | It is recommended to access the genuine WSDL at http://localhost/WS2DB/query.wsdl rather than using the "?wsdl" query method. The latter may return a WSDL file lacking some features of the original or one which does not work at all. |
Run XMLSpy Enterprise Edition. On the SOAP menu, click Create New SOAP Request. When prompted, enter the WSDL of the Web service (in this example, http://localhost/WS2DB/query.wsdl).
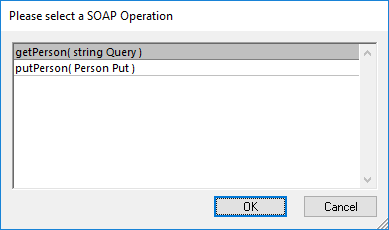
Click OK. When prompted to select a SOAP Operation, select getPerson.
XMLSpy generates a sample request like the one below.
<?xml version="1.0" encoding="UTF-8"?> |
Locate the <Query> element of the request, and replace "String" with the value you want to supply as input to the Web service. As stated before, this Web service retrieves people details from an SQLite database. For the scope of this example, in order for the call to actually retrieve some data, "String" must be replaced with "Ro" (in other words, only people whose first or last name contains "Ro" would be retrieved). The new request now looks as follows:
<?xml version="1.0" encoding="UTF-8"?> |
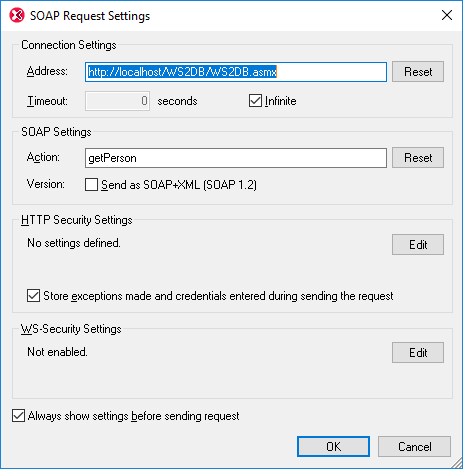
You can now send the request above to the server. On the SOAP menu, click Send Request to Server. The SOAP Request Settings dialog box opens.
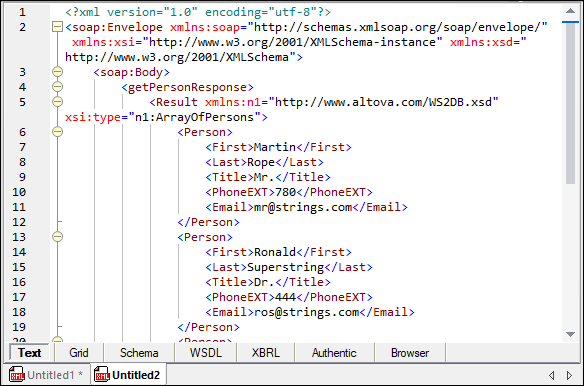
Click OK. XMLSpy initiates the call, and returns the response in the editor. The image below illustrates a successful response.
Using the same approach as described above, you can also call the putPerson operation exposed by this Web service. For step-by-step instructions, see "Calling the Web Service" section in the Java tutorial. Only the WSDL URL is different in the Java tutorial; all other instructions for calling the Web service are identical.
Troubleshooting
The following table lists common problems that you might encounter when building or invoking the Web service, and their solution.
Problem | Solution |
|---|---|
Calling the Web service returns the following error:
The <...> provider is not registered on the local machine." | 1.Build the C# solution in Visual Studio as a 32-bit application. 2.Deploy to IIS. 3.Right-click the IIS application pool where you deployed the application, and select Advanced Settings. 4.Under Enable 32-bit applications, select True. |
Calling the Web service returns the following error:
The <...> database engine cannot open the file '<path>\people.sqlite'. It is already opened exclusively by another user, or you need permission to view its data. | •Grant to the IIS application pool permission to read the SQLite database file, see "Step 4: Configure the application in IIS Manager" above. |
Calling the Web service returns the following error:
Operation must use an updateable query. | •Grant to the IIS application pool permission to write the SQLite database file, see "Step 4: Configure the application in IIS Manager" above. |