"Delete if..." Action
The table action Delete if... is used to delete data from a database table conditionally. You can define this action from the Database Table Actions dialog box (see Database Table Actions Settings). For example, when mapping data from a source XML to a target database, you can configure a Delete if... condition to check whether a certain field in the source XML is equal to a field in the target database record (typically, a primary key value). If the Delete if... condition is true (that is, the two fields are equal), the database record will be deleted when the mapping runs.
| Note: | The Delete if... table action should not be confused with the Delete data in child tables option available in the Database Table Actions dialog box. The Delete if... table action only affects the table for which the action is defined; no other tables are affected. |
This example shows you how to delete data from a database table conditionally, and also insert records into the same database table based on the outcome of the delete condition.
This example uses the following files:
•altova-cmpy-extra.xml — contains the source data to be inserted into the database.
•Altova_Hierarchical.xsd — the schema used to validate the instance file above.
•Altova.sqlite — the target database to be updated.
All files are available in the <Documents>\Altova\MapForce2023\MapForceExamples\ folder. Below, the complete path to them will be omitted, for simplicity.
The mapping in this example modifies a sample database file. It is strongly recommended to back up the original database and start with a new copy before following the steps below. This ensures that the original examples are not overridden and that you get the same results as below. For more information, see Executing Mappings Which Modify Databases. |
The goal of the mapping is as follows:
•If any person records with the same PrimaryKey exist both in the source XML and the target Person table, they must be deleted from the Person table.
•All other records from the source XML must be inserted into the Person table.
To achieve the mapping goal, we will take the steps below.
Step 1: Insert the source XML component
•On the Insert menu, click XML Schema/File, and browse for Altova_Hierarchical.xsd. When prompted to supply an instance file, browse for altova-cmpy-extra.xml.
Step 2: Insert the target database
•On the Insert menu, click Database, and go through the wizard steps to connect to Altova.sqlite. See Add a Database.
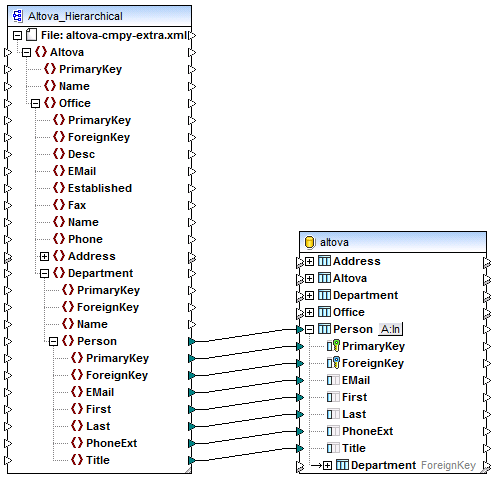
Step 3: Draw the connections
•Draw the mapping connections as shown below.
Step 4: Configure the "Delete if... Insert Rest" actions
1.On the target component, click the Action: Insert ( ![]() ) button next to the "Person" table.
) button next to the "Person" table.
2.Next to Action on record, select Delete if... . This changes the database table action to a conditional delete action. That is, the current record will only be deleted when a condition is satisfied (see next step).
3.Next to PrimaryKey, select the value equal, as shown below. This defines the update condition: that is, the database record will be deleted only when its PrimaryKey value is equal to the PrimaryKey value coming from the mapping.
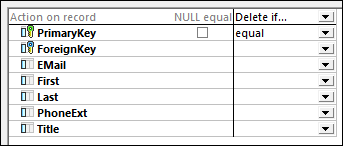
4.Optionally, select the NULL equal check box. In this example, this check box is irrelevant, because neither the PrimaryKey field in the source XML nor the PrimaryKey field in the database contains any null values. However, you should select this check box if your data contains null values, and if you want to treat such null values as equal; otherwise, you may get undesired results. For more information, see Handling Nulls in Database Table Actions.
5.Click Append Action. This adds a new action to the right of the existing Delete If action. Configure the new action as Insert Rest:
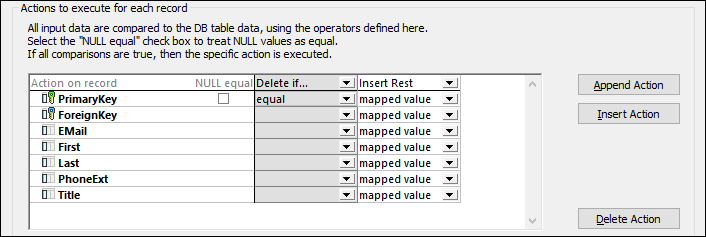
In the image above, the database table actions have been configured in accordance with the goals of the mapping. That is, only when the Delete If... condition is satisfied will the record be deleted; otherwise, it will be inserted. The option "mapped value" specifies that values from the mapping will be used to populate all fields of the record.
6.Click OK to close the dialog box. Notice that, back on the mapping, the Action: Insert ![]() button has now changed to an Action: Delete; Insert (
button has now changed to an Action: Delete; Insert ( ![]() ) button. This indicates that both a delete and an insert action is configured for this table.
) button. This indicates that both a delete and an insert action is configured for this table.
Step 5: Preview the mapping and update the database
Click the Output pane to preview the mapping. A SQL script is generated, containing actions to be executed against the database. The script has not modified the database yet; it is only for preview. To run the script against the database:
•On the Output menu, click Run SQL-Script.
| Note: | Running the SQL script directly from MapForce is just one of the ways to update the database, see also Executing Mappings Which Modify Databases. |
If you open the "Person" table in the DB query pane of MapForce (see Browsing and Querying Databases), you can see the result of the mapping as follows:
•All database records which had corresponding primary keys in the XML file have been deleted. Examples are records with primary key 1, 2, 3, 4, and 5.
•All database records which had no corresponding keys in the XML file remained unaffected. Examples are records with primary key 6, 7, 8, 9, 10, 11, 12, and 13.
•New records have been inserted to the "Person" table (where key did not already exist in the database). Examples are records with primary key 30 and 31.
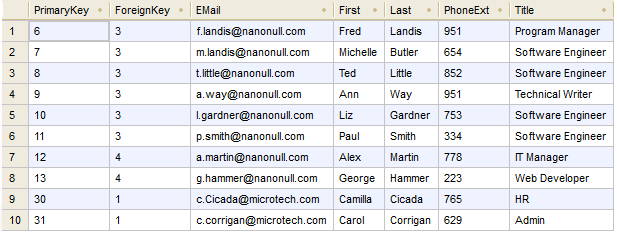
The "Person" table after updating the database