Example: Mapping Data from XML to SQLite
This example walks you through the steps required to create a MapForce mapping which reads data from an XML file and writes it to a SQLite database. The example is accompanied by a sample mapping design (.mfd) file. If you want to look at the sample file before starting this example, you can open it from the following path: <Documents>\Altova\MapForce2023\MapForceExamples\Tutorial\XMLtoSQLite.mfd.
The goal of the example is to insert data from an XML file into a SQLite database. To accomplish the goal of the example, you will need an empty SQLite database to which data will be written. As illustrated below, you can create and explore the SQLite database either with Altova DatabaseSpy, or with the command-line shell available from the official SQLite website.
To create the SQLite database:
If DatabaseSpy is installed on your computer (either standalone or as part of Altova MissionKit), you can create the new SQLite database as follows:
1.Run DatabaseSpy.
2.On the File menu, click Create a Database Connection.
3.Click Connection Wizard, and then click SQLite.
4.Click Create a new SQLite database, enter c:\sqlite\articles.sqlite as path, and then click Connect.
5.When prompted to set a data source name, leave the default name as is.
6.Open a new SQL editor (Ctrl+N) and run the following query against the database:
create table articles (number smallint, name varchar(10), singleprice real); |
Otherwise, follow the steps below to create the database:
1.Download the SQLite command-line shell for Windows from the SQLite download page (http://www.sqlite.org/download.html) and unpack the .zip archive to a directory on your local machine (for the scope of this example, use c:\sqlite).
2.Run c:\sqlite\sqlite3.exe and enter the following statement:
create table articles (number smallint, name varchar(10), singleprice real); |
This creates the table articles in the in-memory database. The table articles consists of three columns: number, name, and singleprice. The purpose of these columns is to store data from the elements with the same name defined in the source XML schema. Each column is declared with a data type suitable for the data expected to be stored in that column.
3.Run the command:
.save articles.sqlite |
This saves the in-memory database to the current working path: c:\sqlite\articles.sqlite. Note that you will need to refer to this path in subsequent steps.
You have now finished creating the sample SQLite database required for this example.
To create the XML to SQLite mapping design:
1.Run MapForce and make sure that the transformation language is set to BUILT-IN (use the menu command Output | Built-in Execution Engine).
2.Add to the mapping area the file Articles.xml located in the <Documents>\Altova\MapForce2023\MapForceExamples\Tutorial folder (use the menu command Insert | XML Schema/File).
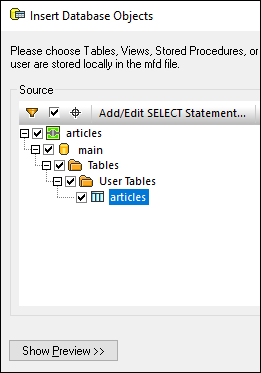
3.Add to the mapping area the database articles.sqlite created in previous steps (use the menu command Insert | Database), and then select SQLite.
4.Click Connect. When prompted to choose the database objects, select the articles table.
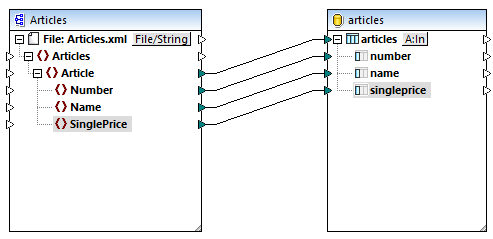
5.Draw the connections as shown below:
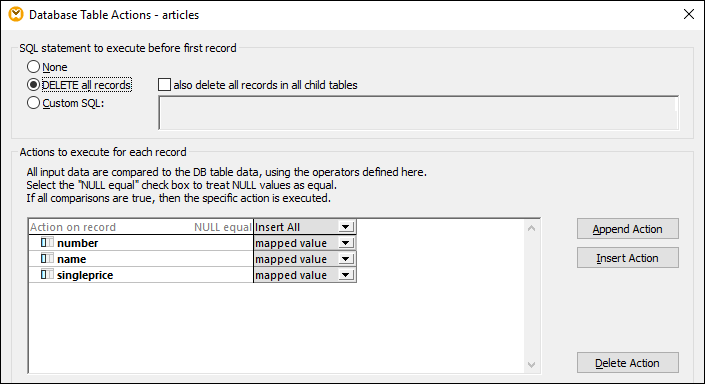
6.Click the A:In button on the database component and select the Delete All records option. This ensures that, every time the mapping is executed, all existing database rows are first deleted, in order to prevent duplication.
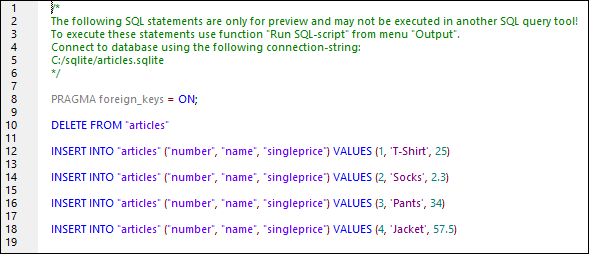
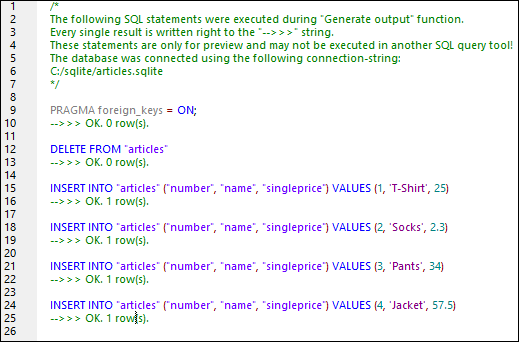
7.Click the Output pane of the main mapping window. MapForce executes the mapping using the built-in execution engine and displays the create SQL query in the Output window.
8.Run the SQL script to populate the database (use the menu command Output | Run SQL-Script). If MapForce does not encounter any runtime errors, the records are inserted into the SQLite database.
To check whether data was correctly inserted into the SQLite database:
1.Click the DB Query pane of MapForce.
2.Select the articles entry from the drop-down list at the top of the DB Query pane.
3.Enter the following query in the SQL Editor:
select * from articles; |
Alternatively, follows the steps below:
1.Run the file c:\sqlite\sqlite3.exe and open the database with the command:
.open articles.sqlite |
2.Run the following select statement:
select * from articles; |
Regardless of the approach you choose to select the table data (MapForce or SQLite shell), the query should returns four rows now. This corresponds to the number of records in the source XML file, which was the intended goal of this example.