Inserting Data into a Table
A mapping can insert data into a database table from any of the source components supported by MapForce, including other databases. You can flexibly configure how the primary key of newly inserted records should be created. For example, the primary key can be taken from the mapping, generated by the database, or calculated based on existing key values in the database table.
This example shows you how to insert new records into an existing database table from an XML file. You will also configure how the primary key is to be generated. The example uses the following files:
•altova-cmpy.xml — contains the source data to be inserted into the database.
•Altova_Hierarchical.xsd — the schema used to validate the instance file above.
•Altova.sqlite — the target database to be updated.
All files are available in the <Documents>\Altova\MapForce2023\MapForceExamples\ folder. Below, the complete path to them will be omitted, for simplicity.
The mapping in this example modifies a sample database file. It is strongly recommended to back up the original database and start with a new copy before following the steps below. This ensures that the original examples are not overridden and that you get the same results as below. For more information, see Executing Mappings Which Modify Databases. |
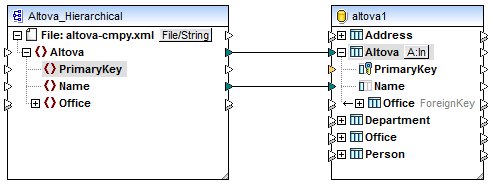
The goal of the mapping is to insert companies found in the Altova-cmpy.xml as new records in the "Altova" table of the Altova.sqlite database. If you open the source XML file, you will notice that it contains only one company, called "Microtech OrgChart". Therefore, the mapping must add a new record to the "Altova" table with the name "Microtech OrgChart". Also, a new primary key must be generated for it.
To achieve the mapping goal, we will take the steps below.
Step 1: Insert the source XML component
•On the Insert menu, click XML Schema/File, and browse for Altova_Hierarchical.xsd. When prompted to supply an instance file, browse for Altova-cmpy.xml.
Step 2: Insert the target database
•On the Insert menu, click Database, and go through the wizard steps to connect to Altova.sqlite (see Add a Database).
Step 3: Draw the connections
•Draw the mapping connections as shown below.
| Note: | If unwanted connections are automatically drawn for descending items, the option "Auto-connect children" is active. In this case, to undo the last action, select the menu option Edit | Undo. To disable the auto-connect option, select the menu option Connection | Auto-connect matching children. |
Step 4: Configure the Insert action
1.On the target component, notice the Action: Insert ( ![]() ) button. This button appears for each table that has a connection from the mapping (in this case, the "Altova" table). Click this button to configure in more detail the database action to be executed (in this case, the insert action). The Database Table Actions dialog box appears.
) button. This button appears for each table that has a connection from the mapping (in this case, the "Altova" table). Click this button to configure in more detail the database action to be executed (in this case, the insert action). The Database Table Actions dialog box appears.
2.In the Database Table Actions dialog box, under Insert All, next to PrimaryKey, select the max() + 1 option.
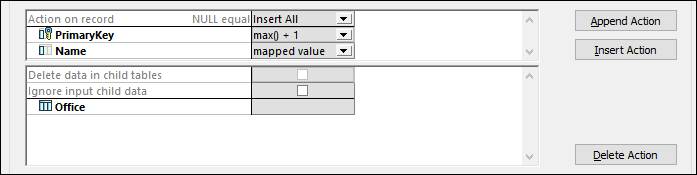
The options available in this list have the following meaning:
Option | Description |
mapped value | Allows source data to be mapped to the database field directly, and is the standard setting for all database fields. It is also possible to use a stored procedure to supply a key value by defining a relation, see Using Stored Procedures to Generate Keys. |
max() + 1 | Generates the key values based on the existing keys in the database. For example, if the table has three records, with primary keys 1, 2, and 3, then max() + 1 is 4.
In this example, the "Altova" table has only one record with primary key 1, so max() + 1 is 2, which is the expected value of the new primary key. |
DB-generated | The database uses the Identity function to generate key values. |
The option mapped value next to "Name" signifies that this column will get the value directly from the mapping. For reference to other options available on the Database Table Actions dialog box, see Database Table Actions Settings.
Step 5: Preview the mapping and update the database
Click the Output pane to preview the mapping. A SQL script is generated, containing actions to be executed against the database. The script has not modified the database yet; it is only for preview. To run the script against the database:
•On the Output menu, click Run SQL-Script.
| Note: | Running the SQL script directly from MapForce is just one of the ways to update the database, see also Executing Mappings Which Modify Databases. |
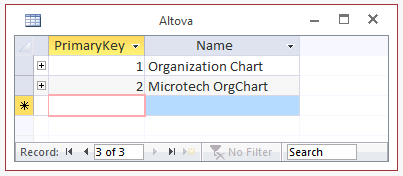
To see the result, open the Altova.sqlite database in DatabaseSpy or Access. Notice that a new "Microtech OrgChart" record has been added to the "Altova" table with the new primary key 2. The data for this record originated in the input XML instance.
You have now finished creating a mapping which inserts data into a database table. For a mapping example which inserts data both into the current table and a dependent child table, see Inserting Data into Multiple Related Tables.