Projects in StyleVision
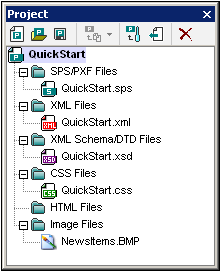
Files that are related to each other can be collected in a project in the Project sidebar (screenshot below). This enables the files in a project to be accessed easily when designing an SPS. For example, an SPS file can be dragged from the Project sidebar to the Design Tree sidebar and created there as a module; or an image file can be dropped into the design as a static image; or a CSS stylesheet can be dragged to the Style Repository sidebar as an external stylesheet.
Creating and saving a project
A new project is created using the Project | Create Project command. When it is created, a project contains separate folders for separate types (see screenshot above). File types are assigned to a folder via the folder's Properties dialog. A project is named when it is saved (with the extension .svp) for the first time. To subsequently change the name of a project, you change the project file's name at its location, using an application such as Windows File Explorer.
Project folders
Folders can be added both to the main project folder as well as to folders within the main project folder and to sub-folders down to an unlimited number of levels. Three types of folders can be added: (i) a project folder; (ii) an external folder (which is added by browsing and selecting); (iii) an external web folder (which is added via a URL). Each of these three folder types is added to the main project folder using the following Project commands, respectively: (i) Add Project Folder to Project; (ii) Add External Project Folder to Project; (iii) Add External Web Folder to Project. To add each of these folder types to a folder or sub-folder within the main project, select the relevant command from the context menu for that folder or sub-folder.
Each folder can be assigned one or more file types in its Properties dialog (screenshot below). To pop up the Properties dialog, right-click the folder for its context menu, and select Properties.
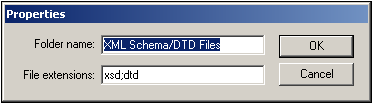
In the Properties dialog, you can edit the folder name and the file type extensions for that folder (each file type extension must be separated by a semi-colon). Project folder names can also be edited by selecting the folder in the Project sidebar, pressing F2, and editing the name. When a folder has file type extensions defined for it, files with that extension, when added using the Add File to Project command, are added to the folder. If more than one folder has the same file type extension defined, the file is added to the first folder in the Project sidebar having that extension. In the Project sidebar, folders can be reordered using drag-and-drop. However, on the first level (that is at the level immediately below the main project folder), folders are ordered as follows: (i) project folders; (ii) external folders; (iii) external web folders.
Project files
Files can be added both to the main project folder as well as to folders and sub-folders within the main project folder. Files can be added using the following commands in the Project menu:
•Add Files to Project: One or more files are selected in a Browse window for addition. Each of the added files goes into the first folder for which its file type extension has been defined.
•Add Global Resource to Project. A file is added via a global resource.
•Add URL to Project: A file is added via its URL (which is defined in the Add URL to Project dialog).
•Add Active File to Project: The active (SPS) file is added to the first folder in the Project sidebar that has .sps defined as its file type extension.
•Add Active and Related Files to Project: The active (SPS) file plus related files, such as the schema/s, Working XML Files, CSS files, static image files, etc, are added to the project, in their respective folders as determined by the file type extensions of the folders. This is a very useful command for quickly gathering into a project all the files relevant to a given design.
•Properties. When any project file is selected, clicking the Properties icon in the Project Window toolbar or selecting the Properties command from the context menu pops up a window that displays the location of the file. XML files additionally enable you to select an SPS with which the file can be associated (see screenshot below).
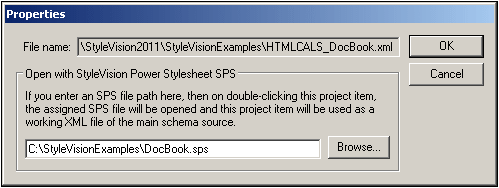
When an SPS file is associated with an XML file that is in a project, double-clicking that XML file in the Project window will open the associated SPS file with the XML file assigned as the Working XML File of the SPS. This is useful if multiple XML files use a single SPS. This feature helps to speed up your work by cutting out the bother of browsing for the SPS file and/or Working XML File.
The commands listed above add files to the main project according to the file type extensions of the folders in the main project folder. To add files to specific folders or sub-folders, right-click the required folder, and in the context menu that pops up, select the corresponding command. Within a folder, files are listed in alphabetical order. Note files can also be dragged to another folder. To see the location of a file, click the Properties command in its context menu.
Global resources
A global resource of file- or folder-type can be added to a folder. A file-type global resource is an alias for a file resource. An alias can have multiple configurations with each configuration pointing to a file resource. So if a global resource is used in a project, it can link to any of the target resources, depending on which configuration is currently active in StyleVision. A folder-type global resource, similarly, is an alias that can target any one of multiple folders according to the configuration that is currently active. If a folder-type global resource is used in the design to identify a file (say, a Working XML File or CSS file), the folder-type global resource will identify a folder only; the path from that folder to the required file will need to be specified additionally. For more information on how to use global resources, see Using Global Resources.
Drag-and-drop
In the Project sidebar, a folder can be dragged to another folder or to another location within the same folder. A file can be dragged to another folder, but cannot be moved within the same folder (within which files are arranged alphabetically). Additionally, files and folders can be dragged from Windows File Explorer to the Project sidebar.
Using projects
Files in a project can be used in various ways depending on what kind of file it is. For each file in the Project sidebar, the actions available are listed in its context menu (right-click to display). Additionally, dragging the file to a location where an action can be executed pops up a menu that contains the relevant command/s; in the case of some commands, the command is executed directly the file is dropped at the relevant location. Given below is a list of available actions for various file types.
SPS Files
•Open Design opens the SPS in a new design window. (This command also becomes available when you drag an SPS file from the Project sidebar into Design View.)
•Import as Module imports the SPS as a module in the currently active SPS; the imported file will be listed under the Modules heading in the Design Tree. (You can also import the file as a module by dragging it to the Modules heading in the Design Overview sidebar.)
XML Files
•Edit File in XMLSpy opens the XML file in XMLSpy.
•Create New Design creates a new SPS. The schema for the SPS is an XML Schema generated from the XML document. The Working XML File of the SPS is the XML file. (You can also drag the file into the Main Template bar of Design View to use this command.)
•Add as New Schema Source adds an XML Schema generated from the XML file as an additional schema source; the XML file is assigned as the Working XML File for this new schema source. (You can also drag the file to the Schema entry of the Design Overview sidebar to generate a schema and add the schema as a new schema source.)
•Assign as Working XML File assigns the XML File as the Working XML File of the SPS. (You can also drag the file to the Working XML entry of the Design Overview sidebar to add it as the Working XML File.)
•Assign as Template XML File assigns the XML File as the Template XML File of the SPS. (You can also drag the file to the Template XML entry of the Design Overview sidebar to add it as the Template XML File.)
•Note: When an XML file is double-clicked, one of three actions will be executed according to what is specified in the Project tab of the Options dialog: (i) Edit file in XMLSpy; (ii) Create a new design based on the XML file; (iii) Ask the user which action to execute.
XML Schema / DTD Files
•Edit File in XMLSpy opens the schema file in XMLSpy.
•Create New Design creates a new SPS based on the selected schema. (You can also drag the file into the Main Template bar of Design View to create a new SPS with the selected schema as the schema source.)
•Add as New Schema Source adds an XML Schema generated from the XML file as an additional schema source; the XML file is assigned as the Working XML File for this new schema source. (You can also drag the file to the Schema entry of the Design Overview sidebar to create an additional schema source.)
•Assign as Schema File assigns the selected schema as the schema source of the currently active SPS, replacing the current schema source. This command is most useful for quickly changing schemas, for example, if the schema location has changed or to correct a wrong assignment. (To use this command, you can also drag the file to the Schema entry of the Design Overview sidebar.)
•Note: When a schema file is double-clicked, one of three actions will be executed according to what is specified in the Project tab of the Options dialog: (i) Edit file in XMLSpy; (ii) Create a new design based on the schema file; (iii) Ask the user which action to execute.
CSS Files
•Edit File in XMLSpy opens the CSS file in XMLSpy.
•Import into Style Repository adds the CSS file to the External CSS files of the Style Repository (External heading in the Styles Repository sidebar). (You can also drag the file to the External heading in the Styles Repository sidebar to import the file into the style repository.)
HTML Files
•Edit File in XMLSpy opens the HTML file in XMLSpy.
•Open opens the HTML file in the default browser.
•Create New Design creates a new SPS, in which you can create the schema based on the HTML document. (You can also drag the file into Design View to use this command.)
Image Files
•When you hover over an image file that has been placed in a project folder, a preview of the image is displayed (.png, .jpeg, .gif, .bmp, .tiff, and .ico formats). Double-click the image to open it in the system's default image viewer/editor application.
•The context menu command Open opens the image file in the default image viewer/editing application.
•The context menu command Insert Image in Design inserts the image as a static image in the SPS. (You can also insert the image at a particular location by dragging it there.)
All file types
•Explore Containing Folder opens a Windows File Explorer window displaying the contents of the folder in which the selected file is located.
•Cut, Copy, Paste, Delete commands work in the standard Windows way, cutting and copying the selected file to the clipboard; pasting files from the clipboard; and deleting. These commands also work for a selection of multiple files.
•Select All selects all the files in the project.
•Properties pops up the Properties dialog, in which the location of the file is given.
Find in project
You can search for project files and folders using their names or a part of their name. If the search is successful, files or folders that are located are highlighted one by one.
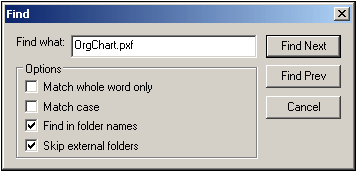
To start a search, select the project folder in the Project sidebar that you wish to search, then select the command Edit | Find (or the shortcut Ctrl+F). In the Find dialog that pops up (screenshot below) enter the text string you wish to search for and select or deselect the search options (explained below) according to your requirements.
The following search options are available:
•Whole-word matching is more restricted since the entire string must match an entire word in the file or folder name. In file names, the parts before and after the dot (without the dot) are also each treated as a word.
•It can be specified that casing in the search string must exactly match the text string in the file or folder name.
•Folder names can be included in the search. Otherwise, only file names are searched.
•External folders can be included or excluded from the search. External folders are actual folders on the system or network, as opposed to project folders, which are created within the project and not on the system.
If the search is successful, the first matching item is highlighted in the Project sidebar. You can then browse through all the returned matching items by clicking the Find Next and Find Prev buttons in the Find dialog.