XML Signatures
An SPS can be designed with an XML signature configured for Authentic View. When XML signatures are enabled, the Authentic View user can digitally sign the Authentic XML file with the enabled signature. After the document has been signed, any modification to it will cause the verification of the signature to fail. Whenever a signed Authentic XML document is opened in the Authentic View of any Altova product, the verification process will be run on the document and the result of the verification will be displayed in a window.
Note: XML signatures can be enabled in the Enterprise edition of StyleVision. If an SPS with an enabled signature is opened in StyleVision Professional or StyleVision Basic, a message indicating that the feature is not supported in these versions is displayed.
Note: XML signatures can be used, and will be verified, in the Authentic View of the Enterprise edition of the following Altova products: Authentic Desktop, Authentic Browser, XMLSpy, and StyleVision.
Working with XML signatures in StyleVision and Authentic View
This section provides an overview of how XML signatures are enabled in an SPS, how Authentic XML documents are signed with XML signatures, and how the signatures are verified.
1.Enabling and configuring the XML signature: In StyleVision, the Design Overview sidebar provides access to the Configure XML Signature dialog (screenshot below), in which you must enable the signature.
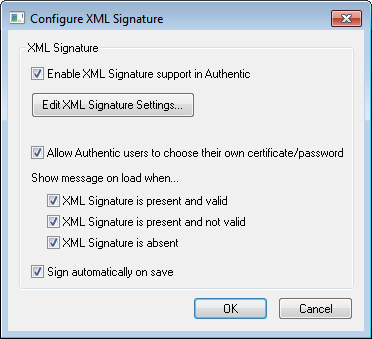
In this dialog you also specify whether the Authentic View user can choose an own certificate/password and whether the Authentic XML document is signed automatically when it is saved. A certificate or password can be specified in the SPS by the SPS designer in the XML Signature Settings dialog, which is accessed via the XML Signature Settings button. The specified certificate/password is used as the default. It can be overridden by the Authentic View user's certificate/password if this has been allowed. When the Authentic View user signs the XML document, the certificate or password is used together with the XML data to generate the signature.
2.In the XML Signature Settings dialog, accessed via the Edit XML Signature Settings button of the Configure XML Signature dialog (see screenshot above), the following settings are specified:
(i) The certificate or password to use. If a certificate is specified, the certificate's key information can be saved with the signature by checking the Append Keyinfo checkbox (at the bottom of the XML Signature Settings dialog); this obviates the need for the Authentic View user to specify a certificate during verification. If a password is specified, the password information can be saved in the SPS file. This enables the Authentic View user to verify the Authentic XML document without needing to enter the password to run the verification process.
(ii) The placement of the signature: The XML signature can be included in the Authentic XML file, or be saved in a separate (detached) file. If the signature is in a separate file, it will have to be delivered together with the Authentic XML file and saved to the correct location relative to the Authentic XML file. Note also that if you place the XML signature within the Authentic XML file, the schema will need to be modified to accommodate the Signature element. This issue is discussed in the section, XML document validity.
(iii) The transformation method: This specifies how the XML will be transformed before being processed to generate the XML signature. The options are described in the section describing the XML Signature Settings dialog.
3.Authentic View user actions: The following Authentic View user actions are possible:
(i) Choosing the certificate/password: Signatures are authenticated with either a certificate or a password. The authentication object (certificate or password) is required when the signature is created and again when it is verified. If an Authentic XML document has a signature-enabled SPS assigned to it, the SPS might specify a default certificate or password for the signature. Whether a default certificate or password has been specified or not, the signature can be configured to allow the Authentic View user to select an own certificate/password. The Authentic View user can do this at any time in the XML Signature dialog (screenshot below). Selecting an own certificate/password overrides the default certificate/password. The own certificate/password is stored in memory and is used for the current session. If, after an own certificate/password has been selected, the Authentic View user closes the file or the application, the SPS reverts to its default setting for the certificate/password.
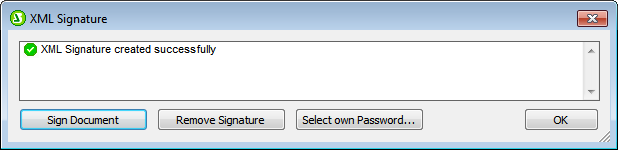
(ii) Signing the document: The Authentic XML document can be signed either automatically or manually. Automatic signing is specified in the signature configuration and causes the document to be signed automatically when it is saved. If the automatic-signing option has not been activated, the document can be signed manually. This is done by clicking the XML Signature toolbar icon  or the Authentic | XML Signature command, and, in the XML Signature dialog that then pops up (screenshot above), clicking the Sign Document button. Note that signing the document with an embedded signature would require the schema to allow the Signature element as the last child element of the root (document) element. Otherwise the document will be invalid against the schema. This issue is discussed in the section, XML document validity.
(iii) Verifying the Authentic XML document: If an SPS has XML Signatures enabled, the verification process will be run on the signature each time the Authentic View XML document is loaded. If the password or certificate key information is not saved with the SPS and signature, respectively, the Authentic View user will be prompted to enter the password or select a certificate for verification. Note that if an embedded signature is generated, it will be saved with the XML file when the XML file is saved. The generated signature must be explicitly removed (via the Remove Signature button of the XML Signature dialog; see screenshot above) if you do not wish to save it with the XML file. Similarly, if a detached signature is generated, it too must be explicitly removed if it is not required.
The sub-sections of this section describe in detail each of the processes discussed above:
•Signing the Authentic XML Document
•Signature Verification in Authentic