Creating a PXF File
To create a PXF file that will contain an SPS design plus related files, open the SPS design in StyleVision and select the command File | Save As. This pops up the Save Design dialog (screenshot below).
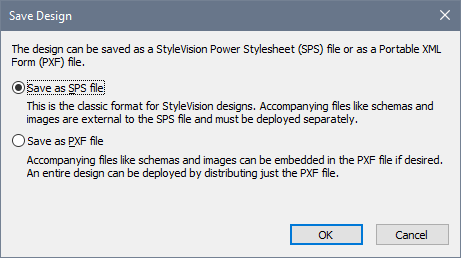
The SPS format is the standard Altova format for StyleVision designs. In this section we are concerned with the PXF format and so will not consider the SPS format here. Saving a file as an SPS is described in detail in the User Reference section.
Save as PXF
Selecting the PXF option causes the familiar Save As dialog of Windows systems to pop up. Saving works exactly as described for the Save Design command—with the additional step of selecting the files you wish to include in the PXF file. After you specify the PXF filename, the Configure PXF dialog (screenshot below) will appear, in which you can select/deselect the files you wish to embed.

In the Global Configuration pane of the Design-time Files tab, you can select/deselect the design-related source files to be embedded/omitted. You can additionally choose to embed XSLT files generated from the design. In the XSLT files pane, select the output formats for which you wish to generate and embed XSLT files. If an XSLT file is included in the PXF file and the PXF file is opened in the Authentic View of an Altova product, then the toolbar button to generate and view that output format is enabled in Authentic View (screenshot below).
In the Additional Files tab (screenshot below), you can specify any additional files you wish to include that are not design-time files. These could be, for example, image files referenced in the design by a URL generated with an XPath expression. In the screenshot below, the image file NewsItems.bmp located in the Images folder is selected for inclusion in the PXF file.

To include an additional file in the PXF file, click the Add Document button and then browse for the file you want. The Open dialog (in which you browse for the required file) opens the folder in which the SPS is located. Files from this folder or any descendant folder may be selected. After an additional file has been added to the PXF file, it and the folder structure leading to it are displayed. The screenshot above indicates that the additional file NewsItems.bmp is in a folder named Images, which is itself contained in the folder in which the SPS file is located.
If a file is selected from a folder located in any level above the folder containing the SPS file, an error is reported.
In the SPS design, any reference to an additional file must be made with a relative path and must use the folder structure shown in the Additional Files pane. For example, NewsItems.bmp in the screenshot above must be referenced with the relative path: Images/NewsItems.bmp.
Note: In order to save PXF files, the option Embed Images for RTF and Word 2007+ (File | Properties | Images) must be selected.