Homepage Alert Forms
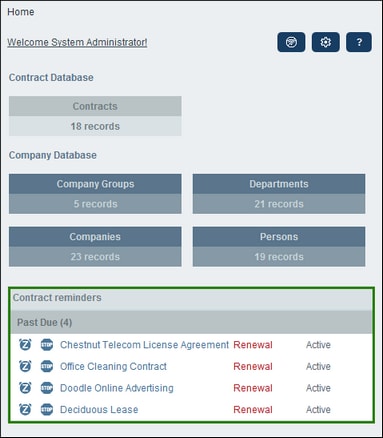
Homepage Alerts are displayed at the bottom of the RecordsManager homepage (highlighted green in the screenshot below). As an admin, you can design multiple Homepage Alert forms for each data table and select the one you want to use for that data table. The selected form for each data table will be displayed on the homepage. If no custom form is designed or used, reminders will be displayed in a default RecordsManager form.
Create a Homepage Alert form
Create a new Homepage Alert form as follows:
1.On the data table's Edit Forms page, click New Homepage Alert Form.
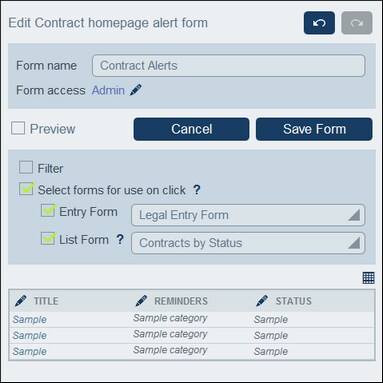
2.Add the fields that you want to show in the form and click Continue. (Note that, in addition to the fields of the current data table, fields of ancestor and linked data tables will also be displayed.) The form will be displayed (screenshot below) and you can edit it. For example, you can edit the design of the table, even adding columns for new fields or deleting columns together with the fields they contain. See Points 5 and 6 below for more information.
3.Give the Homepage Alert form a suitable name.
4.Specify which roles can view and access the reminders displayed via this form on the Home Page. Only users who have at least one of the selected roles will be able to see this form on their homepages.
5.The Entry Form combo box specifies the entry form to use for record viewing or editing when a user clicks a row on the homepage. The List Form combo box specifies the list form to use when a user finishes viewing or editing the record. If the user does not have access rights to these forms, then the default forms will be used. Also, if no form is specified for either setting, then the default form will be used for that setting.
6.Click the Table Editing icon to modify the table structure and content. Click an Insert button to insert a column before the current column, or the Append button (last button) to add a last column to the table. To delete a column, click the respective column's Delete button. You can also set the widths of individual columns by clicking the respective Change Width button.
7.You can edit a column by clicking its Edit button. The following edits are possible: (i) change the field associated with the column; (ii) edit and/or hide the label of the column (its header); (iii) whether to allow sorting of the column's entries.
8.Click Save Form.
9.Click Save Changes (on the data table's Edit Forms page).
10.Remember to select, on the data table's Edit Forms page, the Reminders option of the Homepage Alerts form you want to currently use (see screenshot below).


