Export Forms
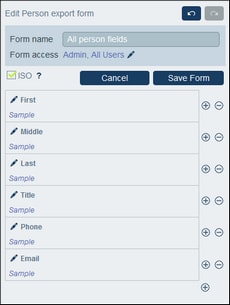
An export form (screenshot below) specifies what data table-related data (data table fields, linked data tables, and child data tables) to export to XML or CSV. For example, the screenshot below shows an export form of the Person data table. The First, Last, Title, Phone, and Email fields of the Person data table have been selected for export, together with the Person data table's parent data table, Department. After the form has been saved (with Save Form) and changes to all forms have been saved (with Save Changes), the export form is available during data entry of records of this data table (in this case, the Person data table). All users who have been authorized to access this form (see screenshot) will be able to export the data specified in this form.
XML format
The exported XML file will have a root element named <Root>, and <Root> will have a child element that has the same name as the current data table (in our example, this is the data table named Person). This element will have the child elements that you selected as the fields to export. For example, the export form for a Person data table (as shown in the screenshot above) might generate an XML file that looks like this:
<Root>
<Person>
<Department>Sales</Department>
<First>Jim</First>
<Last>Gridely</Last>
<Title>Executive</Title>
<Phone>123456789</Phone>
<Email>legal.01@redmaple.com</Email>
</Person>
...
<Person>
<Department>Accounts</Department>
<First>Jane</First>
<Last>Locke</Last>
<Title>Manager</Title>
<Phone>123789777</Phone>
<Email>accounts.04@altova.com</Email>
</Person>
</Root>
CSV format
The first line of the CSV file will contain the headers of fields. Each subsequent line contains one record, with the values of fields being in the same sequence as the headers. The separator in records is a comma. Note that each record is a flat listing of the rows of the export form. Child records cannot be displayed because of the flat structure of CSV files. Compare with the XML structure above.
"Department","First","Last","Title","Phone","Email"
"Sales","Jim","Gridely","Executive","123456789","legal.01@redmaple.com"
...
"Accounts","Jane","Locke","Manager","123789777","accounts.04@altova.com"
| Note: | Among the exported fields in the XML and CSV files, the Department parent of the current data table (Person) is included. Even though Department is not a field of Person, it is available to be added as a field in the export form because of its parent link to Person. Higher-level ancestors are also available and can be added to the form. Although ancestor information is not direct field-level information of a data table, it could be important, and, as a result, is made available as parent links. |
Create an export form
Create a new export form as follows:
1.On the data table's Edit Forms page, click New Export Form.
2.Add the fields you want to export from this data table, including any parent links, and click Continue. (Note that the term parent links includes ancestors at a higher level than the direct parent.)
3.Give the export form a suitable name.
4.Specify which roles can access this form. Only users who have been given at least one of the selected roles will be able to export data using this form.
5.Check the ISO option if you want data in fields of certain datatypes (date, time, number) to be exported in ISO format.
6.To add a field, click an Insert button to insert a row above the current row, or the Append button (last button) to add a last row to the table. To delete a field, click the respective row's Delete button.
7.To change a field, click the field's Edit icon, and make the changes you want.
8.To add child records (for example the Person children of Department), click the field's Edit icon, and (i) select the child data tables to export, and (ii) for each child data table, select which of that child's export forms to use. The child form will be created as a table within the row to which it was added. Note that child data tables cannot be exported to CSV. This is because CSV has a flat structure and cannot reproduce multilevel hierarchies.
9.Click Save Form.
10.Click Save Changes (on the data table's Edit Forms page).
Points to note
•An export form exports data related to the current data table (for example, a Person data table).
•XML export: The fields of the data table that are selected for export will be exported as XML elements that are children of an element that has the name of the current data table (so, for example, an element named Person). See the XML listing above.
•CSV export: The fields of the data table that are selected for export will be exported as the columns of a CSV row, where each CSV row corresponds to a record from the database (for example, one Person record). See the CSV listing above.
•In export forms, it is not only the data table's fields that can be added; parents and higher-level ancestors can also be added. As a result, an exported record can also contain the current data table's parents and higher-level ancestors. See the listings above.
•While data from child data tables can be exported to XML files, they cannot be exported to CSV files. This is because of the flat structure of CSV files.
