Create Filters
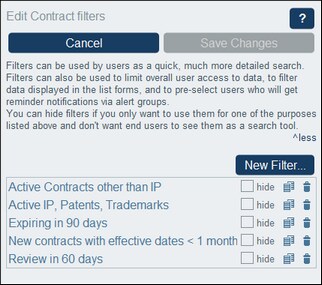
The Edit Filters page (screenshot below) provides an overview of the data table's existing filters. Create a new filter by clicking New Filter.
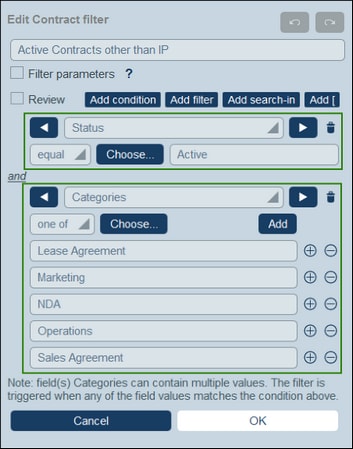
In the Edit <data table> Filter form that appears (screenshot below), give the filter a name. Since filters are presented to users by name (without showing the condition branches you have defined for the filter), you should select a name that is descriptive enough to indicate what the filter selects. After a filter has been created, it will be displayed on the Edit Filters page (screenshot above) along with the other filters of the data table. To edit a filter, click its name on the Edit Filters page. On doing this, the filter's Edit <data table> Filter form appears (screenshot below). The editing form is the same as that used for creating the filter. The form's functionality is described below.
After you have completed editing filters, click Save Changes in the Edit Filters form (see screenshot above).
Structure and broad functionality of the form
The Edit <data table> Filter form has two broad parts:
•A top part, which contains the filter's name and its main controls (a list of parameter definitions for the filter, the Review check box, and buttons to add the condition branches of the filter).
•A bottom part comprising the condition branches, which are framed in green in the screenshot above.
Filter parameters
Filter parameters are parameters that are declared and used in a filter. They can be used in the filter as the values of conditions. If a parameter has been assigned a default value, then that value is used initially when the condition is tested. A user can supply a value to override the default value—thereby modifying the filter. This is the major use of filter parameters: they allow the user to define the filter.
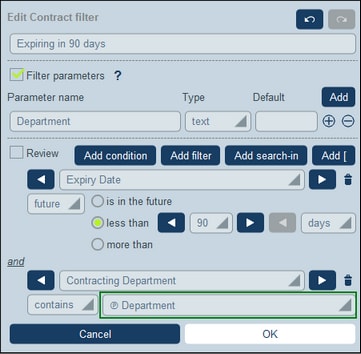
To declare one or more parameters for a filter, check the Filter parameters box (see screenshot below). Uncheck this box to delete all parameters and remove their uses in the filter. You can add additional parameters by clicking Add (see screenshot below). For each parameter: (i) provide a unique name, (ii) specify its datatype, and (iii) optionally specify a default value.
After declaring a filter's parameters as described above, you can use them in conditions of the filter (see the highlighted selection in the screenshot above). Do this by clicking the P icon to the right of the field and selecting one of the filter's parameters from the dropdown list that appears. This means that the value of the parameter will be used in the condition's test. For example, in the second filter condition in the screenshot above, if the Contracting Department field contains the value of the Department parameter, then the condition evaluates to true. During data entry, users can provide these parameter values. In this way, you can enable users to determine how to filter the records of data tables.
'Review' check box
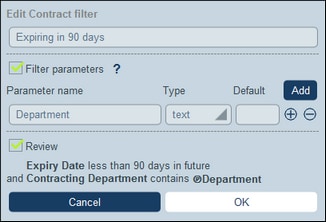
To see the filter's conditions in a compact form, select the Review check box. The condition branches of the filter will then be displayed in a non-editable summarized form with the logical operators that bind them. The compact presentation is achieved due to the absence of editing controls. Compare the screenshot below (of the Review format) with the screenshot above (of the Editing format).
To go back to the editing format, uncheck the Review check box.
Add and define condition branches
The button controls in the form enable you to add condition branches at the top level of the filter. These buttons are located to the right of the Review check box (see screenshot below), and will be available in Editing format, that is, when the Review check box is not selected.
![]()
How to define the branches of the filter is described in the next section, Define Condition Branches.


