Example: Import .NET Assemblies
This example shows you how to import binary types from the .NET Global Assembly Cache (GAC) into a UModel C# project. The instructions are similar if you want to import binary types from a standalone .dll or .exe file. To find out out how to import Java .class files, see the next topic.
To import binary files from the .NET Global Assembly Cache:
1.Go the Project menu and click Import Binary Types (see screenshot below).
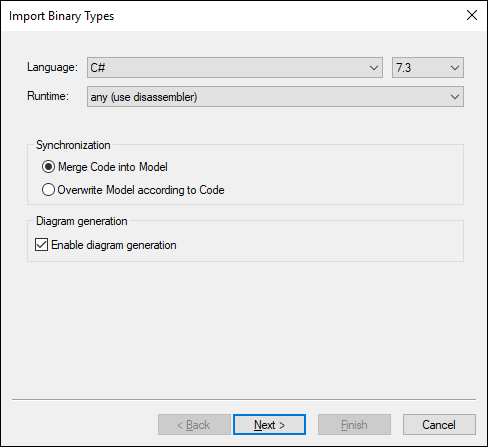
2.Choose the target language of the UModel project (C#, VB.NET, Java). In this example, C# is selected, since we are importing a .NET GAC assembly.
3.If you would like to set a specific language version for the imported UModel project, select it from the adjacent text box. In this example, C# 7.3 is selected.
4.Optionally, select a .NET runtime version from the Runtime drop-down list. The default option is any (use disassembler). In this case, UModel will choose a reflection API that is most appropriate for the imported binary.
5.If you import binary types into a new project, select either Merge Code into Model or Overwrite Model according to Code.
6.Optionally, to generate class diagrams and package diagrams from the imported binary types, select the Enable diagram generation check box. If you select this option, more diagram generation options will be available in the next steps. See Generating Class Diagrams and Generating Package Diagrams.
7.Click Next.
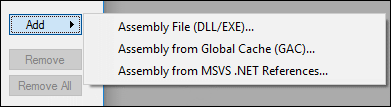
8.Click Add | Assembly from Global Cache (GAC) (see screenshot below). Note that the option Assembly from Global Cache (GAC) is only available for .NET Framework 2.x-4.x. The GAC is not relevant to .NET Core, .NET 5 and later versions. For more information, see the Microsoft documentation. In order to import assembly files for .NET Core, .NET 5 and .NET 6, you will need to extract the required files from the GAC. Then click Add | Assembly File (DLL/EXE), select the assembly files manually and add them to the project.
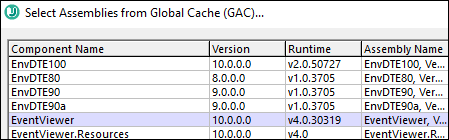
9.Select an assembly from the dialog box. In this example, the EventViewer assembly is selected (see screenshot below).
10.Select the types you would like to import and click Next. For more information about other options of the Import Binary Selection dialog box, see the notes below.
11.Select the import options as applicable. For more information, see Import Binary Options.
12.If you enabled diagram generation in Step 6, click Next and configure the options applicable to diagram generation. Otherwise, click Finish.
UModel performs the conversion and displays a progress log in the Messages window. If the conversion of binary types is not possible, the error text may provide additional information. For example, the binary file you are trying to import is targeting a runtime newer than the one selected in the Import Binary Types dialog box. In this case, select a newer runtime version and try again.
Notes:
•The text box Override of PATH variable... in the Import Binary Selection dialog box is applicable only to Java. Optionally, paste here any Java class paths that must be queried in addition to those read from the CLASSPATH environment variable. Alternatively, click Add and browse for the required folders.
•The check box use 'reflection only' context... in the Import Binary Selection dialog box is applicable only when you import a C# or VB.NET binary. This is useful when importing a library which has dependencies that cannot be resolved or loaded. Selecting this check box will not execute any static initializer code, which might cause errors when importing.