SQL Editor Features
The SQL Editor has multiple visual aids to make the display, editing and navigation of text easier. These include:
•SQL statement selection and navigation
•End-of-Line and whitespace markers
Support for syntax coloring, text auto-completion, and formatting in SQL Editor may vary depending on the database version. More recent database versions typically provide better support for these features. |
Where applicable, you can toggle or customize the features above from the Text View Settings dialog box. Settings in the Text View Settings dialog box apply to the entire application—not only to the active document.
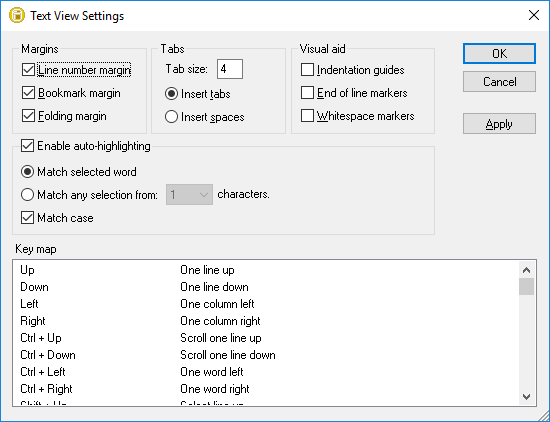
Text View Settings dialog box
To open the Text View settings dialog box, do one of the following:
•On the SQL Editor menu, select Text View Settings.
•Right-click the SQL Editor, and select Text View Settings from the context menu.
Some of the navigation or viewing aids can also be toggled from the application menu, toolbars, or keyboard shortcuts. For reference to all applicable shortcuts, see the "Key Map" section of the Text View Settings dialog box illustrated above.
Line numbers
Line numbers are displayed in the line numbers margin, which can be toggled on and off in the Text View Settings dialog box. When a section of text is collapsed, the line numbers of the collapsed text are also hidden.
Syntax coloring
Syntax coloring is applied according to the semantic value of the text. You can enable or disable syntax coloring from the Tools | Options menu, SQL Editor group.
Statement selection and navigation
The following buttons in the SQL Editor toolbar allow you to select text, depending on where the cursor is positioned.
 | Next statement (Alt+Down): Selects the statement after the statement where the cursor is currently located. |
 | Previous statement (Alt+Up): Selects the statement before the statement where the cursor is currently located. |
 | Last statement (Alt+End): Selects the last statement in the SQL Editor. |
 | First statement (Alt+Home): Selects the first statement in the SQL Editor. |
 | Current statement (Shift+Alt+Enter): Selects the statement where the cursor is currently located. Alternatively, you can also triple-click into a statement or click into any of the margins, if visible. |
Bookmarks
Lines in the document can be bookmarked for quick reference and access. If the bookmarks margin is toggled on, bookmarks are displayed in the bookmarks margin.

Otherwise, bookmarked lines are highlighted in cyan.

The bookmarks margin can be toggled on or off in the Text View Settings dialog box.
You can edit and navigate bookmarks using the following commands:
 | Insert/Remove Bookmark |
 | Go to Next Bookmark |
 | Go to Previous Bookmark |
 | Delete All Bookmarks |
The commands above are available in the SQL Editor | Bookmarks menu and the SQL Editor toolbar. Bookmark commands are also available through the context menu, when you right-click the SQL Editor.
Regions
In the SQL Editor, regions are sections of text that you mark and declare as a unit to structure your SQL scripts. The benefit of regions is that their enclosed text can be easily collapsed or expanded, and thus simplify navigation in long scripts (see also "Source folding" below). It is also possible to nest regions within other regions.
To create a region:
1.In the SQL Editor, select the statements you want to make into a region.
2.Click the Add Region  button in the SQL Script toolbar or select the menu option SQL Editor | Insert | Insert Region.

To remove a region:
•Delete the -- region and -- endregion comments.
Source folding
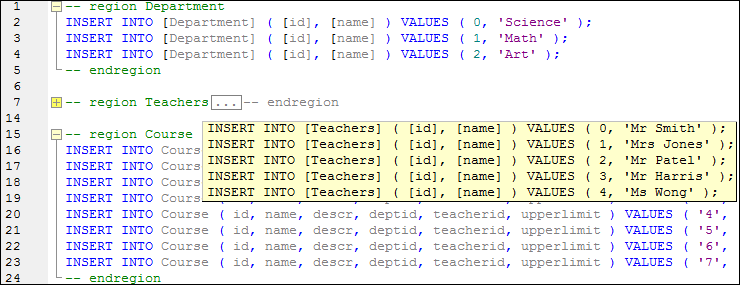
Source folding refers to the ability to expand and collapse regions and is displayed in the source folding margin. The margin can be toggled on and off in the Text View Settings dialog box. To expand or collapse portions of text, click the "+" and "-" nodes at the left side of the window. Any portions of collapsed code are displayed with an ellipsis symbol. To preview the collapsed code without expanding it, move the mouse cursor over the ellipsis. This opens a tooltip that displays the code being previewed, as shown in the image below. Note that, if the previewed text is too big to fit in the tooltip, an additional ellipsis appears at the end of the tooltip.
The Toggle All Folds ![]() command toggles all regions to their expanded or collapsed forms.
command toggles all regions to their expanded or collapsed forms.
End-of-line markers, whitespace markers
End-of-line (EOL) markers and whitespace markers can be toggled on in the Text View Settings dialog box. The image below shows a document where both end-of-line and whitespace markers are visible. An arrow represents a tab character, a "CR" is a carriage return, and a dot represents a space character.

Zooming in and out
You can zoom in and out by scrolling (with the scroll-wheel of the mouse) while holding the Ctrl key pressed. Alternatively, press the "-" or "+" keys while holding the Ctrl key pressed.
Word wrapping
To toggle word wrapping in the currently active document, select the SQL Editor | Word Wrap menu command, or click the Word Wrap  toolbar button.
Text highlighting
When you select text, all matches in the document of the text selection that you make are highlighted automatically. The selection is highlighted in pale blue, and matches are highlighted in pale orange. The selection and its matches are indicated in the scroll bar by gray marker-squares. The current cursor position is given by the blue cursor-marker in the scroll bar.
To switch text highlighting on, select Enable auto-highlighting in the Text View Settings dialog box. A selection can be defined to be an entire word or a fixed number of characters. You can also specify whether casing should be taken into account or not.
For a character selection, you can specify the minimum number of characters that must match, starting from the first character in the selection. For example, you can choose to match two or more characters. In this case, one-character selections will not be matched, but a selection consisting of two or more characters will be matched. So, in this case, if you select t, then no matches will be shown; selecting ty will show all ty matches; selecting typ will show all typ matches; and so on.