Importing Database Data
With DatabaseSpy, you can import data from XML or CSV files to your databases. When you click the Import  button in the Tools toolbar or select the menu option Tools | Import data to the database... (Ctrl+I), the "Import data to the database" dialog box opens where you can select the XML or CSV file to be imported and define the import options. The "Import data to the database" dialog box contains two tabs, Selection and Options.
The lower part of the dialog box always shows a preview of the selected data, which can be updated to reflect the selected options.
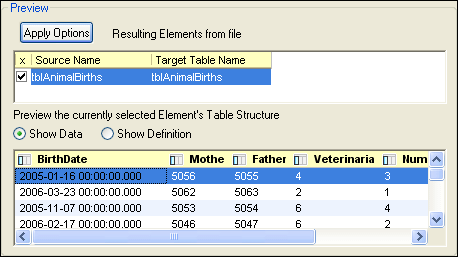
You can choose to preview the data (screenshot above) or the definition (screenshot below) of the selected element's table structure.
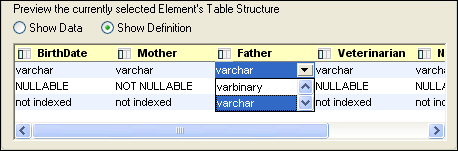
All fields will be created as Text fields with the length specified in the Options tab. You can change the data type separately for every column in the Preview group box if you select the Show Definition radio button (see screenshot above).
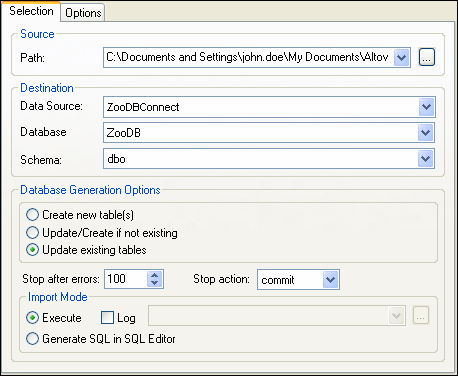
To import data from a CSV or XML file into a database:
1.Make sure that a data source is active in the project folder.
2.Select the menu option Tools | Import data to the database, or press Ctrl+I, or click the Import button in the Tools toolbar. The "Import data to the database" dialog opens.
3.Click either the XML or CSV button at the top-left of the dialog box, as required.
4.In the Path text box, enter the path to the text file you want to import. You can type it in, select it from the drop-down list, or click the Browse  button.
5.Under "Destination", fill in the destination data source, database, and schema, if applicable. If you previously selected a data source, the three fields are automatically filled in. Otherwise, do the following:
a)Select the data source, database, and schema from the drop-down lists.
b)Select Create new table(s), Update/Create if not existing, or Update existing tables, depending on where you want to import the data.
c)In the Stop after errors drop-down list, specify the number of errors after which the import process should be stopped.
d)In the Stop action drop-down list, select the action to perform when import is stopped: Commit commits the tables that did not contain errors; rollback does not commit any imported data.
6.In the Import Mode group box, do one or more of the following:
•Select the Execute option if the necessary SQL should be generated and executed in one step.
•Select the Generate SQL in SQL Editor option if the generated SQL file should be placed in the SQL Editor ready for execution.
•Select the Log check box to enable the drop-down list where you can enter the name and path of the SQL log. You can select a previously used log file or an existing log file by clicking the Browse button.
7.Click the Reload button to preview the data and further define the settings. You may need to click this button if you changed any of the previous options.
8.Optionally, click inside the "Target Table Name" column to change the target table name.
9.Click the Show Data or Show Definition radio button to edit the different aspects of the table structure.
10.Double-click a field in the preview window to edit the data type, nullability, or indexing. Define how/whether you want to import each column by clicking the column header to change it.
 Import
 Do not import
11.Do one of the following:
•If the Execute option was selected previously, click Import. The text file is imported into the database and a message box appears asking if you want to view the log.sql file.
•If the Generate SQL in SQL Editor option was selected previously, click Generate SQL. In this case, you have to execute the generated SQL script in order to import the text file into the database, see Executing SQL.