Inserting Dynamic Content (from XML Source)
This section introduces mechanisms to insert data from nodes in the XML document. In it you will learn how to drag element and attribute nodes from the schema tree into the design and create these nodes as contents. When a node is created as contents, the data in it is output as a string which is the concatenation of the content of that element's child text nodes and the text nodes of all descendant elements.
Inserting element contents
In your SPS, do the following:
1.In the Schema Tree sidebar, expand the schema tree up to the children of the newsitem element (screenshot below).
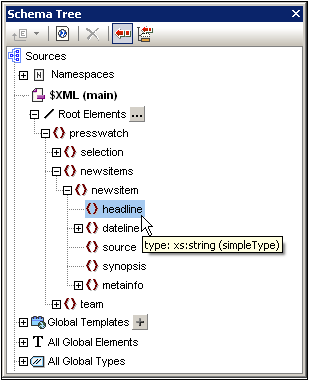
| 2. | Select the headline element (notice that the element's datatype is displayed in a pop-up when you mouseover; screenshot above). Drag the element into Design View, and, when the arrow cursor turns to an insertion point, drop it into the main template. |
| 3. | In the context menu that pops up, select Create Contents. The start and end tags of the headline element are inserted at the point where you dropped the headline element, and they contain the content placeholder. The headline tags are surrounded by the start and end tags of the ancestor elements of headline (screenshot below). |
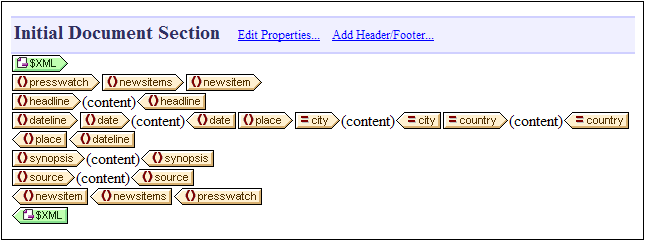
| 4. | In the design put elements on different lines (by pressing Enter) as shown in the screenshot below. |
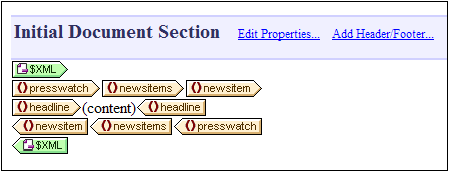
Click the HTML tab to see a preview of the HTML output (screenshot below). The HTML preview shows the contents of the headline child elements of newsitem, each as a text string.

Note: You can also create the contents of a node by using the following steps: (i) Click the the Insert Contents icon in the Insert Design Elements toolbar, (ii) Click the location in the design where you wish to insert the content, (iii) Select, from the Schema Selector tree that pops up, the node for which you wish to create contents.
Inserting attribute contents
When an element is inserted into the design as contents, the contents of its attributes are not automatically inserted. You must explicitly drag the attribute node into the design for the attribute's value to be output. In your SPS, now do the following:
| 1. | Place the cursor after the end tag of the headline element and press Enter. This produces an empty line (screenshot below). |

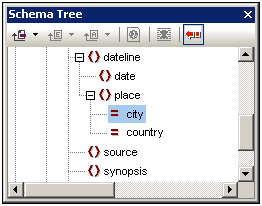
| 2. | In the Schema Tree sidebar, expand the dateline element (screenshot below). |
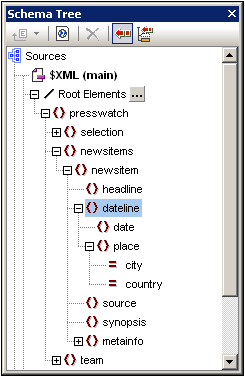
Notice that the dateline element has two child elements, date and place, and that the place element has two attributes, city and country.
| 3. | Drag the dateline element into the design and drop it at the beginning of the newly created empty line (screenshot below). |
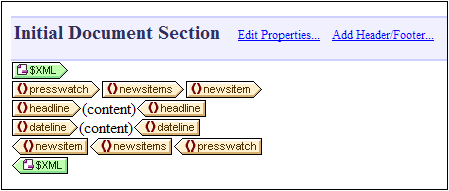
| 4. | Switch to HTML Preview and look carefully at the output of dateline (screenshot below). |
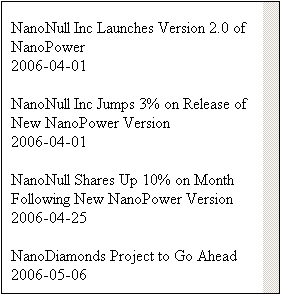
Notice that while the contents of the date children of dateline elements have been output, no contents have been output for the place children of dateline. This is because the place data is contained in the attributes of the place element (in the attributes city and country) and attribute contents are not output when the attribute's parent element is processed.
| 5. | Drag the date element from the Schema Tree sidebar and drop it (create it as contents) in between the start and end tags of the dateline element. |
| 6. | Select the city attribute of the dateline/place element (screenshot below) in the Schema Tree sidebar. |
| 7. | Drag the @city attribute node into Design View, and drop it (create as contents) just after the end tag of the date element. |
| 8. | Drag the @country attribute node into Design View, and drop it (create as contents) just after the end tag of the @city attribute. |
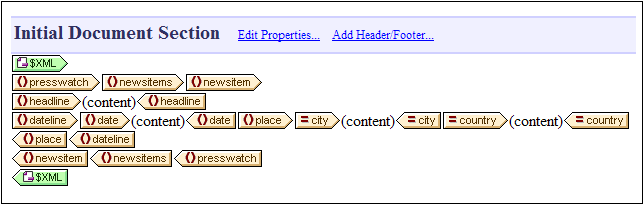
When you are done, the SPS design should look something like this:
The HTML Preview will look like this:
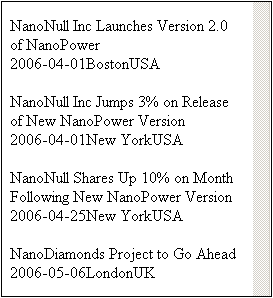
Notice that the values of the @city and @country attributes are now included in the output.
Adding more dynamic content
The contents of elements and attributes from the XML data source can be inserted anywhere in the design using the method described above. To complete this section, add the synopsis and source elements to the design so that the design now looks like this:
Notice that the synopsis element has been placed before the source element, which is not the order in which the elements are in the schema. After you have added the synopsis and source elements to the design, check the HTML preview to see the output. This is an important point to note: That the order in which nodes are placed in the main template is the order in which they will appear in the output (see the section, Templates and Design Fragments, for more information about structuring the output document).
Another important point to note at this stage is the form in which a node is created in the design. In the HTML preview, you will see that all the nodes included in the design have been sent to the output as text strings. Alternatively to being output as a text string, a node can be output in some other form, for example, as a table or a combo box. In this section, you have, by creating all the nodes as (contents), specified that the output form of all nodes are text strings. In the section, Using Conditions, you will learn how to create a node as a combo box, and in the section, Using Global Templates and Rest-of-Contents, how to create a node as a (dynamic) table.
Make sure to save the file before moving to the next section.