Creating TOC Bookmarks
TOC bookmarks are created within a TOC level in the document design. They can be created in the main template and/or in global templates. A TOC bookmark serves two purposes:
•It marks a (static or dynamic) component in the design with a static name you assign. It can either enclose or not enclose a design component; in the latter case it is empty. In the output, the TOC bookmark is instantiated as an anchor identified by a name. This named anchor can be referenced by items in the TOC (template).
•A TOC bookmark also defines the text string that will be used as the text of a TOC item. This text string can be the content of child elements of the node where the marker is located, or it can be the output of an XPath expression.
You can create a TOC bookmark in two ways:
•By using the Create TOC Bookmark Wizard, which enables you to specify the TOC bookmark's name, its text entry, whether auto-numbering should be used, and the level within which it appears.
•By inserting an empty TOC bookmark, the properties of which will be defined subsequently.
Creating the TOC bookmark with the Create TOC Bookmark Wizard
To create a TOC bookmark using the TOC Bookmark Wizard, do the following:
1.Place the cursor at the point in the design where you wish to insert the TOC bookmark. Alternatively, select the design component around which you wish to insert the TOC bookmark.
2.From the context menu (obtained by right-clicking) or from the Insert menu, select Insert Table of Contents | TOC Bookmark (Wizard). If you are enclosing an a node with a TOC Bookmark, use the command Enclose with | TOC Bookmark (Wizard). This pops up the Create Marker Wizard (screenshot below).

3.In the wizard's first screen (screenshot above) you: (i) define the text for the TOC item; (ii) set the TOC bookmark name; and (iii) specify whether this TOC bookmark should be numbered in the output. For the text entry you can select whether the text of child elements should be used, or an XPath expression. For the name of the TOC bookmark, you can enter text directly or select from a dropdown list containing the names of already specified TOC bookmark names. When you are done, click Next.
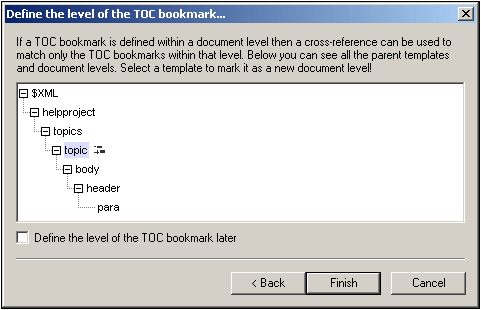
4.In the wizard's second screen (screenshot below), you can create a TOC level on a template if you wish to do so. Ancestor templates of the insertion point location are shown in a tree. If a template has already been created as a TOC level, this is indicated with a symbol. In the screenshot below, the symbol next to the topic template indicates that it has already been created as a level. If you wish to create an additional level on any of the ancestor templates, select that template. Alternatively, you can choose to define the level later by checking the Define Level Later check box. When you have completed making your selection, click Finish. (Note that, if a TOC level already exists on a template, selecting such a template and clicking Finish will not create a new TOC level on that template.)
On clicking Finish, a TOC bookmark will be created at the insertion point and, if it was specified in the second screen of the wizard, a TOC level will be created on one template. The TOC bookmark that has been created will be in the TOC level that immediately contains it. For example, if that TOC level is the third TOC level in the TOC level hierarchy, then the inserted TOC bookmark will be in the third TOC level.
Creating a TOC bookmark
To create a TOC bookmark without attributes (TOC bookmark name, TOC item text, etc), do the following:
1.Place the cursor at the point in the design document where you wish to insert the TOC bookmark, or select the design component around which you wish to insert the TOC bookmark.
2.From the context menu (obtained by right-clicking) or from the Insert menu, select Insert Table of Contents | TOC Bookmark. A TOC bookmark is inserted. This TOC bookmark has neither a name nor a text entry. These can be defined subsequently using the Edit commands (see below).
Inserting hierarchical or sequential numbering for a component
Hierarchical or sequential numbering within the main body of the output document (not within the TOC) can be inserted within (but also outside) a TOC bookmark's tags. Right-click at the location where you wish to insert the numbering, then select Insert Table Of Contents | Hierarchical Numbering / Sequential Numbering. For example, an auto-numbering TOC bookmark that is placed around the chapter heading template will generate numbering for all the chapter headings generated by the chapter heading template.
Note that numbering is based on the structure of TOC levels. So, for example, if a chapter heading element is in the first TOC level, then the fourth chapter heading will be numbered 4 because it is the fourth instance of a chapter heading within the first TOC level. If the sections of a chapter occur within the second TOC level, then the third section of the fourth chapter will be numbered 4.3. This is because, within the first (chapter) TOC level, it is the fourth instance of a chapter, and within the second (section) TOC level (of the fourth chapter), it is the third instance of a section.
Editing the name and text entry of a TOC bookmark
The name and text entry of the TOC bookmark can be edited in the Properties window (screenshot below). To edit these properties, select the TOC bookmark, and either directly edit the property in the Property window or right-click the TOC bookmark and select the property you wish to edit.
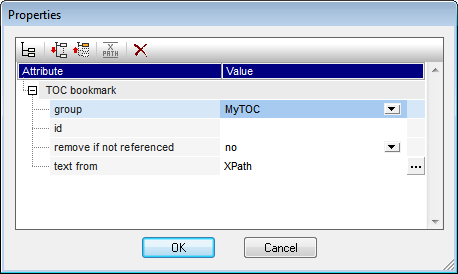
The TOC bookmark has the following properties: (i) the name of the TOC bookmark group (Group); (ii) a unique ID; (iii) an option to remove the bookmark if it is not referenced; and (iv) an option (Text From) to specify the text entry, which could come from the bookmark's content or from an XPath expression.