Dynamic Tables
To insert a dynamic table, do the following:
1.Use one of the following commands: Table | Insert Table or Insert | Table, or click the ![]() Insert Table icon in the Insert Design Elements toolbar.
Insert Table icon in the Insert Design Elements toolbar.
2.All of these commands pop up the Create Table dialog (screenshot below). If you clicked the Insert Table icon in the toolbar, the Create Table dialog will pop up when you click at the location in the design where you want to insert the table.

Click Dynamic Table.
3.In the XPath Selector dialog (screenshot below) that pops up, notice that the XPath Context is the context of the insertion location, and it cannot be changed in the dialog. Select the node that is to be created as the dynamic table. In the screenshot below, the context node is n1:Department, and the n1:Person node has been selected as the node to be created as a table.

If you select the User-defined XPath option, then you can enter an XPath expression to select the node to be created as the dynamic table.
4.Click OK. The Create Dynamic Table dialog (screenshot below) pops up.
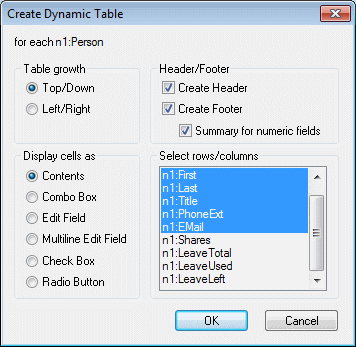
5.The child elements and attributes of the element that has been dragged into the Design window are displayed In the "Select rows/columns" list and can be created as columns of the table. Deselect the child nodes that you do not want and select any attribute/element you want to include as columns. (In the figure above, the elements Shares, LeaveTotal, LeaveUsed and LeaveLeft have been deselected.) An explanation of the other options is given below. Click OK when done. Note that columns are created only for child elements and attributes, and for no descendant on a lower level.
Note: If you specified a User-defined XPath to select the node to be created as the dynamic table, then StyleVision will probably not know unambiguously which node is being targeted. Consequently, the Create Dynamic Table will, in such cases, not display a list of child attributes/elements to select as the fields (columns) of the table. The table that is created will therefore have to be manually populated with node content. This node content should be child attributes/elements of the node selected to be created as the table.
Note: Another way of creating a schema node as a table is to drag the node from the schema tree into the design and to specify, when it is dropped, that it be created as a table.
Table grows down or right
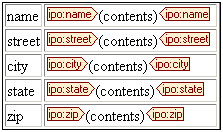
When a table grows top-down, this is what it would look like:
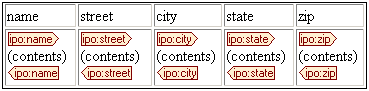
When a table grows left-right it looks like this:
Headers and footers
Columns and rows can be given headers, which will be the names of the column and row elements. Column headers are created at the top of each column. Row headers are created on the left hand side of a row. To include headers, check the Create Header check-box. If the table grows top-down, creating a header, creates a header row above the table body. If the table grows left-right, creating a header, creates a column header to the left of the table body.
To include footers, check the Create Footer check-box. Footers, like headers, can be created both for columns (at the bottom of columns) and rows (on the right hand side of a row). The footer of numeric columns or rows will sum each column or row if the Summary for Numeric Fields check box is checked.
Via the Table menu, header and footer cells can be joined and split, and rows and columns can be inserted, appended, and deleted; this gives you considerable flexibility in structuring headers and footers. Additionally, headers and footers can contain any type of static or dynamic content, including conditional templates and auto-calculations.
Note: Headers and footers must be created when the dynamic table is defined. You do this by checking the Create Header and Create Footer options in the Create Dynamic Table dialog. Appending or inserting a row within a dynamic table does not create headers or footers but an extra row. The difference is significant. With the Create Header/Footer commands, real headers and footers are added to the top and bottom of a table, respectively. If a row is inserted or appended, then the row occurs for each occurrence of the element that has been created as a dynamic table.
Nested dynamic tables
You can nest one dynamic table within another dynamic table if the element for which the nested dynamic table is to be created is a child of the element that has been created as the containing dynamic table. Do the following:
| 1. | Create the outer dynamic table so that the child element to be created as a dynamic table is created as a column. |
| 2. | In the dynamic table in Design View, right-click the child element. |
| 3. | Select Change to | Table. This pops up the Create Dynamic Table dialog. |
| 4. | Define the properties of the nested dynamic table. |
To nest a dynamic table in a static table, drag the element to be created as a dynamic table into the required cell of the static table. When you drop it, select Create Table from the context menu that appears.
Tables for elements with text content
To create columns (or rows) for child elements, the element being created as a table must have a child element or attribute node. Having a child text node does not work. If you have this kind of situation, then create a child element called, say, Text, and put your text node in the TableElement/Text elements. Now you will be able to create TableElement as a dynamic table. This table will have one column for Text elements. Each row will therefore contain one cell containing the text node in Text, and the rows of the table will correspond to the occurrences of the TableElement element.
Contents of table body cells
When you create a dynamic table, you can create the node content as any one of a number of StyleVision components. In the examples above, the table body cells were created as contents; in the Create Dynamic Table dialog, the option for Display Cells As is contents. They could also have been created as data-entry devices. There are two points to note here:
•The setting you select is a global setting for all the table body cells. If you wish to have an individual cell appear differently, edit the cell after you have created the table: right-click in the cell and, in the context menu that appears, select "Change to" and then select the required cell content type.
•If you create cells as element contents, and if the element has descendant elements, then the content of the cell will be a concatenation of the text strings of the element and all its descendant elements.
Deleting columns, rows, and tables
To delete a column, row, or table, place the cursor in the column, row, or table to be deleted, and click the menu item Table | Delete Column, Table | Delete Row, or Table | Delete Table, respectively. If you have nested tables, the table immediately containing the cursor will be deleted when the Table | Delete Table command is used.
Toolbar table editing icons
The table editing icons in the toolbar are shortcuts to the Table menu commands. These commands allow you to insert, delete, edit the structure of, and assign formatting properties to the dynamic table. These icons can also be used for static tables.
Creating dynamic tables in global templates
You can also create dynamic tables on elements inside global templates. The process works in the same way as for Main Template elements (described above). The important point to note is that, in a global template, a dynamic table can only be created for descendant elements of the global template node; it cannot be created for the global template node itself. For example, if you wish to create a dynamic table for the element authors within a global template, then this dynamic table must be created within the global template of the parent element of authors, say contributors. It cannot be created within the global template of the authors element.