Creating a New SPS
In this section, you will learn:
•How to create a new SPS document
•How to add a schema source for the SPS
•How to select the XSLT version of the SPS
•How to assign the Working XML File
•How to specify the output encoding
Files in this section
Files referred to in this section are located in the (My) Documents folder, C:\Documents and Settings\<username>\My Documents\Altova\StyleVision2026\StyleVisionExamples\Tutorial\QuickStart:
•QuickStart.xsd, the XML Schema file on which the SPS is based.
•QuickStart.xml, the Working XML File, which is the source of the data displayed in the output previews.
•QuickStart.sps, which is the finished SPS file; you can compare the SPS file you create with this file.
Creating a new SPS document
Create a new SPS document by clicking File | New | New (Empty) or select New (Empty) ![]() in the dropdown list of the New icon
in the dropdown list of the New icon  in the application toolbar. The Create New Design dialog pops up.
The Create New Design dialog (screenshot below) prompts you to select either: (i) a free-flowing document design, or (ii) a form-based document design (in which components are positioned absolutely, as in a layout program).
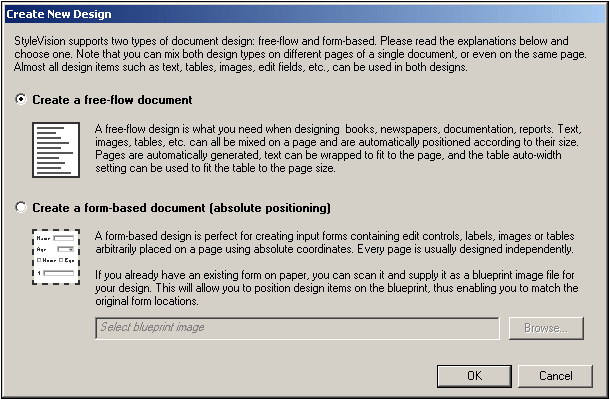
In a free-flowing document design, document content is laid out to fit the output media object or viewer (paper or screen). Items in the document content can only be placed relative to each other, and not absolutely. This kind of design is suited for documents such as reports, articles, and books.
In a form-based document, a single Layout Container is created, in which design components can be positioned absolutely. The dimensions of the Layout Container are user-defined, and Layout Boxes can be positioned absolutely within the Layout Container and document content can be placed within individual Layout Boxes. If you wish the design of your SPS to replicate a specific form-based design, you can use an image of the original form as a blueprint image. The blueprint image can then be included as the background image of the Layout Container. The blueprint image is used to help you design your form; it will not be included in the output.
You will be creating a free-flowing document, so select this option by clicking the Create a free-flow document radio button, then click OK.
A new document titled SPS1.sps is created and displayed in Design View (screenshot below).
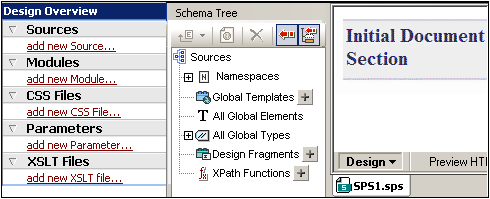
In Design View, an empty main template is displayed. In the Design Overview and Schema Tree sidebars, there are no schema entries.
Adding a schema source
For this SPS, you will use the schema, QuickStart.xsd. To add this schema as the schema source, do the following:
1.In the Design Overview sidebar, under the Sources heading, click the Add New Source command (screenshot above). In the menu that pops up (screenshot below), select Add XML Schema/DTD/XML.

| 2. | In the Open dialog that pops up browse for the file QuickStart.xsd in the (My) Documents folder (see above), and click Open. |
| 3. | You will be prompted to select a Working XML File. Select the option to select the file from the filesystem, then browse for the file QuickStart.xml in the (My) Documents folder (see above), and click Open. The schema will be added as a schema source in the Design Overview sidebar and in the Schema Tree sidebar (screenshot below). Also, in the Design Overview, the Working XML File you chose will be assigned to the schema. |
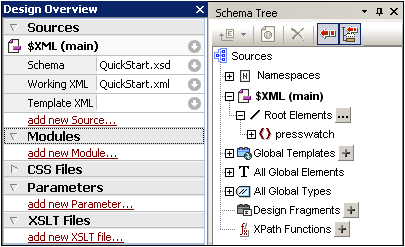
You should note the following points: (i) In Design Overview, the $XML entry for the schema source lists the schema and the Working XML File; (ii) In the Schema Tree sidebar, the Root Elements tree would list the one or more root elements (document elements) you select from among the global elements defined in the schema. In the case of this schema, the element presswatch is selected by default because it is the one global element in the schema that lies clearly at the top of the hierarchy defined in the schema; (iii) All global elements in the schema are listed in the All Global Elements tree.
Selecting the XSLT version
For this SPS you will use XSLT 2.0. To specify the XSLT version, in the application toolbar, click the  icon.
icon.
Assigning or changing the Working XML File
While adding the XML Schema to the SPS in the previous step, you also assigned a Working XML File to the schema. A Working XML File provides the SPS with a source of XML data to process. To assign, change, or unassign a Working XML File for a given schema, in the Design Overview sidebar, right-click anywhere in the Working XML File line you wish to modify (or click the Context Menu icon  at the right), and select the required command from the context menu that pops up. The Working XML File is now assigned, and the filename is entered in the Design Overview. Before proceeding, ensure that you have correctly assigned the file QuickStart.xml, which is in the (My) Documents folder, as the Working XML File.
Specifying the encoding of output
In the Default Encoding tab of the Options dialog (Tools | Options), set the HTML encoding to Unicode UTF-8.
Saving the SPS document
After you have set up the SPS as described above, save it as MyQuickStart.sps in the (My) Documents folder. Do this via the menu command File | Save Design or Ctrl+S. In the Save Design dialog that pops up, select the Save as SPS option, and enter the name of the SPS file to save..