Generate PDFs from XML Files
This example illustrates how to create a FlowForce Server job which takes as input multiple XML files and returns as output multiple PDF files. The FlowForce Server job will invoke both MapForce Server (to generate the XML output from multiple source XML files) and StyleVision Server (to convert the XML output to PDF).
This example requires a basic understanding of how MapForce mappings and StyleVision transformations work. If you are completely new to StyleVision and MapForce, it is recommended to read first the "Tutorials" chapters of MapForce and StyleVision documentation, respectively:
•Quick Start Tutorial (MapForce)
•Quick Start Tutorial (StyleVision)
Prerequisites
•Required licenses:
oMapForce Enterprise or Professional edition. This tool enables you to design a mapping transformation (.mfd file) that converts (in this example) XML files from one schema to another.
oMapForce Server or MapForce Server Advanced Edition. This tool enables you to run the mapping on a server, as a job.
oStyleVision Enterprise or Professional edition. This tool enables you to design a stylesheet (.sps file) that converts an input XML file to a PDF file.
oStyleVision Server. This tool enables you to run the transformation on a server, as a job.
oFlowForce Server. This tool provides the means to run the transformations above as a scheduled or on demand job, change inputs if necessary, and monitor execution.
•The FlowForce Web Server and FlowForce Server services must be listening at the configured network address and port
•Your FlowForce Server user account has permissions to one of the containers (by default, the /public container used in this example is accessible to any authenticated user).
•The job created in this example generates multiple files on the disk. Therefore, on the operating system where FlowForce Server runs, you must have rights to create files in some directory. This example uses the directory C:\FlowForceExamples\GeneratePdfs.
Demo files used
This example makes use of the following sample files, available at the following path: <Documents>\Altova\MapForce2026\MapForceExamples.
•MultipleInputToMultipleOutputFiles.mfd (the MapForce mapping file)
•PersonListWithGrouping.sps (the StyleVision transformation file)
•Nanonull-Branch.xml, Nanonull-HQ.xml (the input XML files)
What the MapForce mapping does
As illustrated below, the mapping consists of a source component (Altova_Hierarchical), a target one (PersonList), and various intermediary MapForce built-in functions used to build miscellaneous strings to be written to the output.
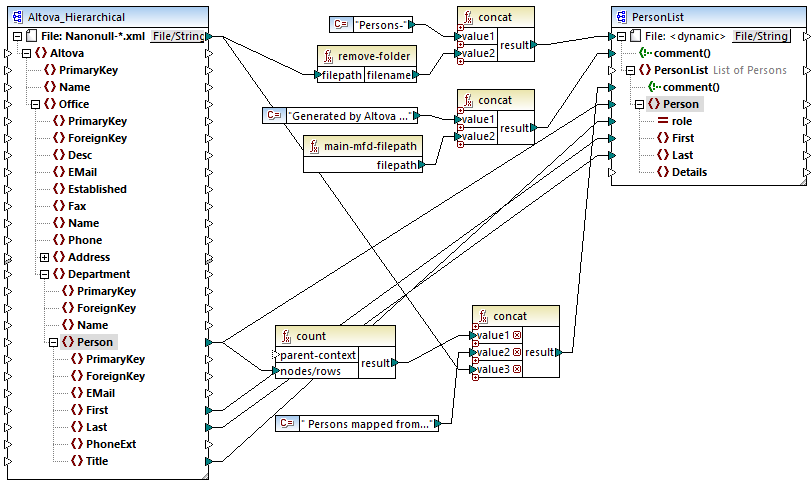
MultipleInputToMultipleOutputFiles.mfd
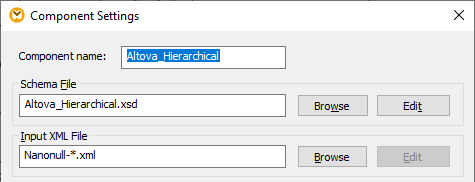
The mapping takes as input any XML file that begins with "Nanonull-", from the directory <Documents>\Altova\MapForce2026\MapForceExamples . This is defined in the source MapForce component settings (in MapForce, right-click the header of the Altova_Hierarchical component illustrated below, and select Properties from the context menu). Notice that "Input File" is set to Nanonull-*.xml, where the asterisk is a wildcard. Literally, the input is any file which begins with "Nanonull-" and has the .xml extension.
The target component, PersonList, is configured to generate file names dynamically based on the file name of the source XML file. This is defined by right-clicking the File/String button at the top of the component, and then selecting Use Dynamic File Names Supplied by Mapping menu option. The connection to the "File <dynamic>" node means that a new file will be created for every value in the source. The remove-folder function is meant to get only the file name (without the folder) from the source path. This is then passed as value to the top concat function, which builds a string like Persons-<Source filename>.
The second concat function builds a string like Generated by Altova... followed by the complete path to the mapping file. The result is written as a comment in the target XML file.
The third concat function uses the output of the count function to build a string that indicates how many person records have been mapped from the source. Again, the result is written as a comment in the target XML file.
Finally, the connection to the target Person node copies people data from the source to the target. An individual connection exists for each child element of Person that must be mapped.
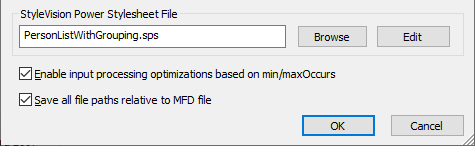
In addition to this, the target component is configured to convert the generated output to PDF, for each XML generated file. Right-click the header of the target component, select Properties, and notice that the StyleVision Power StyleSheet file text box specifies a relative path to a StyleVision .sps stylesheet. The latter performs the actual conversion of XML to PDF (further discussed below).
To preview the output of this mapping directly in MapForce, click the Output tab available under the mapping pane. To preview the PDF result of the StyleVision transformation, click the PDF tab. You will notice that multiple XML's (or PDFs, respectively) are generated in the Output pane, for example:
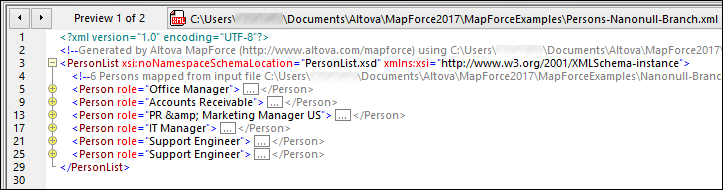
At this stage, it is recommended to save one of the two output XML files to the disk (since, by default, MapForce generates temporary files). The file will act as a sample (working XML) if you would like to open and test the StyleVision power stylesheet in StyleVision (see next section). To save an output file, first click the Output tab, and then, on the Output menu, click Save Output File.
What the StyleVision transformation does
Run StyleVision and open the PersonListWithGrouping.sps transformation file. Recall that this file is in the same directory as the MapForce mapping discussed above, and it is referenced by the target MapForce component.
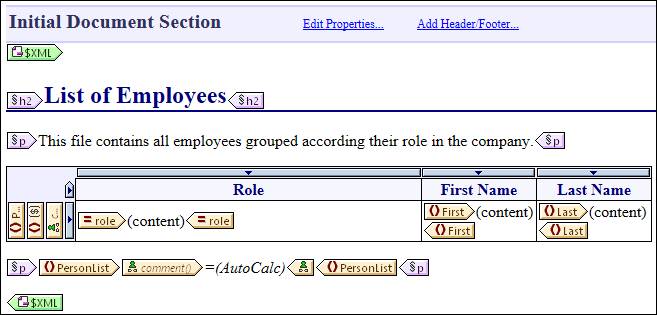
PersonListWithGrouping.sps
The StyleVision .sps stylesheet illustrated above uses a single XML as source and creates a PDF document from it. The PDF document consists of a heading ("h2"), an introductory paragraph, a table populated dynamically, and an ending paragraph. The heading and the introductory paragraph contain static text, while the table and the ending paragraph are populated from the nodes of the source XML file, as indicated by the wrapping tags.
To preview this transformation directly in StyleVision, follow the steps below:
1.In the Design Overview pane, next to Working XML, click ![]() .
.
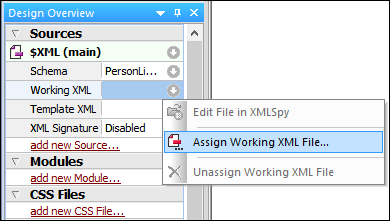
2.Select Assign Working XML File and browse for the XML output file saved previously from MapForce (see previous section).
3.Click the PDF tab.
Importantly, the .sps stylesheet is agnostic with the respect to the actual name or origin of the source XML file; it simply processes the XML file provided as input (as long as it conforms to the specified XML schema), and creates a PDF out of it. In order to automate this stylesheet so that it generates multiple PDF files, it will need to be deployed to FlowForce Server, as shown further below.
Deploy the files to FlowForce Server
So far, you have become familiar with the purpose of both the MapForce mapping and the StyleVision transformation used in this example. For more information about designing MapForce mappings and StyleVision stylesheets, refer to the documentation of these products (https://www.altova.com/documentation.html).
To make automation possible, both files must now be deployed to FlowForce Server. As specified in the "Prerequisites" section above, FlowForce Server must be licensed and running, and both MapForce Server and StyleVision Server must be licensed and running under FlowForce Server management. On Windows, you can use the verifylicense command of each server product to check the status of its license. On other operating systems, the job execution will fail with an error message if the license is not found or valid.
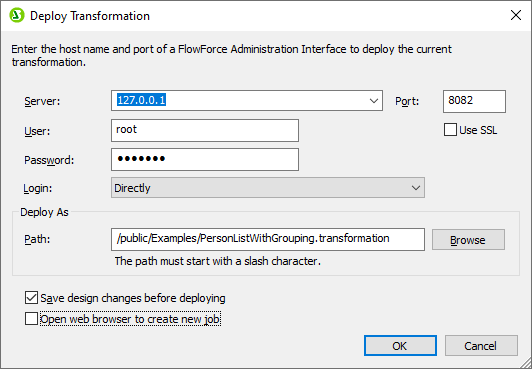
To deploy the StyleVision stylesheet to FlowForce Server:
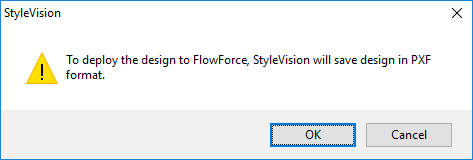
1.On the File menu, click Deploy to FlowForce. (If this command is grayed out, switch to the Design tab first.)
2.When prompted that the design file will be saved as PXF (Portable XML Form) format, click OK.
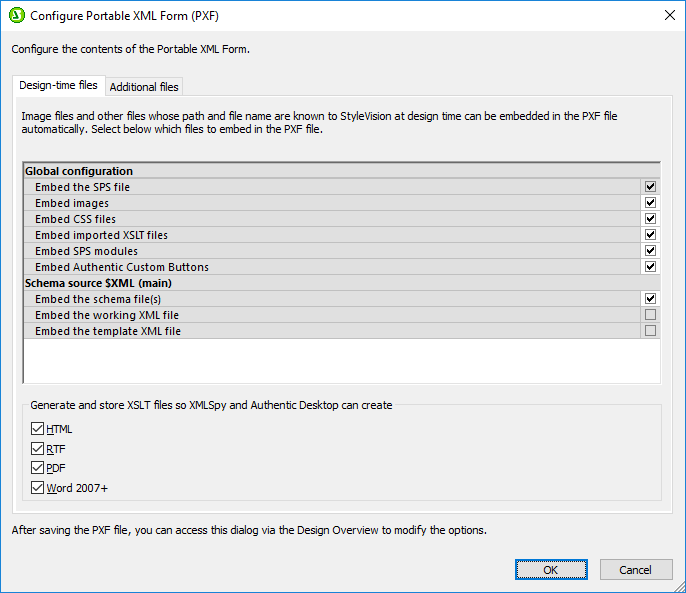
3.When prompted to select the desired files to be included in the deployed package, leave the default settings as is. Although only PDF is generated in this example, including other outputs will save you time later if you change your mind and want to generate additional formats like HTML and RTF.
4.When prompted, fill in the connection details to FlowForce Web Server. For simplicity, in the image below, the transformation is deployed to the local machine on port 8082, through plain HTTP. It is also possible to specify a remote address and deploy the files through an SSL-encrypted connection, provided that FlowForce Web Server has been configured to accept such connections, see Defining the Network Settings. The user and password values are illustrated below for the root FlowForce account; however, any other FlowForce user account may also be used, provided that it has permissions to write data to the specified path. In this example, the Open browser to create new job check box has been deliberately left unchecked, because creating and configuring the job will be a separate step discussed further below.
5.For consistency with other examples, it is recommended to use the target path /public/Examples/PersonListWithGrouping.transformation.
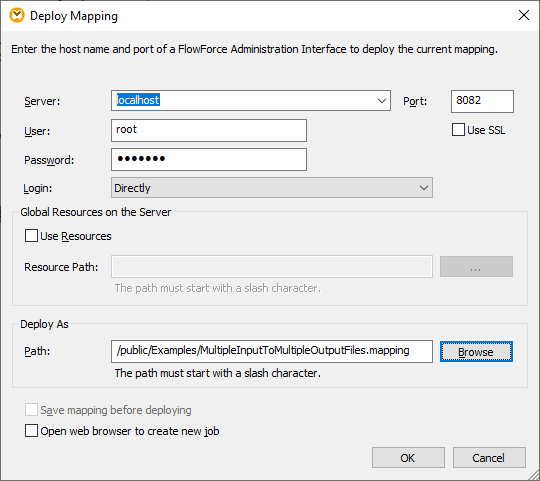
To deploy the MapForce mapping to FlowForce Server:
•On the File menu, click Deploy to FlowForce Server. Filling in the connection details illustrated below works the same way as discussed above for StyleVision. Again, for consistency with other examples, it is recommended to use the target path /public/Examples/MultipleInputToMultipleOutputFiles.mapping.
After the files were successfully deployed, the corresponding entries will appear in the specified FlowForce container (in this case, "/public/Examples") when you log on to FlowForce Server:

Note that the entries above are not jobs yet; they are now FlowForce functions from which actual jobs have yet to be created, as shown below.
Create and configure the FlowForce job
Now that the MapForce mapping and the StyleVision transformation have been deployed to FlowForce Server, they can be used to create the required job, as follows:
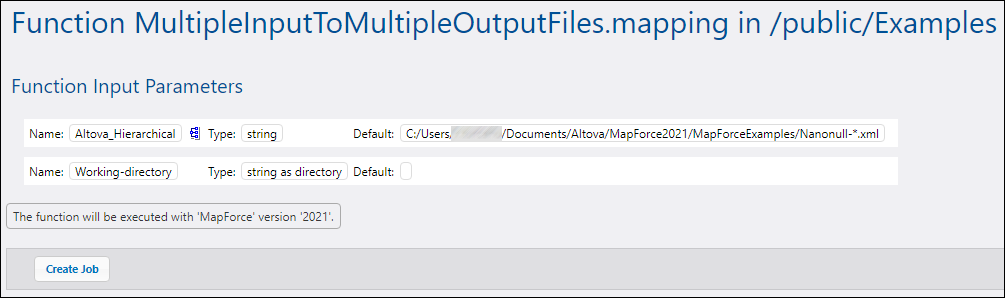
1.Navigate to the FlowForce /public/Examples container and click the function MultipleInputToMultipleOutputFiles.mapping deployed previously. Notice that the source component of the MapForce mapping discussed at the very beginning of this example has now become an input parameter to the FlowForce function. Also, it has a default value which is the path to the instance XML files processed by the mapping. This value can be overridden later if necessary. The "Working-directory" parameter was added automatically by FlowForce; its role will be clarified in the next steps.
2.Click Create Job.
3.Enter a name and optionally a description for the job you are creating.
4.Configure the "Execution Steps" part of the job as shown below.
5.Under "Service", select the "Make this job available via HTTP..." check box and enter the name of the Web service that will trigger the job on demand, for example "GeneratePdfsService". If you prefer to run the job as a scheduled job, or as a file system trigger, set the appropriate triggers (see Managing Triggers).

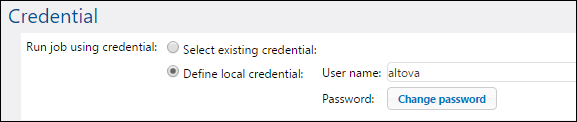
6.Under "Credential", enter the username and password of the operating system user account (the job will be executed as this user). Be careful not to confuse this password with the password of the FlowForce Web administration interface (see also Credentials).
7.Click Save.
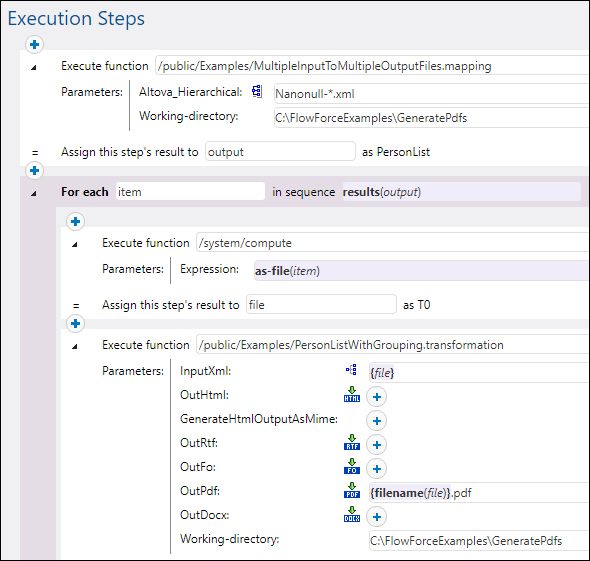
To understand how the job actually works, let's have a closer look at the "Execution Steps" section of the job. The first execution step calls the mapping deployed previously. It looks for any XML file that begins with "Nanonull-" in the working directory. In this example, the working directory is C:\FlowForceExamples\GeneratePdfs.
The output returned by the first execution step represents the data returned by the mapping. It has been explicitly named output, in order to make it possible to refer to it in a subsequent step.
The second step of the job is a "for-each" step. Notice how the "for-each" step uses a FlowForce expression results(output) to get access to the data returned by the first step (that is, the output returned by the mapping). Specifically, the expression calls the function results() which takes as an argument the output returned by the previous step, see also Step Result Functions. For an introduction to FlowForce expressions, see FlowForce Expressions.
The "for-each" step consists of two smaller execution steps:
1.The first step calls the /system/compute built-in function to convert the mapping output into an actual file (generically named file). Importantly, the output of the results(output) expression is a stream, not a file. If the mapping returns multiple outputs (as in this case), the mapping output represents a sequence of streams. For this reason, a FlowForce expression function (as-file) is used to convert the current stream (the one that is being iterated) into an actual file.
2.The second step calls, for each stream that is being iterated, the StyleVision transformation deployed previously. Namely, with each iteration, StyleVision Server is called, an XML file is supplied as input, and a PDF file is returned as output. The FlowForce expression {filename(file)}.pdf creates the actual PDF file name on the disk. This operation takes place in the working directory specified by the "Working-directory" parameter.
Note: In this example, the same working directory is used by both steps—the one which executes the mapping and the one which runs the StyleVision transformation. In some cases, it may be necessary to specify separate working directories, in order to avoid file name collision or job execution errors.
Running the job
To prepare the input data for the job, copy the Nanonull-Branch.xml and Nanonull-HQ.xml from <Documents>\Altova\MapForce2026\MapForceExamples to the working directory (C:\FlowForceExamples\GeneratePdfs). This way, the first step of the job gets some input XML files to read data from when the job runs.
To run the job, do one of the following:
•Go to the Home page and click Show all active triggers and services. Next, click the job's URL displayed in the Info column.
•Enter http://127.0.0.1:4646/service/GeneratePdfsService in the browser's address bar. Note that this URL works only if the FlowForce Server service listens at the default host address and port name. If you have defined other host and port settings on the Setup page, change the address accordingly.
•If you set the optional Host name field of FlowForce Server on the Setup page, you can execute the web service call directly from the job configuration page, by clicking the  button adjacent to the Make this job available via HTTP check box. The button is not displayed otherwise.
If you are asked for credentials when you access the Web service, supply the same credentials you use to log on to FlowForce Server.
Important Supplying your FlowForce Server user credentials for HTTP authentication is only for testing purposes. For production, it is recommended to create a new FlowForce user, grant the Service - Use permission to this user on the container where the job is, and then access the Web service with the corresponding user account. To disable HTTP authentication and make the Web service public, grant the Service - Use permission to the user Anonymous. For details, see How Permissions Work. |
On successful job execution, the PDF files generated by the job will be available in the working directory C:\FlowForceExamples\GeneratePdfs. The browser displays "Cannot output the job" even in case of successful execution (this is expected, since the job produces PDF files which cannot be output to the browser). If the job fails to execute for any reason, the browser will display a "Service execution failed" message. In this case, check the error log of the job. To troubleshoot issues, you may need to verify again all the prerequisites listed at the top of this page.