Validate a Document with RaptorXML
This example shows you how to create a job which validates an XML Schema file. This example shows probably the easiest way to validate a file, because it does not use conditional error handling and does not write the validation result to a custom log file or to the browser. The validation result will be available only in the FlowForce Server log. For a more complex validation job example, see Validate XML with Error Logging.
The validation job used in this example calls the valany function of RaptorXML Server. The valany function validates a document based on its type. It takes the file to validate as the only mandatory parameter, and it can be used to validate XML files, XML schemas, DTD schemas, and other file types. For a list of RaptorXML functions, see the RaptorXML documentation (https://www.altova.com/documentation).
Prerequisites
•Required licenses: FlowForce Server, RaptorXML (or RaptorXML+XBRL) Server
•The FlowForce Web Server and FlowForce Server services must be listening at the configured network address and port
•You have a FlowForce Server user account with permissions to one of the containers (by default, the /public container used in this example is accessible to any authenticated user).
Demo files used
This example job validates the address.xsd file available in the RaptorXML Server installation folder, at the following path: C:\Program Files\Altova\RaptorXMLServer2026\examples\address.xsd.
On a 64-bit Windows running 32-bit RaptorXML Server, the path is C:\Program Files (x86)\Altova\RaptorXMLServer2026\examples\address.xsd, unless you installed RaptorXML Server in a different folder.
You can use any other XML schema file as well.
Creating the job
1.Log in to the FlowForce Server Web administration interface and open the /public/Examples container. The public/Examples container should already exist if you followed the previous examples; otherwise, create it using the Create | Create Container command.
2.Click Create Job. Next, enter a name and, optionally, a description for the job you are creating. This example uses "ValidateSchema" as job name.
3.Click new Execution step.
4.Next to "Execute function", browse for the /RaptorXML/valany function. Note that the mandatory parameter File is shown as an expanded field.
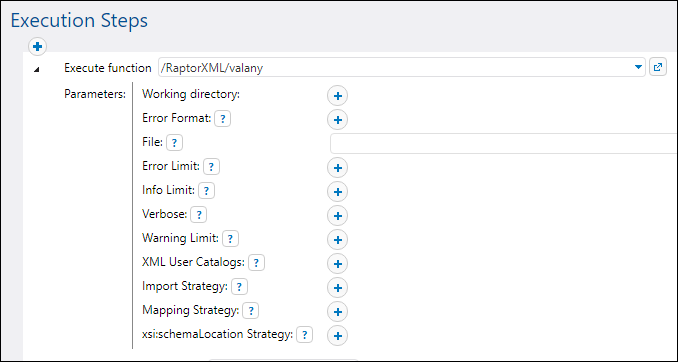
Note: The valany function exists directly under the "RaptorXML" container and also in any container that corresponds to a specific RaptorXML release, for example, "2026". For information about differences between the two, see Generic versus release-specific RaptorXML functions.
5.In the File text box, enter the path to the schema file that you want to validate, for example, C:\Program Files\Altova\RaptorXMLServer2026\examples\address.xsd.
6.Under "Triggers", click new Timer and create a trigger that will run the job at a specific time in future. For details, see Timers.
7.Under "Credentials", select an existing credential record or specify a local credential. For details, see Credentials.
8.Click Save.
Running the job
The job will run at the date and time specified in the trigger. To see whether the job executed successfully, refer to the job log. Specifically, in the Instance Log page, an entry like the one below indicates successful validation:
file:///C:/Program%20Files/Altova/RaptorXMLServer2021/examples/address.xsd: runtime="0ms" result="OK" cmd="valxsd"
If the file did not validate, the job execution is considered failed (since at least one of the steps has failed), so an error is reported in the log. In this case, the logged entry displays result="Fail" along with details about the validation error.